Welcome to the ultimate guide for installing Foamed Aluminium Alloy Board in the stunning Vintage Gold finish! Here at COLORIA GROUP, we understand that whether you're working on a residential masterpiece or a grand commercial project, the materials you choose and how they're installed make all the difference. Our commitment as a one-stop solution provider for architectural materials extends beyond just offering innovative products like our MCM series; it includes ensuring you have all the knowledge for a flawless execution, even for specialized items like our premium Foamed Aluminium Alloy Boards.
This comprehensive guide is designed to walk you through every step of the installation process, from initial planning to the final touches, ensuring your Vintage Gold Foamed Aluminium Alloy Boards look spectacular and perform perfectly for years to come. We'll delve into best practices, essential tools, and critical considerations to help you achieve a professional and durable finish. Let's get started!
Understanding Foamed Aluminium Alloy Board (Vintage Gold)
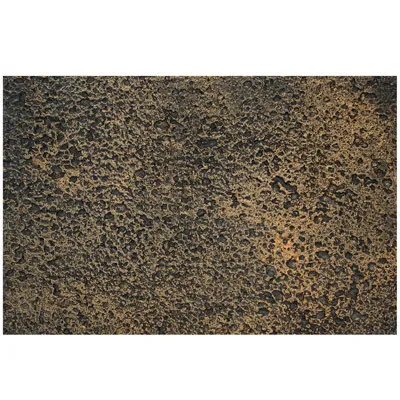
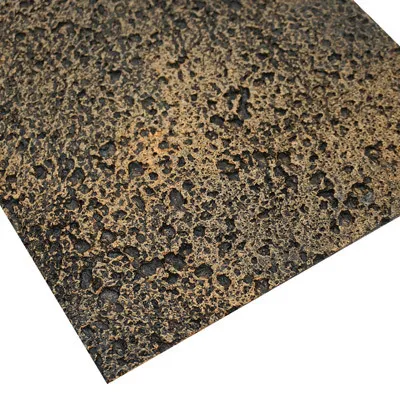
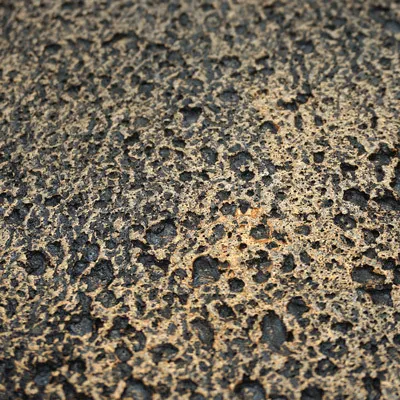
Before we dive into the installation, let's briefly touch upon what makes Foamed Aluminium Alloy Board such a fantastic choice, especially in its Vintage Gold variant. This material is a cutting-edge architectural product, known for its unique blend of lightness, strength, and aesthetic appeal. The "foamed" aspect refers to its porous internal structure, which is achieved through a special manufacturing process. This structure gives it excellent sound absorption and thermal insulation properties, making it ideal for a variety of applications, particularly as internal and external cladding.
The Vintage Gold finish is not just a color; it's a statement. It offers a sophisticated, aged metallic look that adds a touch of classic elegance and luxury to any space. It's perfect for creating accent walls, distinctive facades, or unique design elements that demand attention. Its durability and low maintenance also make it a practical choice for high-traffic areas, ensuring that its beauty endures.
Key Characteristics:
-
Lightweight:
Easier to handle and reduces structural load.
-
High Strength-to-Weight Ratio:
Excellent rigidity despite its light mass.
-
Sound Absorption:
Contributes to better acoustics in a space.
-
Thermal Insulation:
Helps in maintaining internal temperatures, reducing energy costs.
-
Corrosion Resistance:
Aluminium's natural resistance enhanced by surface treatments.
-
Aesthetic Versatility:
The Vintage Gold finish provides a distinctive, premium look.
-
Environmentally Friendly:
Often made from recycled content and is fully recyclable.
Pre-Installation Checklist: Preparation is Key
Successful installation begins long before the first board is cut. Thorough preparation is paramount. Skimping on this stage can lead to costly mistakes, delays, and a less-than-perfect finish. Think of this as laying the groundwork for a masterpiece, much like how our one-stop solution approach ensures every detail is covered from design to delivery.
1. Site Assessment and Surface Preparation
This is where you scrutinize the canvas. Whether it's an internal feature wall or an external facade, the substrate must be pristine.
-
Cleanliness:
Ensure the surface is free from dust, dirt, grease, loose paint, and any other contaminants. A clean surface allows for optimal adhesion and a smooth finish.
-
Flatness & Levelness:
This is critical for achieving a uniform appearance. Any undulations in the substrate will be reflected in the installed boards. Use a long straightedge and level to check for deviations. If necessary, use appropriate fillers, leveling compounds, or shims to create a flat and plumb surface. For exterior applications, ensure the wall is plumb and square.
-
Soundness:
The substrate must be structurally sound and capable of supporting the weight of the Foamed Aluminium Alloy Boards, along with any adhesive or fastening systems. Repair any cracks, crumbling sections, or weak points.
-
Moisture Content:
For substrates like concrete or masonry, ensure they are adequately dry. High moisture content can affect adhesive performance and lead to future issues.
-
Primer Application:
Depending on the substrate and the chosen adhesive/fastening system, a primer might be necessary to enhance adhesion. Always refer to the adhesive manufacturer's recommendations.
2. Material Inspection & Acclimatization
Once your beautiful Vintage Gold Foamed Aluminium Alloy Boards arrive, don't just stack them and forget about them. Give them the attention they deserve!
-
Unpack and Inspect:
Carefully unpackage each board. Check for any damage sustained during shipping, such as dents, scratches, or warping. Report any issues to your supplier immediately.
-
Color Consistency:
While manufacturing processes are highly controlled, subtle variations in hue can sometimes occur between batches, especially with a unique finish like Vintage Gold. It's a good practice to 'dry lay' a few boards or at least check them side-by-side in good lighting to ensure a consistent look. If there are slight variations, plan to distribute them evenly or strategically.
-
Acclimatization:
Allow the boards to acclimatize to the ambient temperature and humidity of the installation area for at least 24-48 hours. This is particularly important for larger panels and can help prevent warping or expansion/contraction issues after installation. Store them flat in a climate-controlled environment.
3. Tool & Equipment Checklist
Having the right tools makes the job easier, safer, and more precise. Don't start without these essentials:
-
Measuring Tapes (steel and flexible)
-
Levels (spirit level, laser level for large areas)
-
Chalk Line / Layout String
-
Pencils / Markers
-
Straightedges / Rules
-
Circular Saw with a fine-tooth blade (designed for non-ferrous metals or specific composite panels)
-
Jigsaw (for intricate cuts, if needed)
-
Router (for edge finishing or special profiles)
-
Drill / Impact Driver
-
Fasteners (screws, rivets, clips – type depends on installation method)
-
Adhesive (construction adhesive, silicone sealant – specified for aluminium and substrate)
-
Caulking Gun
-
Clamps / Temporary Supports
-
Personal Protective Equipment (PPE): Safety glasses, gloves, dust mask, hearing protection.
-
Clean Rags and Solvents (for cleanup)
4. Layout and Planning
This is your blueprint. A detailed layout plan will save time, material, and headaches. Visualize the finished project.
-
Measurements:
Take precise measurements of the area to be covered. Double-check everything.
-
Drawing a Layout:
Sketch out the installation area, noting all dimensions, openings (windows, doors), and obstacles (outlets, fixtures).
-
Panel Orientation:
Decide on the orientation of the boards. Do you want them horizontal, vertical, or a custom pattern? The Vintage Gold finish can look different depending on the light direction and panel orientation.
-
Seam Placement:
Plan where the seams will fall. Try to minimize waste and ensure seams are aesthetically pleasing and structurally sound. For external applications, consider expansion joints.
-
Starting Point:
Determine your starting point. Often, it's best to start from a prominent corner or the center of a wall, working outwards. For exterior facades, starting from the bottom and working up is common.
-
Cutting Plan:
Based on your layout, develop a cutting plan to optimize material usage and minimize waste. Remember the 'measure twice, cut once' mantra!
Pro Tip:
For complex layouts or very large areas, consider creating a scaled drawing or even a digital model to visualize the final outcome and refine your panel layout. This helps in ordering the correct quantities and anticipating challenges.
Installation Methods for Foamed Aluminium Alloy Board (Vintage Gold)
There are several ways to install Foamed Aluminium Alloy Boards, and the best method depends on the application (interior/exterior), desired aesthetic, substrate, and structural requirements. COLORIA GROUP offers diverse solutions, and these boards fit right into that philosophy, adaptable to various installation scenarios.
Method 1: Adhesive Bonding (Common for Interior & Protected Exterior)
This method relies primarily on a strong construction adhesive for attachment. It provides a clean, fastener-free look, which is often desired for the sleek Vintage Gold finish.
Steps:
-
Surface Preparation:
As outlined above, ensure the substrate is clean, dry, flat, and sound. Priming might be necessary.
-
Layout Markings:
Transfer your layout plan to the substrate using chalk lines and levels. Mark the exact positions for each board.
-
Adhesive Application:
Apply a high-quality construction adhesive specifically formulated for aluminium and your substrate. Apply it in vertical beads, zig-zag patterns, or a grid pattern on the back of the board or directly onto the substrate. Ensure adequate coverage (typically 30-50% of the surface area for strong adhesion). Avoid applying adhesive too close to the edges to prevent squeeze-out.
-
Panel Placement:
Carefully position the Foamed Aluminium Alloy Board onto the marked area. Press firmly and evenly across the entire surface to ensure good adhesive transfer. Use shims or temporary supports to maintain proper spacing and levelness.
-
Curing:
Allow the adhesive to cure fully according to the manufacturer's instructions. This usually takes 24-72 hours, during which the boards should not be disturbed. Clamps or bracing may be needed until the adhesive sets.
-
Edge Finishing (Optional):
For a truly seamless look, you might apply color-matched sealant or trim to the edges, though the Vintage Gold finish often looks stunning with crisp, clean edges.
Adhesive Caution:
Always use adhesives that are compatible with both the Foamed Aluminium Alloy and the substrate. Incompatible adhesives can lead to poor bonding, material degradation, or discoloration. Follow manufacturer safety guidelines for ventilation and PPE.
Method 2: Mechanical Fastening (Common for Exterior & High-Load Interior)
This method uses screws, rivets, or specialized clips to physically attach the boards to a substructure. It offers robust security and is often preferred for exterior applications or where panels are subject to high wind loads or heavy impact.
Steps:
-
Substructure Installation:
This is a crucial first step. Install a metal or treated timber substructure (furring strips, battens, or a custom framing system) onto your primary substrate. This substructure must be plumb, level, and securely fastened, creating a flat and ventilated cavity behind the panels. The Vintage Gold finish deserves a perfectly aligned base.
-
Layout Markings:
Mark the exact positions for the Foamed Aluminium Alloy Boards on the substructure.
-
Drilling Pilot Holes:
Pre-drill pilot holes in both the Foamed Aluminium Alloy Boards and the substructure according to fastener manufacturer recommendations. Ensure holes are appropriately sized to allow for thermal expansion/contraction of the panels, especially for exterior use. Oval holes are often used in the panels to facilitate movement.
-
Panel Attachment:
Securely fasten the boards to the substructure using your chosen mechanical fasteners (self-tapping screws with washers, rivets, or concealed clips). Ensure fasteners are flush or countersunk as required by the design.
-
Joint Treatment:
For exterior applications, proper expansion joints are vital. Use backer rods and exterior-grade silicone sealant (color-matched or clear) to seal joints and prevent water ingress. For interior applications, joints can be tight-fitted or sealed with a minimalist bead.
-
Finishing:
Conceal exposed fasteners with color-matched caps or plugs if desired, or leave them exposed as a design feature.
Ventilation for Exterior:
When using a substructure for exterior applications, ensure adequate ventilation in the cavity behind the panels. This prevents moisture buildup and helps maintain the building's thermal performance, aligning with green building practices.
Method 3: Hybrid System (Adhesive + Mechanical Fastening)
This method combines the best of both worlds, offering the clean look of adhesive bonding with the added security of mechanical fasteners. It's an excellent choice for critical applications or where extra assurance is desired.
Steps:
Follow steps for both adhesive bonding and mechanical fastening. Typically, a reduced amount of adhesive is used primarily for initial tack and to prevent vibration, while the mechanical fasteners bear the primary load. The sequence is usually: apply adhesive, position panel, then secure with mechanical fasteners, and finally allow adhesive to cure.
Detailed Steps for Installation (General Approach)
No matter which primary method you choose, these detailed steps apply across the board to ensure a professional finish for your Foamed Aluminium Alloy Boards.
Step 1: Measurement and Cutting
Accuracy here is non-negotiable. Even a slight error can throw off the entire layout.
-
Measure Carefully:
Use a steel tape measure for precision. Always measure the actual space, not just rely on blueprints, as site conditions can vary.
-
Marking:
Use a non-abrasive pencil or fine marker to mark your cutting lines on the protective film of the board. Double-check your measurements before cutting.
-
Cutting Tools:
For straight cuts, a circular saw with a blade designed for non-ferrous metals or composite panels is ideal. Ensure the blade is sharp and clean. For curved or intricate cuts, a jigsaw with a suitable blade can be used. A router can be used for precise edge finishing or creating specific profiles.
-
Safety First:
Always wear safety glasses, hearing protection, and a dust mask when cutting. Secure the board firmly to prevent movement during cutting.
-
Clean Cuts:
Make slow, steady cuts to minimize burrs and ensure clean edges. Any rough edges should be deburred with a file or sandpaper.
Step 2: Laying Out the First Row/Panel
This sets the tone for the entire installation. Get it right, and the rest flows smoothly.
-
Establish a Baseline:
Using a laser level or a long spirit level and chalk line, establish a perfectly level (or plumb, depending on orientation) baseline from which to start. This is crucial for keeping all subsequent panels aligned.
-
Starting Point:
Begin from your designated starting point – often a corner for walls, or the bottom for facades.
-
Shims and Spacers:
Use temporary shims or spacers to maintain consistent gaps between the first panel and the floor/adjacent wall, as well as between subsequent panels. These gaps are essential for thermal expansion and contraction, as well as for applying sealants.
Step 3: Attaching the Panels
This is where the Foamed Aluminium Alloy Board finally takes its place.
-
Apply Adhesive (if applicable):
If using adhesive, apply it according to your chosen pattern (vertical beads, zig-zag). Ensure it's not too close to the edges to avoid mess.
-
Position Carefully:
Lift the board and carefully align it with your layout marks and the previously installed panel.
-
Press Firmly:
Apply firm, even pressure across the entire surface of the board to ensure good contact with the adhesive or to seat it against the substructure.
-
Fasten (if applicable):
If using mechanical fasteners, drive them through the pre-drilled holes into the substructure. Do not overtighten, as this can deform the panel.
-
Check Alignment:
Continuously check each installed panel with a level and straightedge to ensure it remains plumb, level, and aligned with its neighbors. Adjust as needed before adhesive cures or fasteners are fully tightened.
Step 4: Managing Joints and Gaps
The key to a professional finish is how you handle the spaces between panels.
-
Consistent Gaps:
Maintain consistent joint widths using spacers. Recommended gap sizes vary but are typically 1/8" to 1/4" (3-6mm) for thermal movement, especially with materials like aluminum.
-
Backer Rods:
For exterior or wet area joints, insert a compressible backer rod into the joint. This creates a proper depth for the sealant and prevents three-sided adhesion, which can lead to sealant failure.
-
Sealant Application:
Apply a high-quality, flexible sealant (e.g., silicone, polyurethane) into the joints. Ensure it's compatible with the Foamed Aluminium Alloy and any underlying materials. Use a caulking gun for even application.
-
Tooling:
Immediately after applying the sealant, "tool" it with a specialized tool or a gloved finger to create a smooth, concave surface. This ensures proper adhesion and a neat appearance. Remove any excess sealant promptly.
-
Expansion Joints:
For large areas, particularly exterior facades, plan for specific expansion joints at regular intervals. These are larger gaps designed to accommodate significant thermal movement of the entire system.
Step 5: Edge Treatment and Trim
The finishing touches bring everything together.
-
Edge Profiles:
Consider using edge profiles or trims to cap exposed edges of the Foamed Aluminium Alloy Boards. These can be color-matched to the Vintage Gold finish or a contrasting material for a design statement.
-
Corner Details:
For corners, boards can be mitered for a seamless look, or corner trims can be used.
-
Perimeter Sealing:
Seal around the perimeter of the installed area, especially where the boards meet other building components (windows, doors, floor/ceiling), to prevent moisture ingress and enhance the aesthetic.
Best Practices for a Flawless Vintage Gold Finish
Achieving that perfect, luxurious Vintage Gold aesthetic requires attention to detail and adherence to certain best practices. As a provider of high-quality internal and external decoration materials, COLORIA GROUP emphasizes excellence in every project.
1. Handle with Care
The Vintage Gold finish, while durable, can be susceptible to scratches and marks if not handled properly. Treat each board with respect.
-
Gloves:
Always wear clean gloves when handling the boards to prevent fingerprints, oils, and dirt from transferring onto the surface.
-
Protection:
Keep the protective film on the boards for as long as possible during the installation process, only removing it just before final placement or sealing.
-
Soft Surfaces:
When placing boards down, always put them on a clean, soft surface (e.g., blankets, foam sheets) to avoid scratching the finish.
-
Avoid Impact:
Prevent any impact or sharp blows to the edges or faces of the boards, as this can cause dents or chips that are difficult to repair.
2. Precision in Cutting and Fabrication
The unique texture and color of the Vintage Gold finish mean that even slight imperfections in cuts can stand out.
-
Sharp Blades:
Use only sharp, appropriate blades for cutting aluminium. Dull blades can lead to chipping, burrs, and a poor finish.
-
Deburr Edges:
After cutting, meticulously deburr all edges to ensure they are smooth and clean. This is crucial for aesthetic appeal and safe handling.
-
Pre-Fabrication:
For complex projects, consider having panels pre-fabricated off-site by specialists. This ensures precision and reduces on-site cutting, minimizing waste and improving quality control.
3. Consistent Spacing and Alignment
The eye naturally picks up inconsistencies. Uniformity is key to a high-end look.
-
Spacers:
Use dedicated spacers to maintain perfectly consistent joint widths between panels. Don't eyeball it!
-
Levels and Lasers:
Continuously use spirit levels and laser levels to check horizontal and vertical alignment.
-
Reference Lines:
Always work off established reference lines (chalk lines, laser lines) rather than relying on previous panels, which might have accumulated errors.
4. Proper Fastener and Adhesive Selection
The integrity of your installation depends on these choices.
-
Compatibility:
Ensure all adhesives, sealants, and fasteners are compatible with aluminium and the specific substrate. This is critical for long-term durability and to prevent corrosion (e.g., galvanic corrosion if dissimilar metals are used incorrectly).
-
Manufacturer Specs:
Always follow the recommendations of the Foamed Aluminium Alloy Board manufacturer and the adhesive/fastener supplier.
-
Concealment:
If fasteners are used, choose types that can be effectively concealed or are aesthetically pleasing, complementing the Vintage Gold finish.
Fastener/Adhesive Compatibility Considerations
|
Material Type
|
Recommendation
|
Notes
|
|
Screws
|
Stainless Steel (A2/A4 grade)
|
Countersunk or pan head. Avoid plain steel to prevent galvanic corrosion.
|
|
Rivets
|
Aluminium alloy rivets (e.g., 5052, 5056)
|
Use with a suitable backing washer if needed.
|
|
Adhesives
|
High-strength structural polyurethane or silicone-based construction adhesive
|
Must be rated for metal bonding and specified for exterior/interior use. Check temperature resistance.
|
|
Sealants
|
Neutral cure silicone or polyurethane sealant
|
Colour-matched to Vintage Gold or clear. Ensure UV stability for exterior use.
|
|
Substructure
|
Aluminium profiles or treated timber battens
|
Timber must be treated to prevent rot and insect infestation.
|
5. Cleaning and Maintenance
After installation, a final clean-up and a plan for ongoing maintenance will preserve the beauty of your Vintage Gold panels.
-
Initial Cleaning:
Remove any protective film, adhesive residue, or sealant smears promptly after installation. Use mild, non-abrasive cleaners specifically designed for finished aluminium surfaces. Test on an inconspicuous area first.
-
Avoid Harsh Chemicals:
Do not use abrasive cleaners, strong solvents, or steel wool, as these can scratch or damage the Vintage Gold finish.
-
Regular Maintenance:
For routine cleaning, a soft cloth with warm water and a mild detergent is usually sufficient. Rinse thoroughly and dry with a clean, soft cloth to prevent water spots.
-
Inspection:
Periodically inspect the panels and joints for any signs of damage, loosening, or sealant degradation, especially in exterior applications. Address any issues promptly.
Consider the 'Green' Aspect:
As a provider committed to green building practices, COLORIA GROUP encourages specifying recyclable materials and minimizing waste during installation. Foamed Aluminium Alloy is inherently recyclable, contributing to a project's sustainability goals.
Addressing Common Challenges
Even with the best preparation, unforeseen issues can arise. Here's how to tackle some common challenges during the installation of Foamed Aluminium Alloy Board.
1. Warping or Bowing
-
Cause:
Can be due to improper storage, rapid temperature changes, or uneven substrate.
-
Solution:
Ensure panels are acclimatized and stored flat. For minor bowing, gentle pressure and additional mechanical fasteners (if using a hybrid system) can help. For severe warping, the panel may need replacement. Prevent by proper storage and pre-installation checks.
2. Uneven Gaps Between Panels
-
Cause:
Inaccurate cutting, uneven substrate, or inconsistent use of spacers.
-
Solution:
Use precise measuring and cutting techniques. Always use consistent spacers. If the substrate is uneven, rectify it before panel installation. Small adjustments can sometimes be made by gently tapping panels into place before adhesive cures or fasteners are fully tightened.
3. Adhesive Bleed-Out or Squeeze-Out
-
Cause:
Applying too much adhesive, or applying it too close to the panel edges.
-
Solution:
Apply adhesive sparingly and in the recommended pattern. If bleed-out occurs, clean it immediately with an appropriate solvent and a clean rag before it cures. Masking tape can be used around edges to protect the visible surface.
4. Fastener Heads Not Flush (Mechanical Fastening)
-
Cause:
Improper pre-drilling, overtightening, or using the wrong type of fastener.
-
Solution:
Ensure pilot holes are correctly sized. Use countersunk fasteners where flush finish is desired, and counter-sink the panel appropriately. Avoid overtightening. If a fastener is protruding, it may need to be carefully removed and replaced, or its head ground flush if possible.
5. Discoloration or Stains on Vintage Gold Finish
-
Cause:
Contaminants during handling, use of inappropriate cleaners, or chemical splashes.
-
Solution:
Always wear gloves. Clean any spills or marks immediately with a mild cleaner and soft cloth. Avoid harsh chemicals. If staining persists, consult with the supplier; some stains might be permanent.
"The beauty of a material like Foamed Aluminium Alloy in Vintage Gold is not just in its appearance, but in its potential when installed with care and precision. Our goal at COLORIA GROUP is to empower you to realize that potential in every residential and commercial project, whether it's through our pioneering MCM products or specialized architectural panels. We believe in providing robust solutions and comprehensive support, making us a true one-stop solution provider for all your construction material needs."
The Role of Foamed Aluminium Alloy Board in Modern Architecture
In today's dynamic architectural landscape, the demand for versatile, sustainable, and aesthetically powerful materials is higher than ever. Foamed Aluminium Alloy Board, particularly with a distinctive finish like Vintage Gold, stands out as a material that perfectly encapsulates these requirements. It's not just a panel; it's an architectural statement. Its lightweight nature significantly contributes to reducing the overall structural load of buildings, which is a critical consideration in modern, often high-rise, construction. This reduction in dead load can lead to savings in foundation and structural steel costs, showcasing its economic benefits.
Beyond its structural advantages, the inherent properties of foamed aluminum – superior thermal insulation and sound absorption – contribute directly to creating more comfortable and energy-efficient indoor environments. This aligns perfectly with the growing emphasis on green building practices and sustainable development that COLORIA GROUP champions through its various offerings, including our innovative MCM products. Imagine a building facade that not only looks breathtaking in Vintage Gold but also helps regulate interior temperatures and mutes external noise – that's the power of this material.
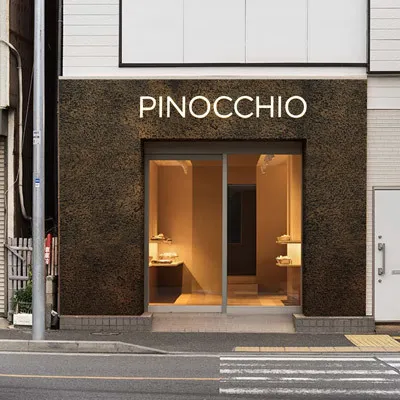
The aesthetic flexibility of the Vintage Gold finish allows architects and designers to push boundaries. It can evoke a sense of timeless elegance in a classical setting or provide a striking contrast in a contemporary design. This versatility makes it suitable for a broad spectrum of projects, from adding a luxurious touch to a residential interior to creating a memorable statement on a high-profile commercial facade. As a one-stop solution provider, we see such materials as essential components in delivering comprehensive and visionary architectural solutions.
Furthermore, the durability and low maintenance requirements of Foamed Aluminium Alloy Boards ensure that the initial investment translates into long-term value. Unlike some traditional materials that require frequent upkeep, these boards retain their finish and structural integrity for decades, even in challenging external environments. This longevity, coupled with the material's recyclability, makes it an environmentally responsible choice, echoing our commitment to providing sustainable building materials.
When integrated into a project, these boards don't just cover a surface; they define a space. They contribute to the overall architectural narrative, playing a vital role in both form and function. Their adaptability to various installation techniques, from seamless adhesive bonding to robust mechanical fastening, further enhances their appeal, allowing for creative freedom without compromising on structural integrity or performance.
Conclusion
Installing Foamed Aluminium Alloy Board in Vintage Gold is an endeavor that combines technical skill with an appreciation for aesthetic detail. By following this comprehensive guide – from meticulous planning and precise execution to understanding the material's unique characteristics and adhering to best practices – you're well on your way to achieving a stunning and durable installation. Remember, every step of the process contributes to the overall success and longevity of your project.
At COLORIA GROUP, we pride ourselves on being a dedicated one-stop solution provider for all your building material needs, offering everything from groundbreaking MCM (Modified Cementitious Material) series products like MCM Big Slab Board Series and MCM Flexible Stone, to specialized panels such as the Foamed Aluminium Alloy Board. Our decades of industry experience, coupled with our global reach, including strong ties in Saudi Arabia, ensure that you receive not only top-tier materials but also the expert knowledge to bring your vision to life. We are here to support your residential and commercial projects with high-quality internal and external decoration materials, ensuring that every detail, including the seamless application of our Vintage Gold Foamed Aluminium Alloy Board, meets the highest standards of excellence.
We believe that an informed installer is an empowered installer. By mastering these techniques, you're not just attaching panels; you're crafting an architectural statement that will stand the test of time, reflecting the quality and innovation that COLORIA GROUP represents. Happy installing!