


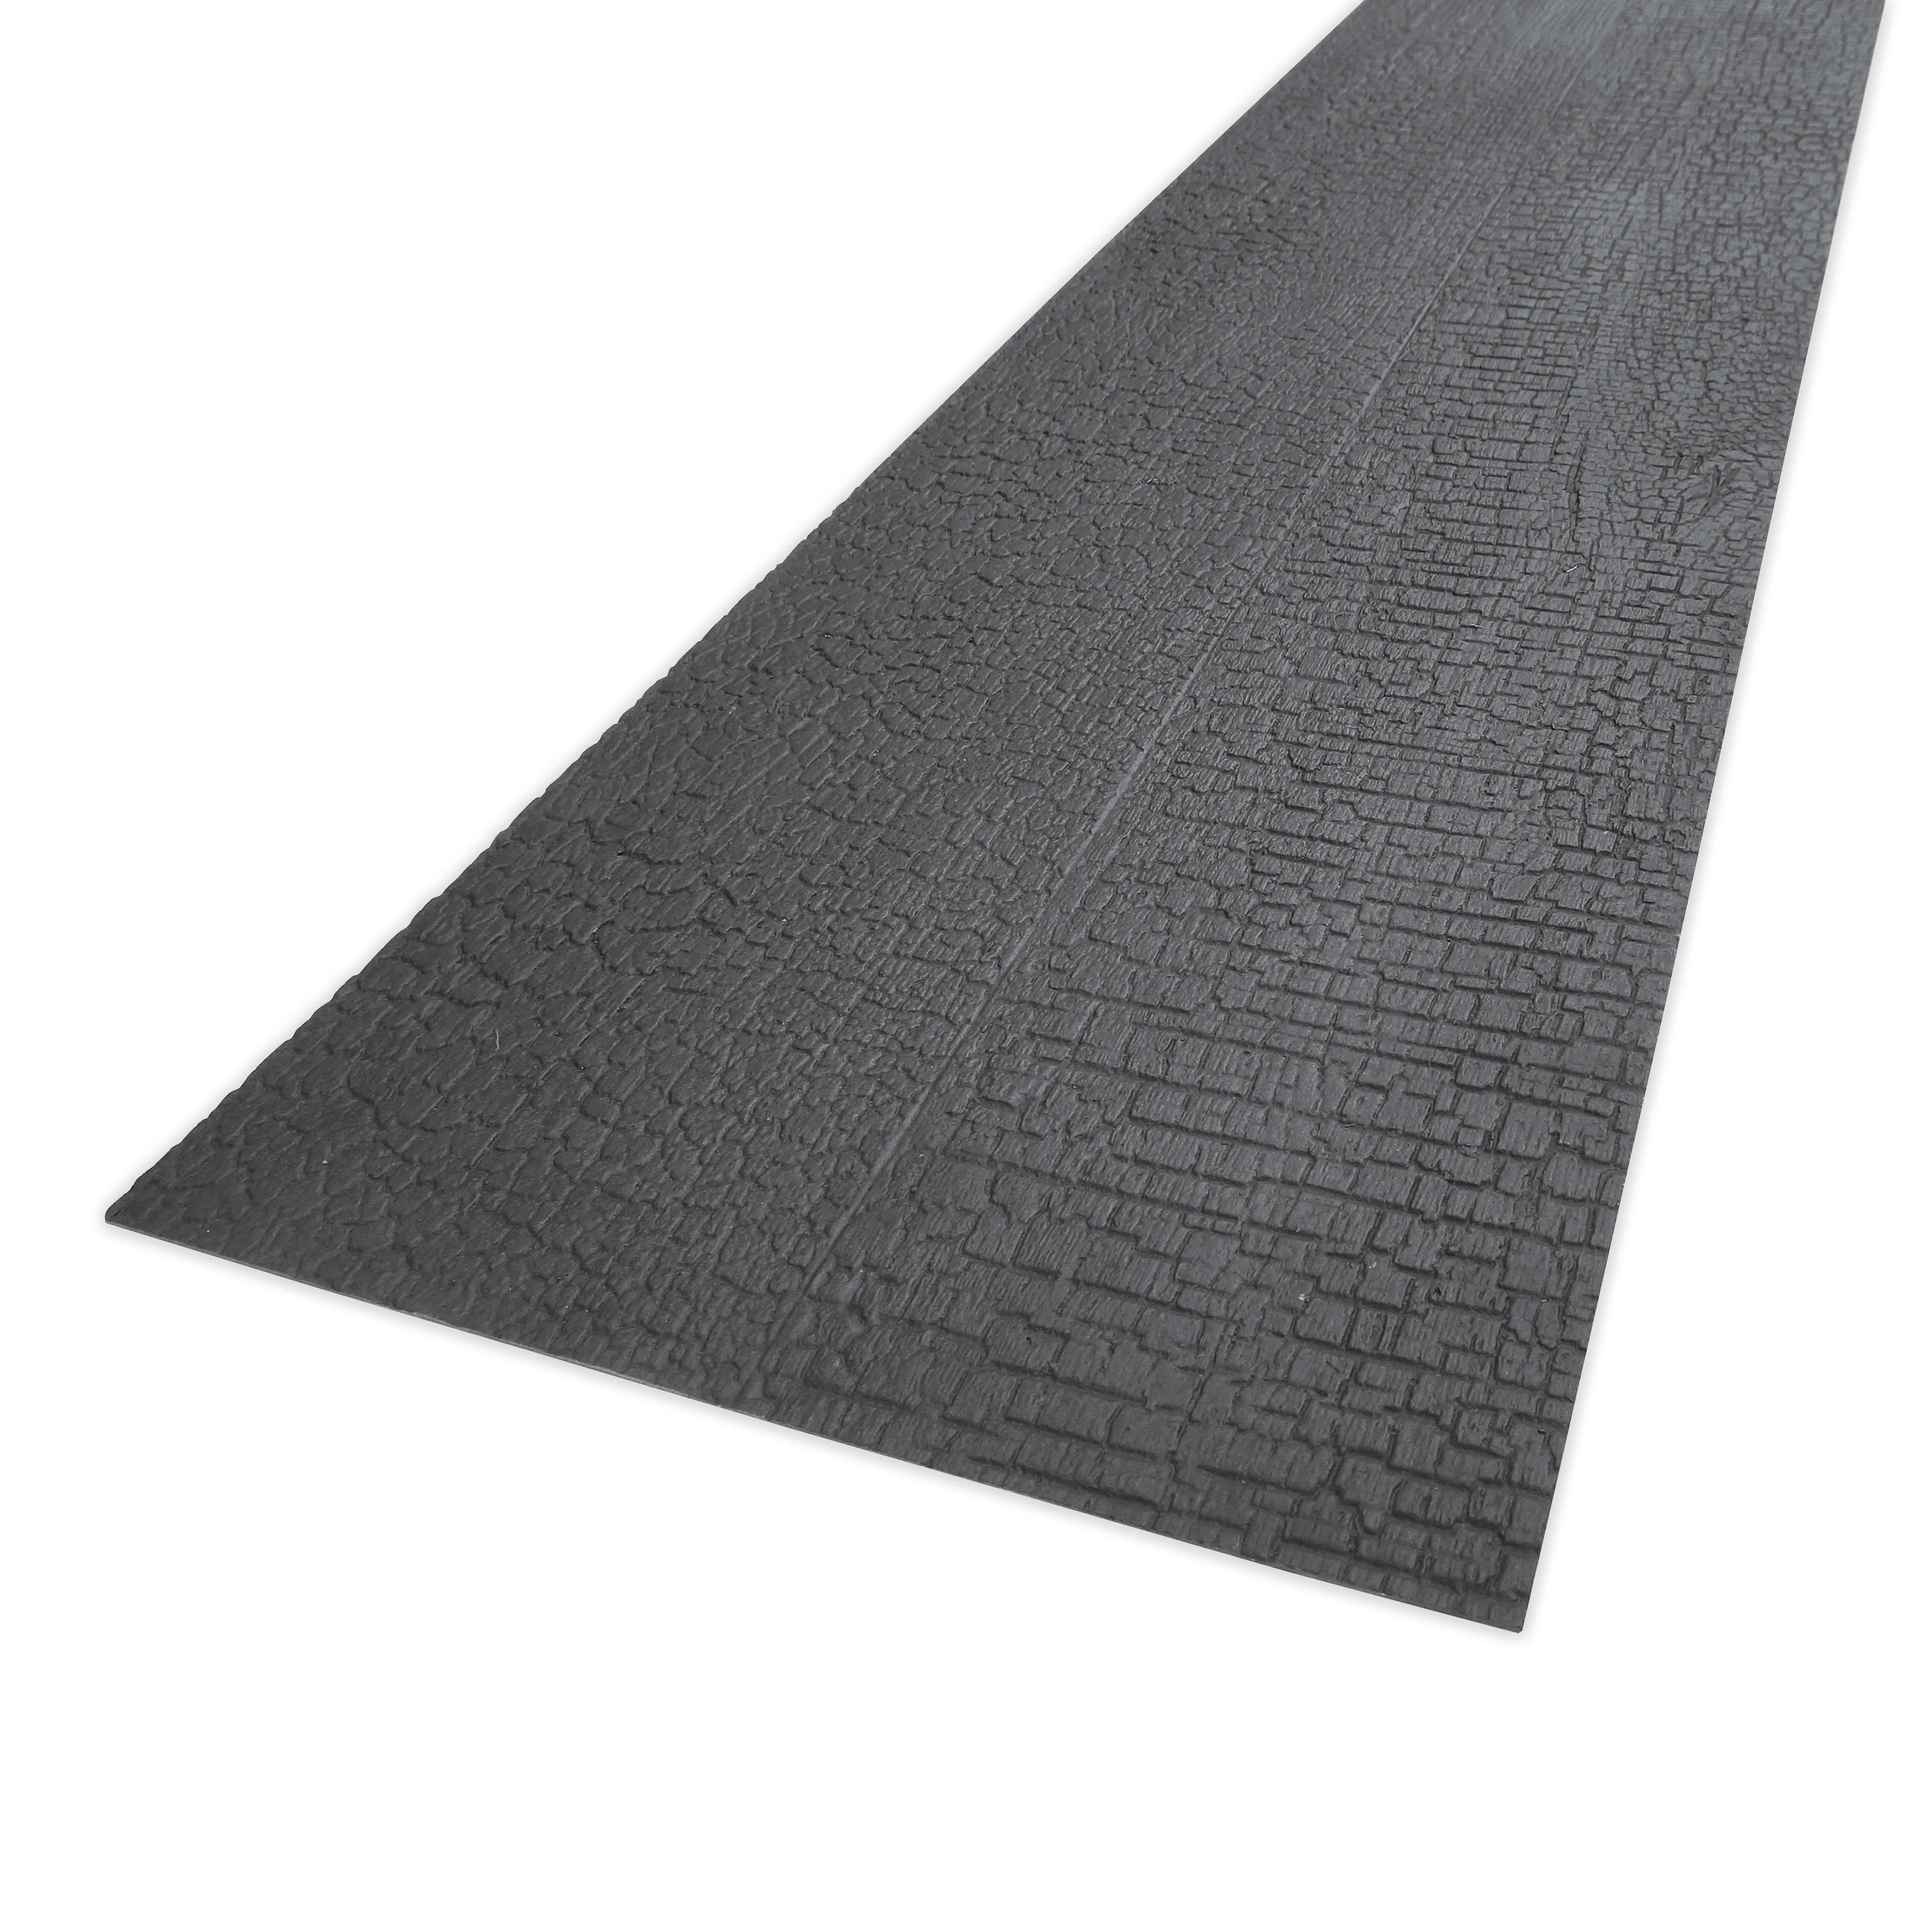
There's something undeniably captivating about charcoal burnt wood board. Its surface, kissed by flame to create deep, smoky hues and a textured, almost storybook finish, adds warmth and character to any space—whether you're revamping a living room accent wall, upgrading a kitchen backsplash, or even sprucing up an outdoor patio. The best part? You don't need to be a seasoned contractor to tackle this project. With a little patience, the right tools, and this guide, you'll be transforming your space with that signature charred charm in no time.
Before we dive in, let's talk about why this material has become a favorite among designers and DIYers alike. Unlike smooth, uniform panels, charcoal burnt wood board carries the marks of its creation—subtle cracks, varying shades of ebony and umber, and a tactile quality that invites touch. It pairs beautifully with modern materials like fair-faced concrete for an industrial-chic look, or alongside wood grain board for a layered, organic feel. And because it's treated with fire (a process known as shou sugi ban in traditional Japanese craftsmanship), it's surprisingly durable, resistant to rot, and even naturally pest-repellent. Ready to get started? Let's gather our tools and materials first.
Tools & Materials You'll Need
Grab a cup of coffee, roll up your sleeves, and let's make sure you have everything on hand. Skipping a tool mid-project is the quickest way to turn excitement into frustration, so double-check this list before you start.
| Tool/Material | Why You Need It |
|---|---|
| Charcoal burnt wood boards | The star of the show! Measure your space first to calculate how many you'll need (add 10% extra for cuts and mistakes). |
| Cordless drill + Phillips bits | For driving screws into the boards and wall/floor studs. |
| 4-foot level | To keep your boards straight—crooked panels are a dead giveaway of a rushed job! |
| Tape measure & carpenter's pencil | Precise measurements prevent wasted boards and uneven gaps. |
| Circular saw or miter saw | For cutting boards to size. A handsaw works too, but power tools save time (and elbow grease). |
| Notched trowel (1/4-inch) | To spread adhesive evenly on the back of boards or installation surface. |
| Construction adhesive (water-resistant) | Creates a strong bond between boards and the wall/floor. Look for formulas safe for wood and masonry. |
| Wood screws (1.5-inch, rust-resistant) | Reinforces the adhesive bond, especially for vertical installations or high-moisture areas. |
| Spacers (1/8-inch) | Ensures even gaps between boards for a professional, uniform look. |
| Chalk line & plumb bob | Marks straight, level guidelines to keep rows aligned. |
| Sanding block (medium-grit) | Smooths rough edges after cutting and preps the surface for sealing. |
| Sealer (matte or satin polyurethane) | Protects the wood from moisture, stains, and fading—don't skip this step! |
Pre-Installation Prep: Set Yourself Up for Success
Think of installation like baking a cake: the prep work matters just as much as the actual steps. Rushing this phase will lead to headaches later, so take your time—you'll thank yourself.
Step 1: Measure Twice, Cut Once (Literally)
Start by measuring the area where you'll install the boards. Whether it's a wall, backsplash, or floor, write down the height and width, then multiply them to get the square footage. Divide that by the square footage of one charcoal burnt wood board (check the product label) to get the total number of boards needed. Add 10% to account for cuts, mistakes, or future repairs—better to have extra than run short!
Pro tip: If your space has obstacles like outlets, windows, or light switches, sketch a quick diagram and note their positions. This will help you plan where to cut notches in the boards later.
Step 2: Prep the Surface
Charcoal burnt wood board can be installed on walls, floors, or even ceilings, but the surface must be clean, flat, and sturdy. Let's break it down by common surfaces:
- Fair-faced concrete: Wipe away dust with a damp cloth and check for cracks. Fill small gaps with concrete patching compound; for larger issues, consult a professional—you don't want boards adhering to an unstable base.
- Drywall: Ensure there are no loose seams or holes. Patch with spackle, sand smooth, and prime if the drywall is new (unprimed drywall soaks up adhesive, weakening the bond).
- Wooden subfloor/wall: Sand down splinters, tighten loose nails, and replace any warped or rotted sections. A level surface is key here—use a long straightedge to check for dips or bumps.
Once prepped, let the surface dry completely. Even a little moisture can cause adhesive to fail or wood to warp over time.
Step 3: Plan Your Layout
Now for the fun part: deciding how your boards will look! Will you install them horizontally for a calming, wide-open feel? Vertically to draw the eye upward and make ceilings feel taller? Or maybe in a herringbone pattern for a playful twist? Grab some graph paper and sketch your idea, or lay out a few boards on the floor to visualize the pattern.
Pro tip: Stagger the seams between rows (like brickwork) to avoid creating weak points. For example, if your first row starts with a full board, the next row should start with a half-board. This not only looks better but also makes the installation stronger.
Step-by-Step Installation: Let's Get to Work
With your tools gathered, surface prepped, and layout planned, it's time to start installing. Take it one step at a time, and don't hesitate to pause and double-check your work—precision here pays off in the end.
Step 1: Mark Your Guidelines
Using a chalk line and plumb bob, mark vertical and horizontal guidelines on your surface. For horizontal installation, snap a level line at the bottom of your installation area—this will be your starting point. For vertical, snap a vertical line along the leftmost edge. These lines are your roadmap, so take time to ensure they're straight and level. A quick trick: use your 4-foot level to check the chalk line before moving on—even a tiny slant will throw off the entire project.
Step 2: Cut the Boards (If Needed)
Most projects will require cutting boards to fit around obstacles or at the edges of the installation area. Measure the space you need to fill, then transfer that measurement to the board, marking with a carpenter's pencil. Use a straightedge to draw a clear line—wobbly lines lead to uneven cuts!
For cutting, a circular saw with a fine-tooth blade works best (it minimizes splintering on the charred surface). If you're new to using power tools, ask a friend for help or practice on a scrap piece first. Always wear safety glasses and hearing protection, and secure the board with clamps to prevent it from moving mid-cut. After cutting, lightly sand the edge with a medium-grit sanding block to smooth any rough spots.
Step 3: Apply Adhesive
Now, let's get sticky! Squeeze a bead of construction adhesive onto the back of a charcoal burnt wood board, then use the notched side of your trowel to spread it evenly. The goal is a thin, consistent layer—too much adhesive will squish out between boards, and too little won't hold. Aim for grooves about 1/8-inch deep; this ensures maximum contact with the surface.
Pro tip: Work in small sections (about 2-3 boards at a time) to prevent the adhesive from drying out before you can position the boards. Most adhesives stay workable for 15-20 minutes, but check the label to be sure.
Step 4: Place the First Row
Align the bottom edge of your first board with the horizontal chalk line (or left edge with the vertical line). Gently press it into place, wiggling slightly to help the adhesive spread. Slide a spacer along the side to maintain your gap, then place the next board, repeating until the row is complete. Use your level to check that the row is straight—adjust immediately if it's tilting (adhesive sets quickly, so don't wait!).
If you're installing vertically, start at the bottom and work upward; gravity will help hold the boards in place as the adhesive sets. For horizontal installation, start at the left (or right, if you're left-handed) and move across.
Step 5: Secure with Screws (Optional but Recommended)
While adhesive alone may be enough for small, lightweight installations, adding screws adds extra security—especially for walls or areas prone to moisture (like bathrooms). Pre-drill a small pilot hole (slightly smaller than your screw) near the top and bottom corners of each board to prevent splitting. Then drive a rust-resistant wood screw into each hole, stopping just before the head sinks into the wood (you don't want to crack the charred surface!).
Pro tip: For a seamless look, countersink the screws slightly and fill the holes with wood filler that matches the board's color once the adhesive is dry. Sand smooth, and no one will ever know they're there!
Step 6: Continue Rows, Staggering Seams
Move on to the second row, starting with a half-board (or the length you planned in your layout) to stagger the seams. Repeat the adhesive application, positioning, and spacing steps. As you go, wipe away any excess adhesive that oozes between boards with a damp rag—dried adhesive is hard to remove and will mar the finish.
Take a step back every few rows to check your work. Are the gaps consistent? Is the installation staying level? It's easier to fix a small mistake now than after the adhesive has fully cured.
Step 7: Trim and Finish
Once all full rows are installed, you'll likely need to cut boards to fit the top, bottom, or sides of the installation area. Measure carefully (remember: measure twice, cut once!), make your cuts, and install these "filler" boards using the same adhesive and spacing method. Take your time here—these edge pieces are visible, so precision counts!
After all boards are in place, let the adhesive cure fully (check the label—most take 24-48 hours). Then remove the spacers and sand any rough edges with a sanding block. Finally, apply a coat of polyurethane sealer using a foam brush, working in the direction of the wood grain. Let it dry, then add a second coat for extra protection. The sealer will deepen the board's color slightly and give it a subtle sheen—choose matte for a more natural look or satin for a soft glow.
Troubleshooting Common Hiccups
Even the most careful DIYers run into snags. Here's how to fix the most common issues:
- Boards are uneven: If a row starts to tilt, gently pry up the board (while the adhesive is still wet) and reposition it. Use your level to check, then add a few temporary shims underneath if needed to hold it in place while the adhesive sets.
- Adhesive oozing excessively: Wipe it away immediately with a damp rag. If it dries, scrape gently with a plastic putty knife (metal can scratch the charred surface).
- Gaps between boards are uneven: Use spacers consistently! If a gap is too wide, remove the board, clean off the old adhesive, and reapply with a fresh layer, using spacers to nudge it into place.
- Board splits when screwing: Always pre-drill pilot holes, and avoid placing screws too close to the edge (at least 3/4-inch from the end).
Caring for Your Charcoal Burnt Wood Board
With proper care, your installation will look beautiful for decades. Here's how to keep it in top shape:
- Clean regularly: Dust with a soft cloth or vacuum with a brush attachment. For deeper cleans, wipe with a slightly damp cloth—avoid soaking the wood, as excess moisture can cause warping.
- Reseal every 2-3 years: Over time, the sealer will wear thin, especially in high-traffic areas. Sand lightly with fine-grit sandpaper, wipe away dust, and apply a fresh coat of polyurethane.
- Protect from extreme moisture: While charcoal burnt wood board is more water-resistant than untreated wood, it's not waterproof. Wipe up spills immediately, and avoid installing it in areas with standing water (like a shower floor).
- Avoid harsh chemicals: Skip abrasive cleaners or bleach—they can strip the sealer and damage the charred surface. Stick to mild soap and water if needed.
Fun fact: Compared to wood grain board, which can fade or show scratches over time, the charred layer on charcoal burnt wood board actually becomes more pronounced with age, developing a richer, more complex patina that tells the story of your space.
Congratulations—you've done it! What started as a pile of boards and a vision is now a stunning feature that will make your space feel uniquely yours. The deep, smoky tones of the charcoal burnt wood board will evolve over time, picking up new nuances as light and life pass over it. And if you're feeling inspired, why not experiment with complementary materials? Pair it with masonry stone for a rustic, earthy vibe, or contrast it with sleek fair-faced concrete for a modern twist—the possibilities are endless.
Remember, DIY projects are all about learning and enjoying the process. Even if a few boards are slightly crooked or a cut isn't perfect, those "imperfections" are what make your installation one-of-a-kind. So grab a cold drink, sit back, and enjoy the fruits of your labor—you've earned it.


