Let's start with a simple truth: there's nothing quite like the warmth of wood. It turns a house into a home, a commercial space into a welcoming retreat, and a blank wall into a story. But here's the catch—real wood? It's high-maintenance. It warps in humidity, fades in sunlight, and scratches at the drop of a hat. That's where
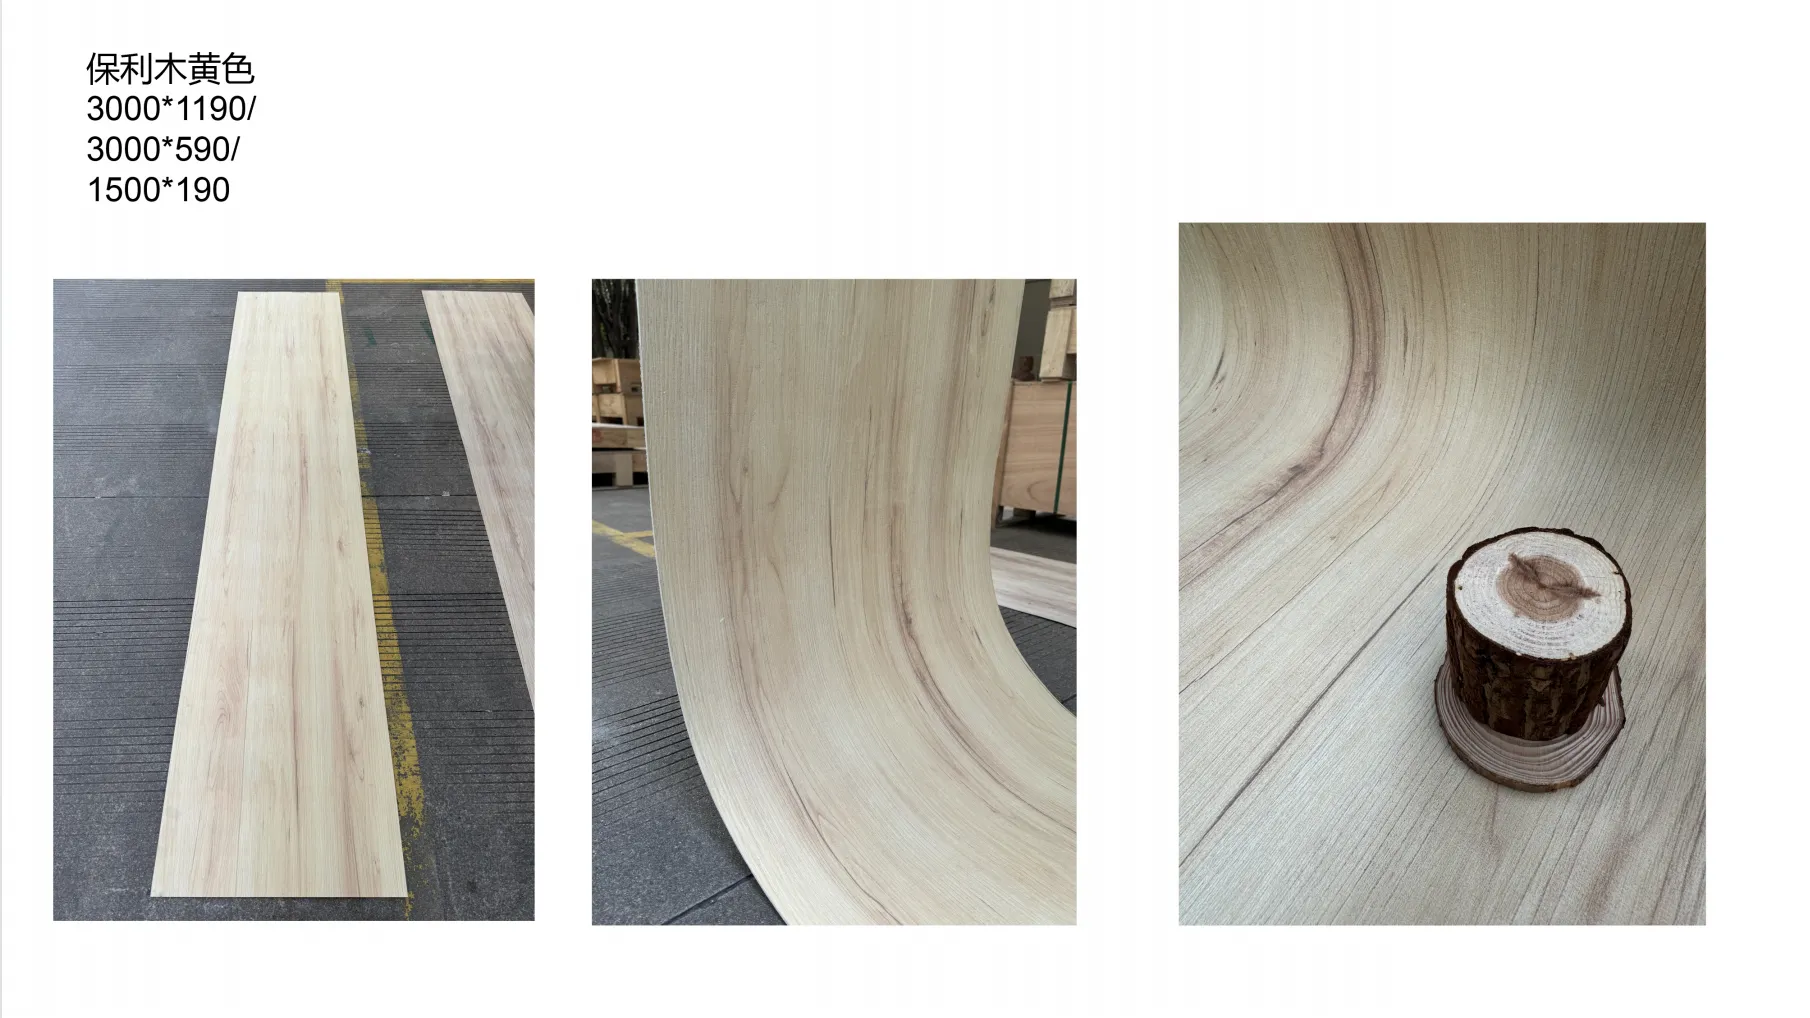
Poly Wood Board
from COLORIA MCM comes in. Think of it as wood's cooler, more durable cousin: all the natural grain, texture, and charm, but built to stand up to the chaos of real life.
COLORIA MCM isn't just about materials—they're about solving problems. Their Poly Wood Board is a masterclass in innovation: a modified composite material that mimics the look of aged oak, weathered pine, or smooth teak, without the upkeep. Whether you're revamping a kitchen backsplash, cladding a patio ceiling, or adding an accent wall to your living room, this stuff checks every box. And today, we're breaking down how to install it yourself, step by step. No confusing jargon, no fancy tools you'll never use again—just a friendly guide to help you transform your space with confidence.
But first, let's talk about why this matters. When you install something with your own two hands, it becomes more than just a surface—it becomes a part of your story. You'll walk past that wall and think, "I did that." And with COLORIA MCM's materials, that story gets a happy ending: a surface that looks better with time, not worse. Plus, we'll be weaving in a few of their other standout products—like
wood grain board
for trim and
MCM flexible stone
for adjacent walls—to show you how to create a cohesive, magazine-worthy look. Ready to dive in?
Step 1: Prep the Surface—Your Foundation Matters
Imagine building a house on sand—it's not going to last. The same goes for installing Poly Wood Board: your surface needs to be solid, clean, and flat. Let's break this down:
-
Clean like your project depends on it (because it does):
Wipe down the wall or ceiling with a damp cloth to remove dust, grease, or grime. For kitchen areas, use a mild degreaser—cooking oils can wreck adhesive bond. Let it dry completely—no shortcuts here.
-
Check for flatness:
Grab your level and run it horizontally and vertically across the surface. If there are dips deeper than 1/8 inch, fill them with a lightweight spackle. If there are bumps (like nail heads or uneven drywall), sand them down until smooth. COLORIA's Poly Wood Board is flexible, but it's not a miracle worker—lumps will show through.
-
Repair any damage:
Cracks in drywall? Patch them. Loose paint? Scrape it off. Rotting wood (if you're installing over an old surface)? replace it. You want a surface that's as stable as possible—no "give" when you press on it.
I once skipped this step to save time, and let's just say my first Poly Wood Board project looked like a funhouse mirror after a month. The adhesive couldn't grip properly, and the boards started to bow. Learn from my mistake: prep work is non-negotiable.
Step 2: Measure Twice, Cut Once—The Golden Rule
You've heard it a million times, but it's true: measuring correctly is the difference between a seamless install and a "why does this gap exist?" headache. Here's how to do it like a pro:
-
Map out your space:
Draw a rough sketch of the area on paper. Note windows, doors, outlets, or any obstacles that'll require cuts. For example, if you're installing a backsplash, mark where the stove, sink, and outlets are—you'll need to notch boards around them.
-
Take precise measurements:
Use your tape measure to get the width and height of the installation area. Add 1/2 inch to both for wiggle room (you can always trim later). For horizontal installs, measure the length of each wall section; for vertical, the height.
-
Plan your layout:
Do you want a straight stack (boards aligned vertically or horizontally), a herringbone pattern, or something more creative? COLORIA's Poly Wood Board looks stunning in herringbone, but it requires more precise cutting. For beginners, start with a straight layout—you can get fancy later! Pro tip: Use painter's tape on the floor (or wall) to mock up the pattern. Stand back and see how it looks—lighting changes everything.
-
Mark your reference line:
This is your "starting point." For horizontal installs, measure up from the floor (or down from the ceiling) and draw a level line—this ensures your first row is perfectly straight. For vertical installs, measure from a corner and draw a vertical line. This line is your north star—never lose sight of it.
Step 3: Cutting the Boards—Sharp Tools = Clean Edges
Cutting Poly Wood Board is easier than you think, but it does require the right tools. Remember: this is a composite material, so a dull blade will tear the surface instead of cutting it cleanly. Here's how to get crisp edges:
-
Choose the right blade:
A fine-tooth circular saw blade (60-80 teeth) or a miter saw blade labeled for "composite decking" works best. Avoid blades with large teeth—they'll splinter the surface.
-
Measure and mark each board:
Use your carpenter's pencil to mark the cut line. For straight cuts, align a straightedge with your mark and draw a line—no freehanding! For angled cuts (like 45 degrees for corners), use a miter box or the angle guide on your saw.
-
Secure the board:
Clamp the board to a workbench or sawhorse so it doesn't move while cutting. The last thing you want is a wobbly board and a crooked cut. Pro tip: Place a piece of painter's tape over the cut line—this reduces splintering on the surface.
-
Cut slowly and steadily:
Let the saw do the work—don't force it. Push the blade through the board at a consistent speed, and keep your hands well away from the blade (safety first!). After cutting, sand the edge with 120-grit sandpaper to smooth any rough spots.
I once tried to cut a board with a jigsaw and a dull blade, and the result looked like a beaver chewed on it. Invest in a good blade—you'll thank yourself when your edges line up perfectly.
Step 4: Applying Adhesive—Stick With the Pros
Adhesive is the glue that holds this whole project together (pun intended). COLORIA MCM recommends their high-grab polyurethane adhesive—it's designed specifically for their composite materials and forms a bond that can withstand temperature swings, moisture, and everyday wear. Here's how to apply it:
-
Prep the adhesive:
Shake the can (or stir the bucket) thoroughly—you want the formula mixed evenly. If it's cold in your workspace, warm the adhesive to room temperature first—cold adhesive is thick and hard to spread.
-
Use a notched trowel:
The size of the trowel notches depends on your board thickness. For standard 1/2-inch Poly Wood Board, a 1/4-inch notched trowel works best. Hold the trowel at a 45-degree angle and spread the adhesive in a "U" pattern over the back of the board. Cover about 80% of the surface—you want enough to ensure contact, but not so much that it oozes out the sides (though a little oozing is normal).
-
Work in small sections:
Adhesive dries quickly! Only apply it to one board at a time, or to a small area of the wall (about 2ft x 2ft) if you're using a wall-mount method. If the adhesive starts to turn tacky before you place the board, scrape it off and reapply—old adhesive won't bond properly.
Step 5: Installing the Boards—Patience Pays Off
Now comes the fun part: watching your space transform! Start with your reference line and work your way out. Here's the play-by-play:
-
Align the first board:
Place the board against your reference line, making sure it's flush with the edge of the wall (or your starting point). Press firmly to set the adhesive—you should feel it "grab" the surface.
-
Check for level:
Slide your level along the top (for horizontal installs) or side (for vertical) of the board. If it's off, gently tap it with a rubber mallet to adjust. Don't use a regular hammer—you'll dent the surface!
-
Add spacers:
Place 1/4-inch spacers between the first and second board. This creates a consistent gap for expansion (yes, even composite materials expand and contract with temperature changes!). Spacers also ensure your boards line up evenly—no uneven edges.
-
Repeat and stagger:
Continue installing boards, staggering the seams like brickwork (this makes the install look more professional and hides gaps). For example, if your first row starts with a full board, the second row should start with a half board. This prevents a "striped" look and makes the pattern more natural.
-
Trim around obstacles:
When you hit a window, outlet, or corner, measure the space carefully, mark the board, and cut it to fit. Take your time here—precision is key. For outlets, drill a hole slightly larger than the outlet box, then cut out the opening with a jigsaw.
I remember the first time I installed a full row of boards—it felt like solving a puzzle, and when that last board clicked into place, I did a little happy dance. You'll get there too—just take it one board at a time.
Step 6: Add Complementary Accents—Elevate the Design
A great install isn't just about the main boards—it's about the details. COLORIA MCM's
wood grain board
and
MCM flexible stone
are perfect for adding depth and cohesion to your project. Here's how to use them:
-
Wood grain board for trim:
Use 1x2 or 1x3 wood grain board to cover the edges of your Poly Wood Board where they meet the ceiling, floor, or walls. Cut the trim at 45-degree angles for clean corners, and attach it with the same adhesive (or small finishing nails, if you prefer). The wood grain texture matches the Poly Wood Board perfectly, creating a polished look.
-
MCM flexible stone for adjacent walls:
If your Poly Wood Board accent wall is next to a fireplace or another wall, consider adding MCM flexible stone. This thin, lightweight material looks like natural stone but bends to fit curves. It's a stunning contrast to the wood grain—think rustic wood meets modern stone. Install it using the same adhesive method, and watch how the two materials complement each other.
-
Accent strips:
Cut narrow strips of wood grain board and install them vertically between Poly Wood Board rows for a "shiplap with a twist" look. It adds visual interest without overwhelming the space.
Step 7: Finishing Touches—The Devil's in the Details
You're almost there! Now it's time to clean up and make everything look seamless:
-
Remove spacers:
Once the adhesive is dry (check the manufacturer's instructions—usually 24-48 hours), pop out the spacers. You'll be left with clean, even gaps between boards.
-
Fill gaps (if needed):
For small gaps (less than 1/8 inch), you can leave them as is—they'll allow for expansion. For larger gaps (like around corners), use color-matched silicone caulk. Apply a thin bead with a caulking gun, then smooth it with a wet finger for a professional finish.
-
Sand and seal:
If you're installing outdoors (like a patio ceiling), apply COLORIA MCM's water-based poly sealant with a foam brush. This protects against UV rays and moisture. For indoor installs, sealing is optional, but it can help prevent stains (especially in kitchens).
-
Clean up:
Wipe away any excess adhesive or caulk with a damp cloth. Vacuum up dust from cutting, and step back to admire your work—you earned it!
Step 8: Maintenance—Keep It Looking Like New
The best part about COLORIA MCM's Poly Wood Board? It's low-maintenance. But a little care goes a long way:
-
Clean regularly:
Wipe with a damp cloth or sponge. For tough stains (like food splatters), use a mild soap and water—no harsh chemicals or abrasive pads (they'll scratch the surface).
-
Avoid standing water:
While it's moisture-resistant, don't let water pool on the surface for days (like a leaky roof). Wipe up spills promptly.
-
Touch up scratches:
Minor scratches can be buffed out with 120-grit sandpaper (follow the grain!). For deeper scratches, use a color-matched wax stick to fill them in.
-
Re-seal outdoors every 2-3 years:
If you installed Poly Wood Board outside, reapply the sealant every few years to keep it looking fresh. It's a quick job, and it'll extend the life of your install.
You Did It—Now Enjoy the Results
Take a step back. Look at that wall, that ceiling, that backsplash. You measured, cut, and installed it yourself—and it looks amazing. That's the power of DIY: turning a vision into reality with your own hands. And with COLORIA MCM's Poly Wood Board, you didn't just create a surface—you created a space that's durable, beautiful, and uniquely yours.
Whether you're hosting friends, cooking a meal, or just relaxing at home, you'll smile every time you see that Poly Wood Board. It's more than a material—it's a reminder that you're capable of big things. And who knows? Maybe this is just the first project. Next up: adding MCM flexible stone to the fireplace, or wood grain board to the bookshelves. The possibilities are endless.
So go ahead—invite over the neighbors, post a photo on social media, or just sit back and enjoy the fruits of your labor. You earned it. And remember: when it comes to home improvement, the best tool you have is patience. With COLORIA MCM's materials and this guide, you've got everything else you need.