Welcome, Fellow Innovators! A Deep Dive into MCM Installation
Alright, contractors, let's talk about leveling up our game. In today's competitive architectural landscape, clients aren't just looking for good; they're looking for extraordinary. They want materials that are not only visually stunning but also perform exceptionally and align with modern sustainability goals. That's where COLORIA GROUP steps in, particularly with our fantastic Modified Cementitious Material (MCM) panels. We're not just selling products; we're offering a comprehensive,
one-stop solution provider
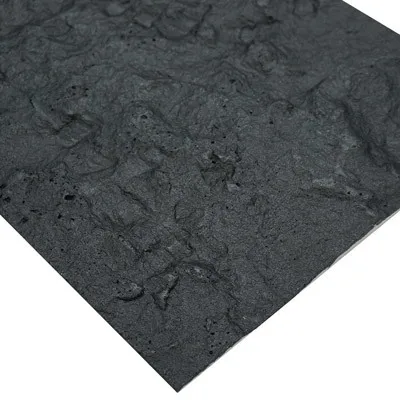
for all your interior and exterior finishing material needs, backed by decades of industry experience. Today, we're zeroing in on a particularly striking option: our Lunar Peak Black MCM Panels.
This isn't just another installation guide. This is your go-to resource for confidently and expertly applying COLORIA GROUP's Lunar Peak Black MCM panels, ensuring every project not only meets but exceeds client expectations. These panels, part of our renowned MCM product family, offer a sleek, sophisticated finish that can transform any space, whether it's a residential facade or a commercial interior. We're going to walk through everything from preparation to the final touches, making sure you've got all the insider knowledge to make your next project a resounding success.
Our commitment at COLORIA GROUP is to deliver
high-quality interior and exterior finishing materials and supporting services
that empower you to create architectural masterpieces. The Lunar Peak Black MCM panels are a testament to this, combining the natural beauty of stone with the advanced properties of our unique modified cementitious material. So, let's roll up our sleeves and get started!
Understanding the Power of COLORIA GROUP's MCM Panels
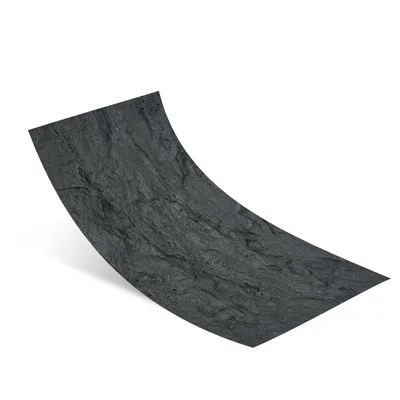
Before we dive into the nitty-gritty of installation, let's quickly remind ourselves why our MCM panels are such a game-changer. COLORIA GROUP has pioneered the development of these incredible materials, which are essentially a fusion of natural minerals, polymers, and other additives. The result? A flexible, durable, and lightweight material that mimics the texture and appearance of natural stone, wood, or even fabric, but with superior performance characteristics.
Our product range is extensive, but when we talk about large-scale applications like Lunar Peak Black, we're often looking at our
MCM Big Slab Board Series
and
MCM Project Board Series
. These are designed with contractors in mind, offering ease of handling, cutting, and installation while maintaining incredible durability. The "Lunar Peak Black" finish specifically offers a deep, rich black with subtle textural variations, perfect for creating dramatic and modern aesthetics.
Key Benefits for Your Projects:
-
Flexibility and Lightweight:
Unlike traditional stone, MCM panels can be bent and are significantly lighter, reducing structural load and making transport and installation much easier and safer.
-
Durability:
They are weather-resistant, UV-stable, fire-resistant (Class A), and highly resistant to impact and abrasion, ensuring long-lasting beauty.
-
Eco-Friendly:
Our commitment to
green and eco-friendly
practices is evident. MCM uses natural inorganic materials, significantly less energy in production compared to traditional ceramics or stone, and is often made from recycled content. It's a choice that feels good for the planet.
-
Customization:
We understand that every project is unique. Our MCM panels, including the Lunar Peak Black, offer fantastic
customization
options in terms of size, thickness, and even texture, allowing you to achieve truly bespoke designs.
-
Versatility:
Perfect for both interior and exterior applications, from feature walls and building facades to columns and ceilings.
Pre-Installation Checklist: Setting the Stage for Success
A flawless installation begins long before the first panel is affixed. Diligent preparation is absolutely crucial when working with MCM panels, especially with a distinct color like Lunar Peak Black, where consistency and precision truly shine. Don't skip these steps – they're your foundation for a professional finish.
1. Site Assessment and Planning
-
Substrate Evaluation:
Critically assess the existing surface. Is it sound, clean, dry, and flat? MCM panels can be installed over various substrates like concrete, plaster, cement board, existing tiles, and even wood, but proper preparation is key. Any unevenness greater than 3mm over a 2-meter span needs to be rectified.
-
Environmental Conditions:
Check ambient temperature and humidity. Ideal installation conditions are between 5°C and 35°C (41°F and 95°F) with moderate humidity. Extreme conditions can affect adhesive curing.
-
Material Quantity and Batch Check:
Verify you have enough Lunar Peak Black MCM panels, adhesive, grout/caulk, and any necessary accessories. Always check the batch numbers on all panels. Slight color variations can occur between batches, so mix panels from different boxes to ensure a natural blend across the entire surface. This is particularly important for a uniform color like Lunar Peak Black.
-
Project Layout:
Plan your panel layout. Where will cuts be made? How will joints be aligned? Consider the visual flow and symmetry. Sketching this out on paper or digitally can save a lot of headaches later.
2. Material Handling and Storage
-
Unpacking:
Unpack panels carefully to avoid damage. Lay them flat on a clean, dry surface.
-
Storage:
Store panels indoors, away from direct sunlight, extreme temperatures, and moisture. Keep them flat to prevent warping. Protect edges and corners from impact.
-
Adhesive Storage:
Store adhesives and sealants according to the manufacturer's instructions. Ensure they are within their shelf life.
3. Tools and Equipment
Having the right tools at hand makes all the difference for efficient and high-quality work. For Lunar Peak Black MCM panels, you'll need:
-
Measuring tape, level, chalk line, plumb bob, laser level (for large areas)
-
Notched trowels (specific size based on adhesive and panel size – often 6x6mm or 8x8mm)
-
Rubber mallet and J-roller for panel compression
-
Cutting tools:
-
For straight cuts:
Utility knife, straight edge, and a scoring tool for thinner panels; circular saw with a diamond blade for thicker panels or large quantities.
-
For curved or complex cuts:
Jigsaw or grinder with a suitable blade.
-
Mixing drills and paddles for adhesive
-
Buckets, sponges, cleaning cloths
-
Caulking gun, masking tape, jointing tools (if using caulk/grout)
-
Safety gear: Gloves, safety glasses, dust mask.
4. Substrate Preparation: The Foundation of Durability
This is non-negotiable. Proper substrate prep ensures optimal adhesion and prevents future issues like delamination or cracking. Think of it like painting – the prep work is 80% of the job!
-
Cleanliness:
The surface must be completely free of dust, dirt, grease, oil, paint flakes, loose particles, and any other contaminants. Use a stiff brush, vacuum, or pressure washer (allow to dry thoroughly).
-
Soundness:
The substrate must be structurally sound and free from cracks or crumbling. Repair any damage with appropriate patching compounds.
-
Dryness:
The surface must be absolutely dry. Moisture content should be checked and meet adhesive manufacturer specifications.
-
Flatness:
Achieve a flat and even surface. Use leveling compounds or render as needed.
-
Priming:
Depending on the substrate and adhesive, a primer might be necessary. Always follow COLORIA GROUP's recommendations or the adhesive manufacturer's guidelines. Priming enhances adhesion and reduces substrate absorption.
Important Note:
For exterior applications, especially with a dark color like
Lunar Peak Black that can absorb more heat, ensuring the substrate is robust and properly prepared to handle thermal expansion and contraction is even more critical.
The Installation Journey: Step-by-Step Excellence
With our Lunar Peak Black panels ready and the substrate prepped, let's get down to the actual installation. This process is about precision, patience, and following best practices. We'll break it down into manageable phases.
Phase 1: Planning the Layout and Cuts
Before you even think about adhesive, visualize the final look. This is where your initial layout planning really pays off.
-
Establish Reference Lines:
Use your laser level, chalk line, and plumb bob to establish perfectly horizontal and vertical reference lines. For exterior facades, a level base course is paramount. Always start from the most visible corner or a central point to maintain symmetry.
-
Dry Layout (Optional but Recommended):
For complex patterns or critical areas, lay out a few panels dry on the ground to visualize the spacing and cuts. This helps confirm your plan and identify any potential issues.
-
Measure and Mark:
Measure each area meticulously. Transfer these measurements to the back of your MCM panels. Remember, measure twice, cut once!
-
Cutting Panels:
-
Scoring & Snapping:
For thinner MCM panels, a heavy-duty utility knife or scoring tool can be used. Score along your mark several times with firm pressure, then snap the panel cleanly along the score line. This technique is similar to cutting gypsum board.
-
Circular Saw:
For thicker panels (common in the MCM Big Slab Board Series or MCM Project Board Series) or when making numerous cuts, a circular saw fitted with a fine-toothed diamond blade (suitable for masonry/tile) is ideal. Use a guide for straight cuts.
-
Jigsaw/Grinder:
For intricate shapes, curves, or cut-outs (e.g., around windows, outlets), a jigsaw or an angle grinder with a diamond blade can be used. Always cut on the face side for cleaner edges and minimize chipping.
Pro Tip:
When cutting
Lunar Peak Black panels, especially with power tools, wear appropriate respiratory protection as dust will be generated. Clean cut edges carefully.
Phase 2: Adhesive Application – The Heart of the Bond
The right adhesive and proper application are critical for the longevity of your MCM installation. COLORIA GROUP can recommend specific high-performance polymer-modified cementitious adhesives or specialized elastic adhesives that are compatible with our panels and suitable for your climate and substrate.
-
Mix Adhesive:
Follow the adhesive manufacturer's instructions precisely for mixing. Use a clean bucket and a mixing drill with a paddle. Mix to a consistent, lump-free consistency, allowing it to "slake" (rest) for the recommended time, then remix briefly. Only mix enough adhesive that can be applied within its pot life.
-
Substrate Application (Back-buttering Method Recommended):
-
Use the recommended notched trowel (e.g., 6x6mm for smaller panels, 8x8mm for larger ones) to apply an even layer of adhesive to the substrate. Hold the trowel at a 45-degree angle to create uniform ridges.
-
For optimal adhesion and to ensure full coverage, especially with larger format panels like our MCM Big Slab Board Series, it is highly recommended to "back-butter" the panel as well. Apply a thin, even layer of adhesive to the entire back of the MCM panel with the flat side of the trowel. This ensures 100% adhesive contact.
Coverage is Key:
Aim for at least 85% adhesive coverage for interior applications and 95-100% for exterior applications to prevent issues caused by trapped moisture or air pockets.
Phase 3: Panel Placement and Alignment
This is where your Lunar Peak Black design starts to come to life. Precision here is paramount.
-
Starting Point:
Begin panel installation from your established reference line, usually working from bottom to top for walls, or a central point for floors/ceilings, and working outwards.
-
Press and Adjust:
Carefully place the MCM panel onto the adhesive-covered surface. Press firmly and evenly across the entire panel using your hands, a J-roller, or a rubber mallet to ensure good contact and expel any trapped air. Apply consistent pressure.
-
Alignment:
Immediately check alignment with your level and reference lines. Make any necessary adjustments within the open time of the adhesive. Panels should be perfectly plumb and level.
-
Spacing and Joints:
Maintain consistent joint spacing between panels. Use spacers if necessary. For Lunar Peak Black, a tight, uniform joint can create a seamless, monolithic look, while a slightly wider joint can be used for aesthetic effect or to accommodate movement.
-
Remove Excess Adhesive:
Promptly remove any adhesive that squeezes out from the joints or gets onto the panel face with a damp sponge or cloth before it cures. Dried adhesive, especially on a dark panel, can be very difficult to remove without damaging the surface.
Phase 4: Securing Panels (For Specific Applications)
While adhesive provides primary bonding, some applications, especially very large exterior panels or those installed at height, may require supplemental mechanical fasteners as per local building codes or COLORIA GROUP's engineering recommendations. This is particularly relevant for the
MCM Project Board Series
in certain demanding scenarios.
-
Types of Fasteners:
Depending on the panel thickness and substrate, options might include screws with washers, clips, or a combination system. Consult COLORIA GROUP technical data for specific recommendations.
-
Drilling:
If mechanical fasteners are used, pre-drill pilot holes through the MCM panels using a masonry bit appropriate for the fastener size. Ensure holes are precisely aligned to avoid stress on the panel.
-
Installation:
Install fasteners according to specifications, ensuring they are flush or slightly recessed and properly sealed if exposed to weather.
Phase 5: Finishing Touches and Curing
The final steps ensure a beautiful, long-lasting finish.
-
Joint Treatment (Grout/Caulk):
-
Grouting:
If a traditional grouted look is desired, apply a non-sanded grout suitable for MCM (consult COLORIA GROUP or grout manufacturer). Work the grout into the joints, then clean excess.
-
Caulking/Sealant:
For a more seamless appearance, or where expansion joints are required, use a high-quality, flexible, UV-stable sealant/caulk (often silicone or polyurethane-based) that matches the Lunar Peak Black color or a contrasting shade. Mask off joint edges for clean lines. This is often preferred for exterior applications with MCM panels due to thermal movement.
-
Cleaning:
Once all panels are set and joints are treated, perform a final cleaning. Use a mild, non-abrasive cleaner and a soft cloth to remove any remaining adhesive residue, dust, or smudges from the Lunar Peak Black surface. Avoid harsh chemicals or abrasive scrubbing.
-
Protection and Curing:
Protect the newly installed surface from traffic, impact, or moisture for the adhesive's full curing period (typically 24-72 hours, depending on temperature and humidity). Adequate curing time is vital for bond strength.

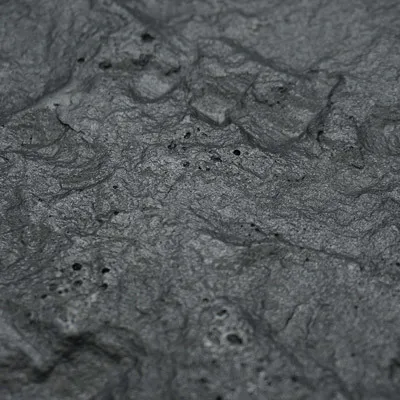
Specific Considerations for Lunar Peak Black MCM Panels
Working with a dark, sophisticated material like Lunar Peak Black brings a few specific points to consider to ensure the best outcome.
-
Thermal Expansion:
Dark colors absorb more solar radiation, leading to greater thermal expansion and contraction, especially in exterior applications. This makes proper joint design and flexible sealants absolutely critical. Ensure expansion joints are incorporated as needed, particularly on large, uninterrupted surfaces. Our
MCM Project Board Series
is engineered to handle such demands when installed correctly.
-
Visibility of Imperfections:
On a deep black surface, dust, scratches, or even minor adhesive smudges can be more noticeable. Emphasize cleanliness throughout the installation process and use soft, non-abrasive tools and cleaning materials.
-
Color Consistency:
While COLORIA GROUP ensures high consistency, always mix panels from different boxes to blend any subtle variations. This is good practice for any uniform-colored material but especially important for a dominant color like Lunar Peak Black.
-
Cutting Edge Appearance:
When cut, the edge of the MCM panel will expose its core material. For a perfectly uniform look, consider edge-banding or using a color-matched sealant along exposed cut edges, if not already covered by trim or corner pieces.
-
Lighting Effects:
The sophisticated matte or subtle sheen of Lunar Peak Black can appear different under various lighting conditions (natural daylight vs. artificial light). Consider how lighting will play on the surface when planning the layout.
Troubleshooting Common Installation Issues
Even the most experienced contractors can encounter a snag or two. Knowing how to quickly and effectively troubleshoot can save time and maintain project quality.
|
Issue
|
Possible Cause(s)
|
Solution(s)
|
|
Panel Delamination / Poor Adhesion
|
Improper substrate preparation (dust, moisture, unevenness); incorrect adhesive mixing/application; insufficient adhesive coverage; incorrect adhesive type for substrate/environment; insufficient pressure during installation.
|
Remove affected panel(s). Re-prepare substrate thoroughly (clean, level, dry, prime). Ensure correct adhesive use and 100% back-buttering. Apply adequate pressure with J-roller. Extend curing time.
|
|
Misaligned Panels / Uneven Joints
|
Lack of reference lines; rushing installation; not checking alignment frequently; substrate unevenness; inconsistent spacer use.
|
Establish clear reference lines. Work methodically. Use a laser level and spacers constantly. Remove and re-set panels if alignment is off before adhesive cures. Rectify substrate unevenness prior to installation.
|
|
Adhesive Squeeze-out / Stains on Panel Face
|
Excessive adhesive; improper trowel technique; not cleaning immediately.
|
Use the correct notched trowel size. Apply consistent pressure to avoid too much squeeze-out. Immediately clean any adhesive residue with a damp sponge before it dries. For dried adhesive, carefully scrape with a plastic tool, then clean with an appropriate solvent (test in an inconspicuous area first).
|
|
Cracks in Panels After Installation
|
Panel installed over an unstable/cracking substrate; insufficient expansion joints; extreme thermal shock; impact damage; panels installed too tightly against each other or adjacent structures.
|
Ensure substrate stability. Implement proper expansion joints, especially for exterior use. Handle panels carefully during installation. replace cracked panels after addressing the underlying cause.
|
|
Color Variation Between Panels
|
Not mixing panels from different batches; inherent slight variations in natural materials.
|
Always mix panels from several different boxes/pallets before starting installation to ensure a natural blend across the entire surface. If significant, contact COLORIA GROUP for batch control information.
|
Remember, open communication with COLORIA GROUP's technical support team is always an option if you encounter complex issues or require specific product advice. We're here as your
one-stop solution provider
, not just for materials, but for expert guidance too!
The COLORIA GROUP Advantage: Beyond the Panel
Choosing COLORIA GROUP for your Lunar Peak Black MCM panel projects means partnering with a company that understands your needs as a contractor. We don't just supply exceptional products; we offer a complete support system:
-
Technical Expertise:
Our team has decades of experience. We're ready to assist with project planning, material selection, and installation best practices.
-
Quality Assurance:
Every Lunar Peak Black MCM panel undergoes rigorous quality checks, ensuring you receive consistent,
high-quality interior and exterior finishing materials
every time.
-
Global Reach, Local Support:
With a strong presence in global markets and dedicated agencies, like in Saudi Arabia, we provide timely delivery and localized support.
-
Innovation:
We're constantly pushing the boundaries of material science, developing new solutions like our
MCM 3D Printing Series
for truly revolutionary architectural elements, or our
MCM Flexible Stone
for unparalleled design flexibility. This innovation trickles down into the quality and performance of all our MCM offerings.
-
Sustainability Focus:
Our products are designed with the environment in mind. By choosing our MCM panels, you're offering your clients a
green and eco-friendly
solution that contributes to sustainable building practices.
Final Thoughts for the Modern Contractor
Installing Lunar Peak Black MCM Panels from COLORIA GROUP isn't just about sticking a material to a wall; it's about crafting an experience, delivering a statement, and leaving a lasting impression of quality and sophistication. This guide has armed you with the knowledge and techniques to approach your next MCM project with confidence and precision. The sleek, dark elegance of Lunar Peak Black, combined with the versatility and durability of our MCM technology, offers unparalleled design freedom and performance.
Embrace the
customization
possibilities these panels offer, from creating dramatic feature walls to full-building facades. Remember, attention to detail in every step—from initial substrate preparation to the final joint treatment—is what elevates a good installation to a truly exceptional one.
At COLORIA GROUP, we are immensely proud of our MCM products and the trust that contractors like you place in us. We are committed to continuing our legacy as a reliable, innovative
one-stop solution provider
in the building materials sector. So, go forth, confidently install those Lunar Peak Black MCM panels, and create something truly spectacular!
We're excited to see the incredible projects you'll bring to life with COLORIA GROUP's MCM panels. Your success is our success!


