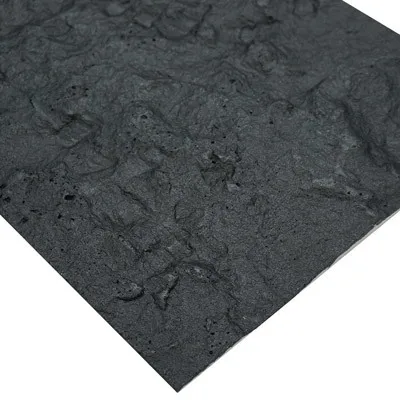
There's an undeniable magic to the deep, enigmatic allure of black stone. It speaks of cosmic depths and timeless elegance, turning any wall into a statement piece. For designers, architects, and homeowners alike, materials that capture this essence, like our Lunar Peak Black, are more than just a surface; they're the backdrop to a lifestyle. But what happens when life, well, happens? A scratch, a stain, a chip—these minor imperfections can feel like a major headache.
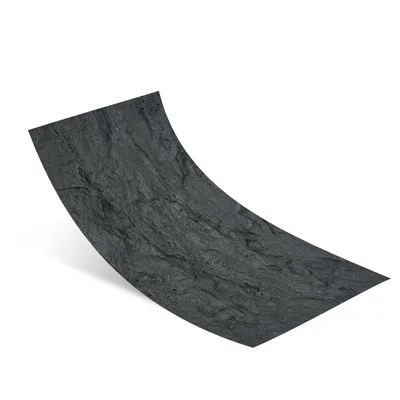
This is where the true beauty of modern material science shines. We're not talking about heavy, brittle, and unforgiving traditional stone. We're talking about the next generation of architectural finishes. At COLORIA GROUP, we've dedicated ourselves to pioneering these advanced materials, and our Lunar Peak Black Flexible Stone is a perfect example. It's designed not just for stunning aesthetics but for real-world living. It's durable, versatile, and, most importantly, repairable.
As a leading
one-stop solution provider
in the building materials industry, we believe in empowering our clients. Our role doesn't end when the materials are delivered; it extends to ensuring you can maintain the pristine beauty of your investment for years to come. This comprehensive guide is born from that philosophy. We'll walk you through everything you need to know about caring for, repairing, and, if necessary, replacing your Lunar Peak Black Flexible Stone. So, roll up your sleeves, and let's dive into how you can keep your space looking celestial and flawless.
Before we get into the nuts and bolts of repair, it's helpful to understand what makes this material so special. "Flexible stone" might sound like a contradiction, but it's the result of incredible innovation in material science. Understanding its composition is key to appreciating its strengths and knowing how to properly care for it.
Lunar Peak Black is part of our flagship
MCM Flexible Stone
series. MCM stands for Modified Cementitious Material. This isn't your standard concrete or stone veneer. It's a technologically advanced composite material created from a base of natural mineral powders, quartz sand, and modified clay, all bonded together with a water-based polymer. This mixture is then shaped, textured, and cured through a low-temperature firing process.
The result is a material that has the authentic look and feel of natural stone but with a host of superior properties. One of the most significant aspects of this technology is its commitment to being
green and eco-friendly
. The production process consumes far less energy than quarrying and processing natural stone or firing traditional ceramics. The raw materials are abundant and sustainable, and the final product is lightweight, which dramatically reduces the carbon footprint associated with transportation and installation. It's a choice that looks good on your walls and feels good for the planet.
Key Advantages Over Traditional Black Slate or Granite
Why choose Lunar Peak Black over a slab of natural black slate or granite? While traditional stone has its charm, our flexible stone offers practical benefits that make it a smarter choice for many modern residential and commercial projects.
-
Incredible Flexibility:
This is its superpower. Lunar Peak Black can be bent to a certain radius, allowing it to wrap seamlessly around curved walls, columns, and arched entryways. This opens up a world of design possibilities that are difficult or impossible to achieve with rigid stone.
-
Feather-Light Weight:
MCM Flexible Stone is up to 80% lighter than traditional stone of the same thickness. This means no need for heavy-duty structural support, reduced risk of injury during installation, and lower shipping costs. It can be installed on substrates where heavy stone would be out of the question.
-
Exceptional Durability:
Don't let "flexible" fool you into thinking it's weak. It's highly resistant to impact, weathering, freeze-thaw cycles, and water. Its surface is dense and less porous than many natural stones, making it inherently more stain-resistant.
-
Simple & Fast Installation:
Forget messy mortar beds and complex anchoring systems. Lunar Peak Black is installed using a specialized adhesive, almost like a heavy-duty tile. The process is cleaner, faster, and requires less specialized labor, saving you time and money on your project.
|
Feature
|
COLORIA's Lunar Peak Black Flexible Stone
|
Traditional Natural Black Slate
|
|
Weight
|
Flexible Stone">
Very Light (approx. 4-6 kg/m²)
|
Very Heavy (approx. 25-30 kg/m²)
|
|
Flexibility
|
Flexible Stone">
Can be bent to fit curved surfaces
|
Completely rigid, will crack if bent
|
|
Installation
|
Flexible Stone">
Simple adhesive application, can be cut with a utility knife
|
Requires mortar, specialized saws, and often mechanical fixing
|
|
Impact Resistance
|
Flexible Stone">
High; absorbs impact due to its flexibility
|
Brittle; can chip or crack easily on impact
|
|
Environmental Impact
|
Flexible Stone">
Low-energy production, lightweight transport, made from natural soils
|
High-energy quarrying, heavy transport, generates significant waste
|
|
Application
|
Flexible Stone">
Interior/exterior walls, ceilings, columns, curved surfaces
|
Primarily flat surfaces; exterior use requires careful sealing
|
Chapter 2: Identifying Common Types of Damage
Even the most durable materials can show signs of wear and tear over time. The first step to a successful repair is accurately diagnosing the problem. By understanding what you're looking at, you can choose the right tools and techniques for the job. Let's go over the most common issues you might encounter with your Lunar Peak Black installation.
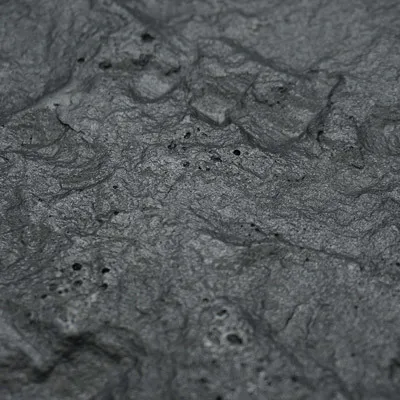
Surface Scratches and Abrasions
This is probably the most frequent type of minor damage, especially in high-traffic areas.
-
Causes:
These are typically caused by something sharp or rough being dragged across the surface. Think of a metal chair leg, the corner of a piece of furniture being moved, or even a bag with a metal buckle repeatedly brushing against a wall.
-
How to Spot Them:
Scratches can range from faint, silvery lines that are only visible in certain light to deeper gouges that remove a bit of the surface material and texture. Abrasions are wider, scuffed areas where the texture has been flattened or worn down. On the deep, dark surface of Lunar Peak Black, lighter-colored scratches can be particularly noticeable.
Stains and Discoloration
While MCM material is highly resistant to staining, it's not entirely impervious, especially if spills are not cleaned up promptly.
-
Causes:
Common culprits include oil or grease splatters in a kitchen backsplash application, spilled wine or coffee, or the use of harsh, acidic, or alkaline chemical cleaners that can react with the surface. In exterior applications, atmospheric pollutants or rust runoff from metal fixtures can also cause discoloration over time.
-
How to Spot Them:
Stains often appear as dark, soaked-in spots (for oils) or as faded, bleached, or discolored patches. You might see a yellowish or brownish tinge in some areas, which could indicate a chemical reaction.
Chips, Gouges, and Cracks
These are more significant forms of damage, usually resulting from direct, forceful impact.
-
Causes:
A heavy object falling against the wall, a sharp corner of a vacuum cleaner hitting a baseboard, or even structural shifts in the building can cause this type of damage. Improper installation where the substrate isn't perfectly flat can also create stress points that lead to cracking.
-
How to Spot Them:
A chip is a small piece of the material that has broken off, usually at a corner or edge. A gouge is a deeper indentation or scoop out of the surface. Cracks can be fine, hairline fractures that are hard to see, or larger, more obvious breaks that run through a portion of the panel.
Peeling or Delamination
This issue is almost always related to the bond between the flexible stone and the wall behind it.
-
Causes:
The primary cause is improper installation. This could mean the wall surface wasn't properly cleaned and primed, the wrong type of adhesive was used, or not enough adhesive was applied. Moisture seeping into the wall from behind can also compromise the adhesive bond, causing the panel to lift.
-
How to Spot Them:
You'll notice the edges of a panel starting to lift or curl away from the wall. In some cases, you might see a "bubble" or blister in the middle of a panel where it has detached from the substrate. Tapping on the surface might produce a hollow sound compared to the solid sound of well-adhered areas.
Pro Tip: Regular Inspection.
Once every six months, take a few minutes to closely inspect your flexible stone walls. Use a bright flashlight held at an angle to the wall to reveal any subtle scratches or texture changes. Run your hand over the surface to feel for any lifting edges or bubbles. Catching these issues early makes the repair process much simpler and more effective.
Chapter 3: The Art of Repair: A Step-by-Step Guide
Now for the main event! Armed with your diagnosis, it's time to become a repair artist. The beauty of MCM Flexible Stone is its forgiving nature. Most common damages can be fixed seamlessly, restoring your wall to its original glory. We'll cover everything from minor touch-ups to more involved fixes.
General Preparation: The Foundation for a Perfect Fix
No matter how small the repair, don't skip the prep work. A clean, prepared surface is the difference between a temporary patch and a permanent, invisible repair.
-
Safety First:
Always wear safety glasses to protect your eyes from dust or debris. For jobs involving sanding or adhesives, gloves and a dust mask are also recommended.
-
Gather Your Tools:
Before you start, make sure you have everything you need. A typical repair kit might include: soft cloths, a pH-neutral cleaner, a spray bottle with water, fine-grit sandpaper (400-600 grit), a utility knife, painter's tape, a small putty knife, and the specific repair materials for your job (which we'll detail below).
-
Clean the Area:
This is non-negotiable. Using a soft cloth and a solution of pH-neutral cleaner and water, thoroughly clean the damaged area and the surrounding surface. This removes any dust, oils, or grime that could interfere with the repair. Rinse with a clean, damp cloth and let it dry completely.
Technique 1: Fixing Minor Scratches and Scuffs
For those light, surface-level marks, the goal is to gently blend the scratch away without damaging the surrounding texture.
-
Step 1: Clean and Dry.
As mentioned above, start with a perfectly clean surface.
-
Step 2 (Optional - For Scuffs): Gentle Heat.
Sometimes, a minor scuff or abrasion is just a disturbance of the surface polymers. Using a heat gun on its lowest setting, gently warm the area from about 6-8 inches away, moving constantly. This can sometimes cause the surface to self-heal and the scuff to disappear. Be very careful not to overheat or scorch the material.
-
Step 3: Light Sanding.
If heat doesn't work or for a light scratch, take a small piece of 400-grit or 600-grit sandpaper. Wrap it around a small, soft block. Using very light pressure, sand *along the grain* of the scratch. The idea is to soften the edges of the scratch, not to sand the surface flat. Do a few gentle passes and then wipe away the dust to check your progress. Less is more here.
-
Step 4: Apply a Color-Matched Sealer.
After sanding, the area might look slightly dull. As part of our service as a
one-stop solution provider
, COLORIA GROUP can provide touch-up kits or sealants that are perfectly matched to your Lunar Peak Black. Apply a very thin layer of the sealer with a small artist's brush just over the repaired area. This will restore the deep black sheen and protect the spot. Feather the edges to blend it seamlessly.
Technique 2: Tackling Stains and Discoloration
The approach to stains depends on what caused them. Always test any cleaning agent on a small, inconspicuous area first.
-
For General Grime & Water-Based Stains (Coffee, Juice):
A simple solution of pH-neutral cleaner and warm water is usually all you need. Apply with a soft cloth, gently agitate the stained area, and rinse with a clean, damp cloth. Avoid scrubbing with abrasive pads.
-
For Oil-Based Stains (Grease, Cooking Oil):
These are tougher because they penetrate the surface. You'll need a specialized poultice. A poultice is a paste-like substance that you apply to the stain, and as it dries, it draws the oil out of the material. You can purchase commercial poultices designed for composite stone or make one by mixing a solvent (like acetone or a specialized degreaser) with an absorbent powder (like baking soda or diatomaceous earth) to form a thick paste.
-
Step 1:
Apply the poultice paste over the stain, about 1/4 inch thick, extending slightly beyond the stain's edges.
-
Step 2:
Cover the poultice with plastic wrap and tape down the edges. This slows the drying process, allowing the solvent to work longer.
-
Step 3:
Let it sit for 24-48 hours.
-
Step 4:
Remove the plastic and allow the poultice to dry completely. As it dries, it will pull the stain into itself.
-
Step 5:
Once bone dry, gently scrape off the powder with a plastic putty knife and wipe the area clean. You may need to repeat the process for very stubborn stains.
Technique 3: Repairing Chips, Gouges, and Cracks
This is where things get a bit more hands-on, but the results can be truly amazing. The key is a color-matched repair putty. COLORIA GROUP can supply a repair kit specifically for your Lunar Peak Black, which will include the base putty and color pigments to achieve a perfect match.
-
Step 1: Prepare the Damage.
Use the tip of a utility knife to carefully clean out any loose debris from inside the chip or crack. If it's a tight crack, you may need to slightly widen it into a "V" shape to give the filler a good surface to adhere to. Clean the area thoroughly with an alcohol wipe to ensure it's free of dust and oils.
-
Step 2: Mix the Repair Putty.
Follow the instructions on your repair kit. Typically, you'll mix the putty base with a hardener and a small amount of color pigment. Mix it on a scrap piece of cardboard or plastic. Add the pigment gradually until you have a perfect match to your stone. Mix thoroughly.
-
Step 3: Fill the Damage.
Using a small, flexible putty knife or even a razor blade, press the filler firmly into the chip or crack. Overfill it slightly, as the material may shrink a bit as it cures.
-
Step 4: Level the Surface.
Scrape the putty knife flat across the surface to remove the excess filler, leaving the filled area flush with the surrounding stone.
-
Step 5: Recreate the Texture.
This is the secret to an invisible repair. While the putty is still pliable, you need to mimic the texture of the Lunar Peak Black. You can do this by dabbing it gently with a coarse sponge, a stiff brush, or even a spare piece of the flexible stone itself (if you have one). The goal is to break up the smooth surface of the filler and make it match the slightly rough, stony texture around it.
-
Step 6: Cure and Clean.
Allow the filler to cure completely, as per the manufacturer's instructions (usually a few hours). Once cured, you can very lightly sand the edges with 600-grit sandpaper if needed to blend it perfectly. Wipe away any final residue.
Chapter 4: When to replace: A Full Panel Replacement Guide
While repairs are effective for most issues, there are times when replacing a full panel is the better long-term solution. This might be the case if a panel has a very large, complex crack, is shattered from a major impact, or has extensive delamination that makes re-adhering it impractical. The good news is that replacing a single panel of flexible stone is far easier than replacing a slab of granite or a section of ceramic tile.
This is another area where partnering with a company like COLORIA GROUP pays off. We maintain detailed records of our product batches, ensuring that a replacement panel will have the same color, shade, and texture as your original installation. This is crucial for a seamless look, especially in large-scale projects that might also feature complementary products from our
MCM Project Board Series
. Consistency across product lines is key to a professional finish.
Step-by-Step Removal of the Damaged Panel
-
Step 1: Isolate the Panel.
Using a sharp utility knife with a fresh blade, carefully cut along the grout lines or seams on all four sides of the damaged panel. Cut deep enough to go all the way through the grout and any backing material, completely separating it from its neighbors.
-
Step 2: Apply Heat.
The adhesive holding the panel is strong, and heat is your best friend for loosening its grip. Use a heat gun on a medium setting. Start in one corner and gently heat the surface of the panel. Keep the gun moving in a circular motion to distribute the heat evenly and prevent scorching. You'll feel the panel become more pliable.
-
Step 3: Pry and Peel.
Once a corner is sufficiently warmed, slide a stiff putty knife or a small pry bar into the seam and gently begin to lift the panel away from the wall. As it starts to peel, continue applying heat just ahead of where you're peeling. Work slowly and methodically. The panel should peel off in one piece.
-
Step 4: Prepare the Substrate.
This is the most critical step for a successful new installation. The wall surface where the old panel was must be perfectly clean and flat. Use a wide scraper or putty knife to remove all of the old adhesive. You may need to sand the area to get it completely smooth. Once all the old adhesive is gone, wipe the wall down with a damp cloth to remove all dust and let it dry completely.
Step-by-Step Installation of the New Panel
-
Step 1: Dry Fit the New Panel.
Before you even think about adhesive, place the new Lunar Peak Black panel into the empty space. It should fit perfectly with a consistent gap for grout on all sides. If it's a little tight, you can easily trim the edge with a utility knife or a pair of heavy-duty shears.
-
Step 2: Apply the Adhesive.
Using a V-notch trowel, apply the recommended MCM adhesive to the back of the new panel or directly onto the prepared wall surface. Apply a consistent, even layer, combing it with the trowel to create ridges. This ensures 100% coverage and a strong bond.
-
Step 3: Set the Panel.
Carefully place the new panel into position. Start by aligning one edge and then press it firmly onto the wall, working from the center out towards the edges.
-
Step 4: Ensure Full Contact.
Use a rubber J-roller or a clean, soft block of wood to apply firm pressure across the entire surface of the panel. Roll from the center to the edges to push out any trapped air bubbles. A solid, void-free bond is essential for long-term durability.
-
Step 5: Clean Up.
Immediately wipe away any adhesive that may have squeezed out from the edges or onto the face of the panel, using a damp cloth. It's much easier to clean when it's wet.
-
Step 6: Grout the Seams.
Wait for the adhesive to cure according to the manufacturer's directions (typically 24 hours). Then, using a color-matched pointing agent or grout, fill the seams around the new panel. Tool the grout joint for a clean, professional finish and clean up any excess.
A Final Word on Replacement:
While this process is straightforward, if you're not comfortable undertaking it yourself, a local tiling professional or general contractor will find it very easy to do. The process is much simpler and less messy than any other form of masonry or tile replacement.

Conclusion: Enduring Beauty, Made Simple
Your space is a reflection of your taste, and a feature wall of Lunar Peak Black Flexible Stone is a bold, beautiful statement. Its deep texture and cosmic color bring a unique energy to any room or facade. As we've seen, its beauty is more than skin deep. This is a material engineered for the real world—a world of accidental bumps, spills, and the passage of time.
The true value of an advanced material like our
MCM Flexible Stone
lies not only in its initial impact but in its longevity and serviceability. Knowing that you can easily repair a scratch, remove a stain, or even replace a panel without a major overhaul provides incredible peace of mind. It transforms your design feature from a fragile piece of art into a durable, living part of your home or building.
At COLORIA GROUP, our commitment is to provide more than just innovative products. We strive to be your partner through every stage of your project's life, from initial design to long-term maintenance. By empowering you with the knowledge to care for your investment, we hope to ensure that the stunning beauty of your Lunar Peak Black installation endures for many, many years to come.


