Hey there, design enthusiasts and renovation warriors! Ever gazed upon a wall and thought, "Wow, that rust mosaic stone look just pops!"? Well, you're not alone. This unique aesthetic, with its earthy tones and textured feel, is becoming a superstar in modern architectural design. It brings a touch of nature's rugged beauty indoors or adds a spectacular facade to any exterior. But how do you achieve that stunning finish, especially when you want something durable, flexible, and sustainable? That's where we, COLORIA GROUP, step in, offering innovative materials that make these dreams a tangible reality.
We're talking about the magic of
MCM Flexible Stone
. This isn't your grandma's heavy, brittle stone tile. Instead, it's a game-changer that allows you to capture the authentic look and feel of natural stone, including that coveted rust mosaic vibe, without all the traditional headaches. Whether you're a seasoned contractor juggling multiple
residential and commercial projects
or a passionate DIYer looking to spruce up your living space, this guide is packed with everything you need to know to get that rust mosaic stone look flawlessly installed.
At COLORIA GROUP, we pride ourselves on being a true
one-stop solution provider
for all your building material needs. Our decades of experience, especially with our strong presence in places like Saudi Arabia, mean we understand the nuances of various climates and design preferences. Our commitment to innovation, particularly with our
MCM series products
, ensures you're always getting top-tier materials that are not just beautiful, but also perform exceptionally. We're all about giving you the tools and knowledge to achieve professional-grade results, every single time.
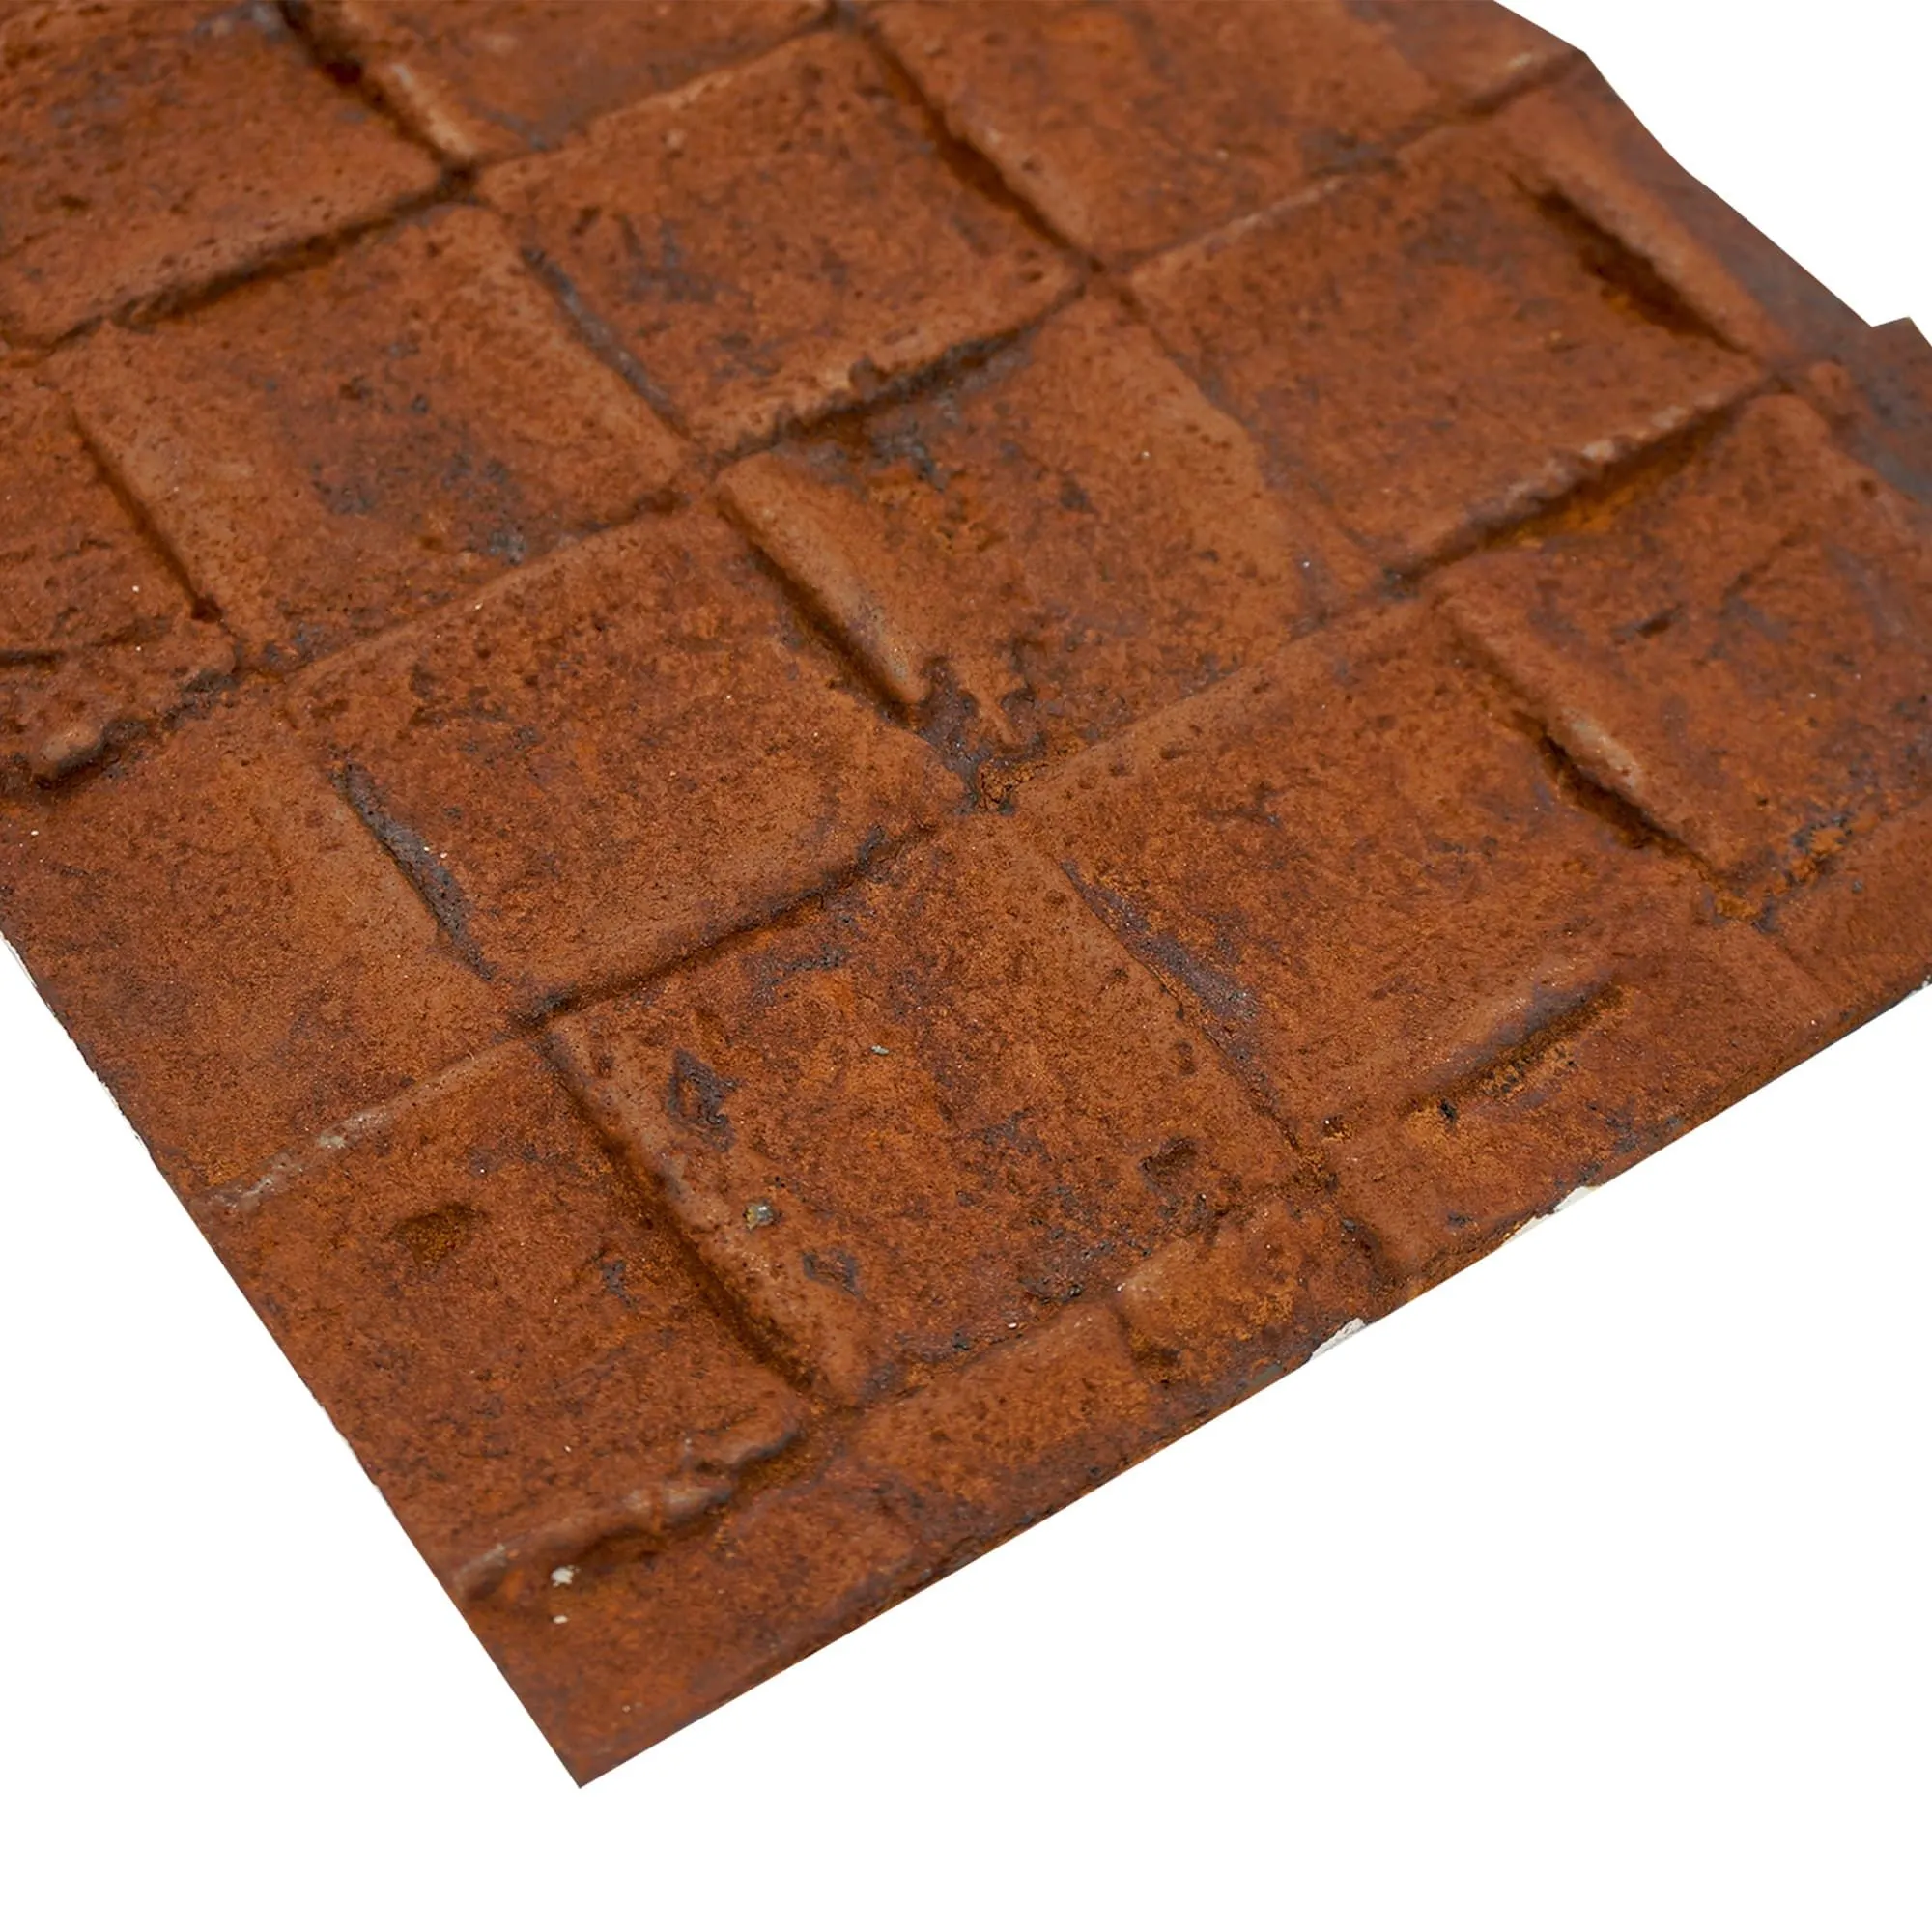
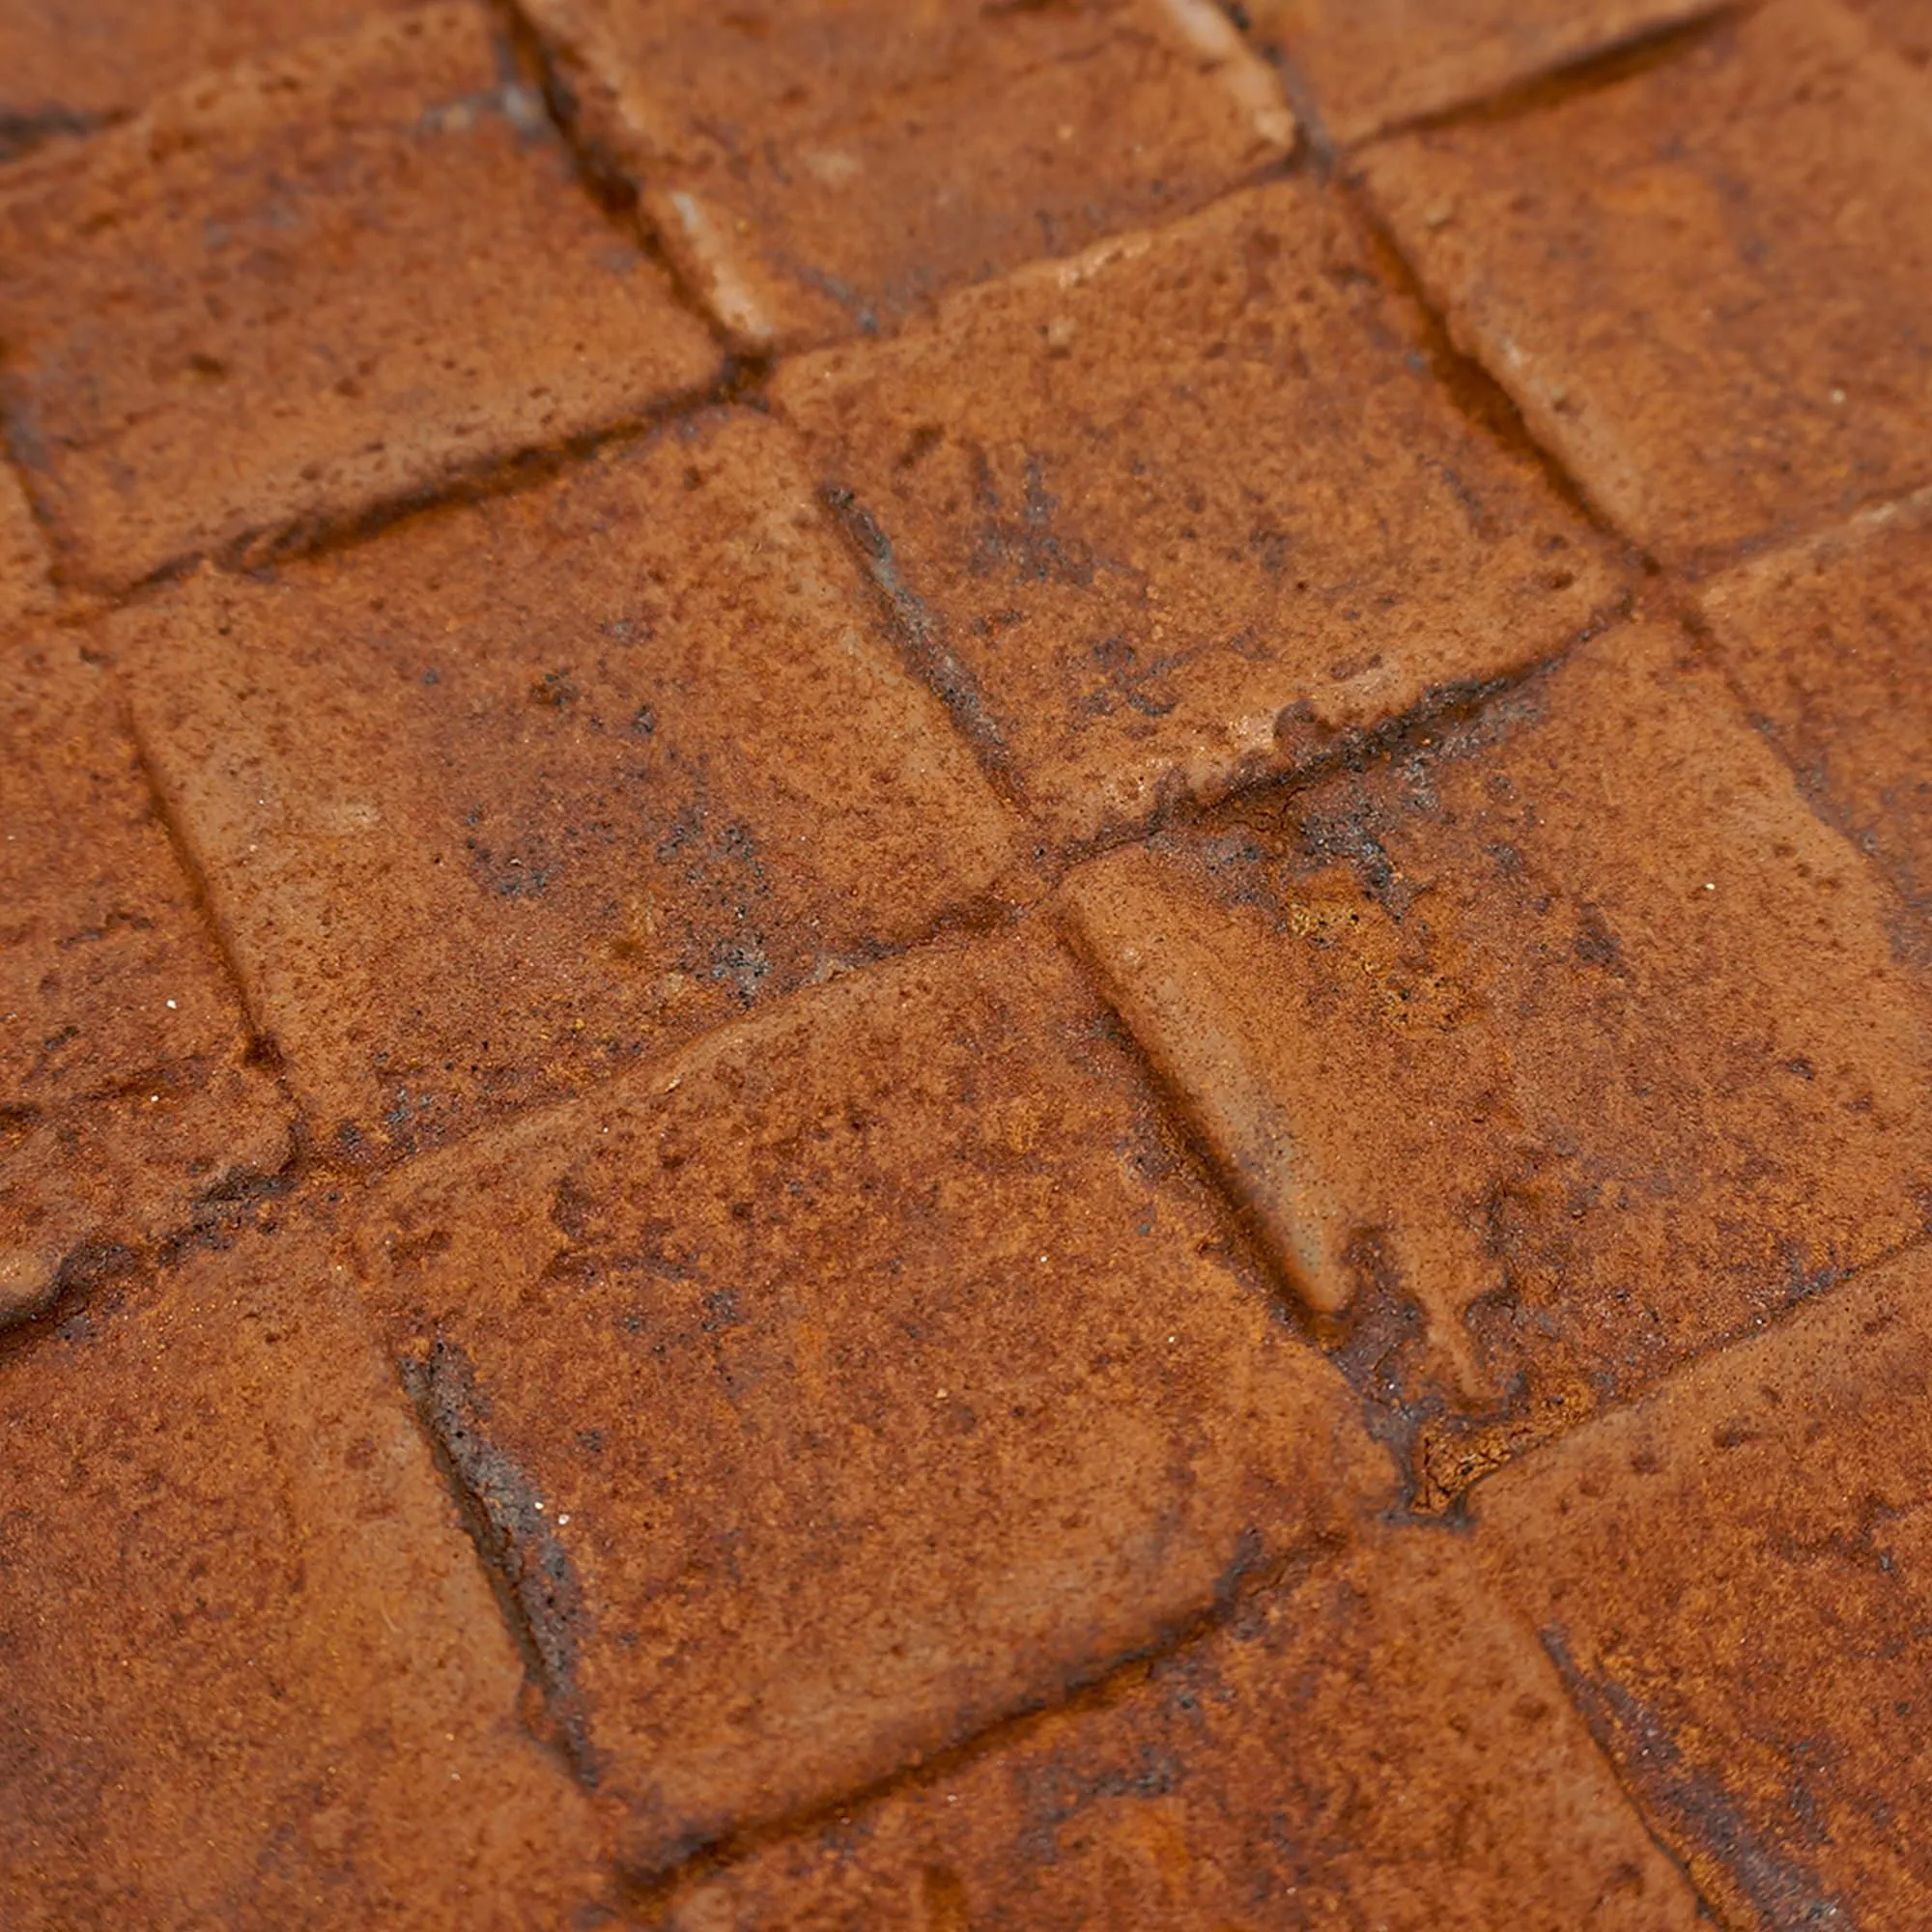
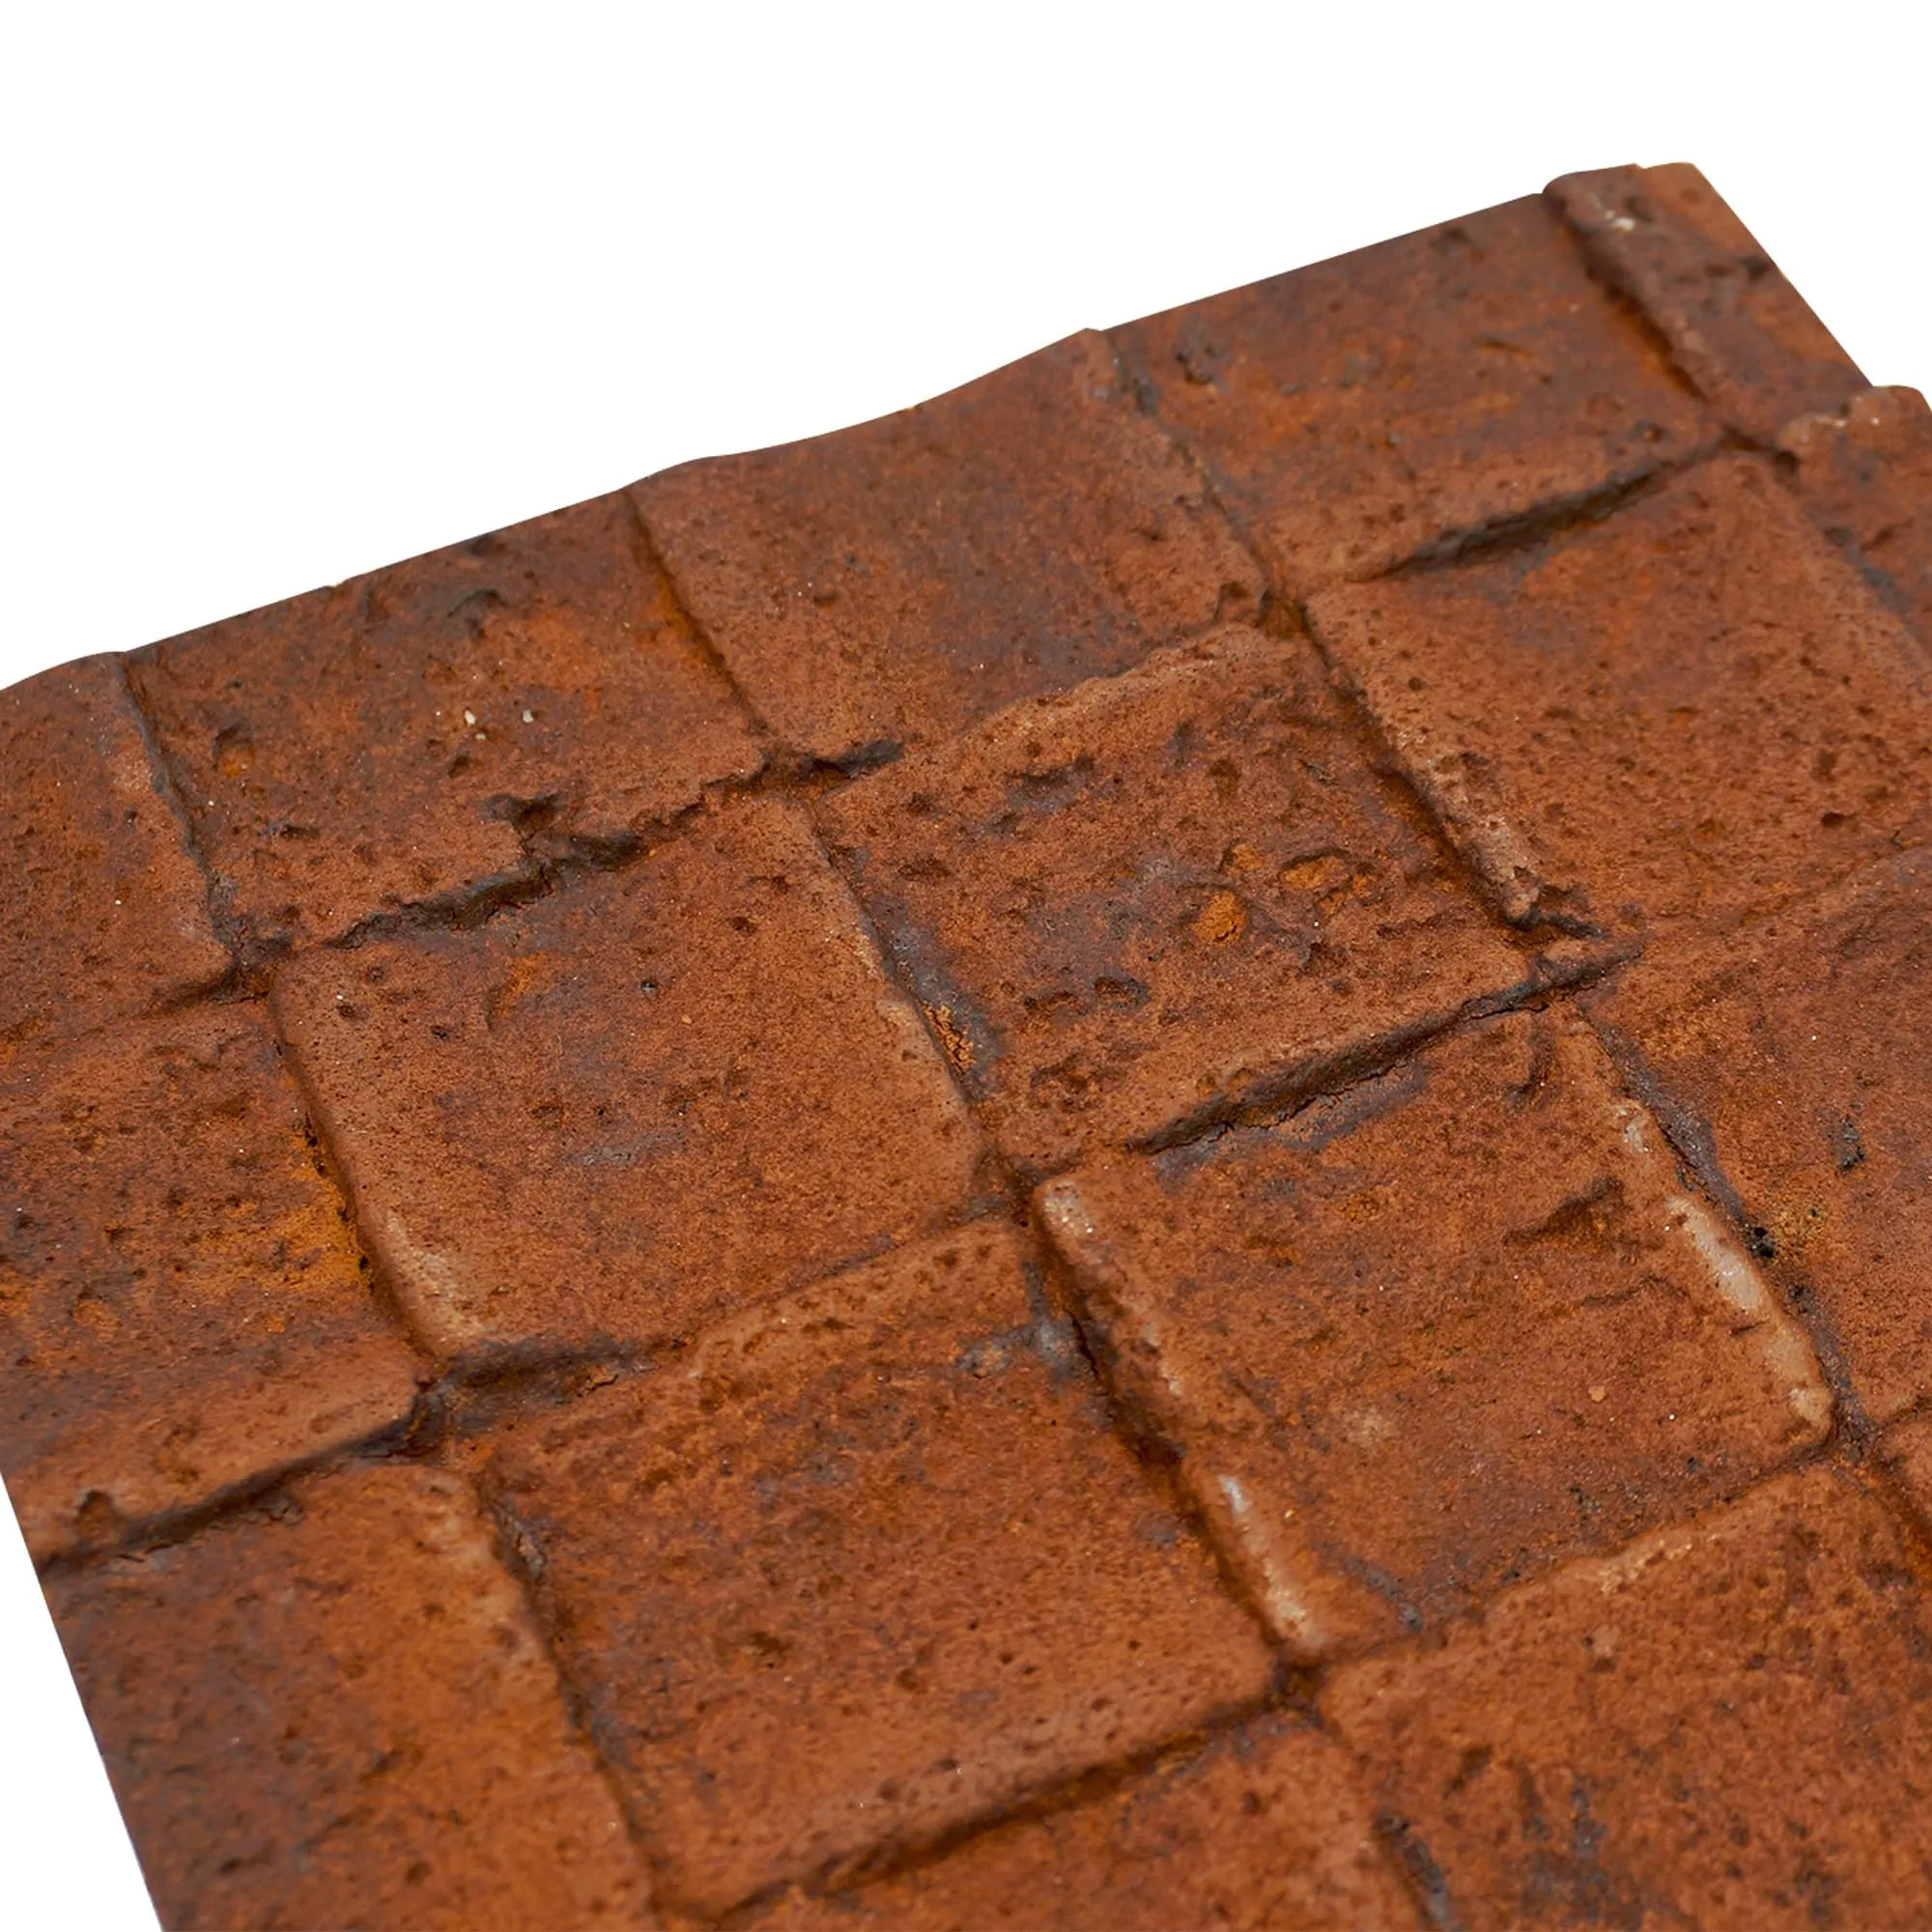
Before we dive into the nitty-gritty of installation, let's clarify what we mean by "Rust Mosaic Stone" in the context of COLORIA GROUP's offerings. When we talk about achieving this look, we're primarily referring to our MCM Flexible Stone products. These aren't just pretty faces; they're engineered wonders. Modified Cementitious Material (MCM) is a revolutionary blend of inorganic raw materials, like clay, sand, and minerals, modified and reshaped through an innovative process. The result? A material that's incredibly lightweight, flexible, and boasts the authentic textures and colors of natural materials, including various stone and wood finishes.
The "rust" aspect of Rust Mosaic Stone isn't about using actual rusty metal (though that's a cool aesthetic too!). Instead, it refers to the rich, earthy color palette – think deep reds, oranges, browns, and even hints of dark grey – that mimic naturally oxidized iron or weathered stone. When arranged in a mosaic pattern, this creates a visually striking, organic, and incredibly versatile surface. Our MCM Flexible Stone can replicate these hues and textures with stunning accuracy, offering unparalleled durability and ease of application compared to traditional stone.
Why Choose MCM Flexible Stone for Your Rust Mosaic Look?
You might be thinking, "Why go with MCM when I could just use real stone?" Great question! Here's why our
MCM Flexible Stone
is often the superior choice, especially for the rust mosaic aesthetic:
-
Flexibility and Lightweight:
Unlike rigid stone, MCM Flexible Stone can bend and contour to surfaces, making installation on curved walls or complex designs a breeze. Its lightweight nature also significantly reduces structural load and shipping costs.
-
Durability:
Don't let its flexibility fool you. MCM is incredibly tough, resistant to UV, weathering, freeze-thaw cycles, and fire. It's built to last, making it perfect for both interior and exterior applications.
-
Eco-Friendly:
This is a big one for us at COLORIA GROUP. Our
MCM series products
are made from natural, non-toxic materials and produced with minimal energy consumption and waste. They're part of our commitment to offering
green and eco-friendly
building solutions, helping you achieve stunning designs without compromising the planet.
-
Customization:
We understand that every project is unique. Our MCM products offer incredible
customization
options in terms of color, texture, and size, allowing you to perfectly match your vision for that ideal rust mosaic look.
-
Ease of Installation:
This is where MCM truly shines, especially for DIY enthusiasts. Its lightweight and flexible nature, combined with straightforward application methods, significantly cuts down on labor time and complexity.
Pre-Installation Checklist: The Foundation of Success
Alright, let's get down to business. Before you even think about grabbing an adhesive, proper preparation is non-negotiable. Skipping steps here is a surefire way to run into problems later. Think of it as laying the groundwork for a masterpiece. This applies whether you're tackling a small accent wall or a massive commercial facade.
1. Site Assessment & Planning
Every great project starts with a solid plan. Walk the space, visualize the finished look, and consider all the practicalities.
-
Surface Analysis:
Is the wall or surface you're working on structurally sound? Is it flat, clean, dry, and free of dust, grease, or loose debris? This is crucial. For exterior applications, consider exposure to sun, rain, and wind.
-
Measurement:
Accurately measure the total area where the MCM Flexible Stone will be applied. Factor in corners, windows, doors, and any other architectural features. It's always smart to order about 10-15% extra material to account for cuts, potential mistakes, and future repairs. Trust us, it saves a lot of hassle!
-
Design Layout:
For a mosaic look, it's wise to do a dry layout on the floor or a large flat surface before applying to the wall. This allows you to play with different arrangements, ensuring a balanced and aesthetically pleasing rust mosaic pattern. Mix tiles from different boxes to ensure color consistency, as slight variations can occur between batches.
-
Environmental Conditions:
Pay attention to temperature and humidity. Most adhesives perform best within a specific temperature range (typically 5°C to 35°C or 40°F to 95°F). Extreme conditions can affect curing times and adhesion strength.
2. Gathering Your Tools and Materials
Having the right tools makes all the difference. It speeds up the process and ensures a cleaner, more professional finish. Here's a comprehensive list of what you'll likely need:
|
Category
|
Item
|
Description/Purpose
|
|
MCM Materials
|
COLORIA GROUP MCM Flexible Stone (Rust Mosaic finish)
|
Your primary material, ensure you have enough with extra for waste.
|
|
|
MCM Adhesive (recommended by COLORIA GROUP)
|
Crucial for strong, lasting adhesion. Always use the manufacturer-recommended product.
|
|
|
Primer (if recommended for your substrate)
|
Improves adhesion on certain surfaces.
|
|
Cutting Tools
|
Utility Knife / Box Cutter
|
For straightforward, clean cuts on MCM Flexible Stone. Keep blades sharp!
|
|
|
Straight Edge / Ruler
|
To ensure straight cuts.
|
|
|
Measuring Tape
|
For accurate measurements.
|
|
Application Tools
|
Notched Trowel
|
For spreading adhesive evenly. The notch size depends on the specific adhesive and MCM product.
|
|
|
Rubber Mallet (optional, but helpful)
|
Gently tap tiles into place to ensure full contact and remove air pockets.
|
|
|
J-Roller / Pressure Roller
|
To apply uniform pressure across the entire surface of the MCM tile after placement.
|
|
|
Level & Plumb Line
|
Ensuring your first few tiles are perfectly straight is vital for the entire installation.
|
|
|
Spacers (if required for uniform gaps)
|
Some mosaic patterns benefit from consistent spacing.
|
|
Cleaning & Finishing
|
Damp Sponges / Rags
|
For wiping away excess adhesive immediately.
|
|
|
Clean Water Buckets
|
For rinsing sponges and tools.
|
|
|
Grout (if applicable/desired)
|
For filling gaps between mosaic pieces, enhancing the look and protecting joints.
|
|
|
Grout Float
|
For applying and spreading grout.
|
|
|
Sealer (optional, but recommended for some applications)
|
For added protection against moisture and stains, especially in high-traffic or wet areas.
|
|
Safety Gear
|
Safety Glasses
|
Protect your eyes from debris, adhesive splashes.
|
|
|
Gloves
|
Protect your hands from adhesive and rough edges.
|
|
|
Dust Mask (if cutting extensively)
|
Though MCM produces less dust than traditional stone, it's good practice.
|
Safety First!
Always wear appropriate personal protective equipment (PPE) like safety glasses and gloves. Ensure good ventilation when working with adhesives. Read and follow all instructions on adhesive and primer product labels.
3. Surface Preparation: The Unsung Hero
This step cannot be overemphasized. A well-prepared surface is the secret to a long-lasting, beautiful installation.
-
Cleanliness is Key:
Thoroughly clean the surface. Remove any dust, dirt, grease, oil, paint chips, or loose particles. A damp cloth might suffice for light dust, but for stubborn grime, a degreaser or mild detergent followed by a rinse and dry might be needed.
-
Smooth and Flat:
The surface should be as smooth and flat as possible. Fill any cracks or holes with appropriate patching compound. Sand down any high spots. While MCM Flexible Stone can accommodate minor imperfections, significant unevenness will telegraph through the tiles and compromise adhesion.
-
Dryness:
Ensure the surface is completely dry before proceeding. Moisture can interfere with adhesive bonding.
-
Priming (if necessary):
Depending on your substrate (e.g., highly porous concrete, drywall, certain painted surfaces), a primer might be recommended or even required. Always check the adhesive manufacturer's guidelines and conduct a small test patch if unsure. Priming can create a more uniform, stable surface for the adhesive to bond to.
The Installation Process: Step-by-Step for that Perfect Rust Mosaic
With your planning complete and tools ready, it's time for the exciting part! This section will walk you through the application of your COLORIA GROUP
MCM Flexible Stone
to create that stunning rust mosaic effect. Remember, patience and precision are your best friends here.
Step 1: Layout and Starting Point
-
Marking Guidelines:
Using your level and plumb line, mark your starting point. For most wall installations, it's best to start from the center of the wall and work outwards, or from a prominent corner if it's an entire room. This helps ensure symmetry and minimizes awkward cuts at visible edges. Use a chalk line or pencil to draw horizontal and vertical guidelines.
-
Dry Run (Highly Recommended):
Even if you did a dry layout earlier, position a few tiles on your marked surface without adhesive to double-check your spacing and pattern. This is especially critical for intricate mosaic designs. Adjust as needed before committing.
Step 2: Applying the Adhesive
-
Mix Adhesive:
If your adhesive requires mixing, follow the manufacturer's instructions precisely. Consistency is key for proper application.
-
Trowel Application:
Using a notched trowel, spread a thin, even layer of adhesive onto the back of the MCM Flexible Stone tile (back-buttering) or directly onto the substrate. For smaller, individual mosaic pieces, back-buttering each piece is usually more effective. Ensure about 80-90% coverage for optimal bonding. Avoid applying too much adhesive at once, especially on large areas, as it can skin over before you place the tiles.
-
Even Coverage:
The notches in your trowel will help create ridges of adhesive, which flatten out when the tile is pressed, ensuring full contact and minimal air pockets.
Pro Tip:
Don't apply adhesive to too large an area at once. Work in sections that you can comfortably cover with tiles within the adhesive's open time (the period before it starts to skin over and lose its stickiness). This might be 10-20 minutes, depending on the product and environmental conditions.
-
Positioning:
Carefully place the first piece of MCM Flexible Stone onto your marked starting point. Align it perfectly with your guidelines.
-
Press and Secure:
Firmly press the tile into the adhesive. You can use your hands, a rubber mallet for gentle tapping, or a J-roller to ensure full contact and expel any trapped air bubbles. Roll or press from the center outwards.
-
Spacers (if used):
If your design calls for uniform gaps between mosaic pieces, insert spacers immediately after placing each tile.
-
Wipe Away Excess:
Immediately wipe away any excess adhesive that squeezes out from the edges with a damp sponge or cloth. Once cured, it's much harder to remove.
-
Continuity:
Continue placing tiles, working methodically and consistently. Periodically check your alignment with a level and adjust as needed before the adhesive sets. Remember to mix tiles from different boxes to maintain a natural, varied rust mosaic look, avoiding obvious patterns or color blocks.
One of the major advantages of
MCM Flexible Stone
is its ease of cutting. No need for heavy, noisy wet saws like with traditional stone!
-
Measure and Mark:
Accurately measure the area where a cut piece is needed and mark the MCM tile with a pencil.
-
Straight Cuts:
For straight lines, use a sharp utility knife and a straight edge (ruler or T-square). Score the surface firmly, then bend the tile along the score line to snap it cleanly. You might need multiple scores for thicker pieces.
-
Irregular Cuts/Curves:
For more intricate cuts or curves (common in mosaic patterns or around obstacles), you can score and snap smaller sections, or even use heavy-duty scissors or snips for very thin materials. Some professionals use a jigsaw with a fine blade for precision, though this generates more dust.
-
Edge Finishing:
The cut edges of MCM Flexible Stone generally look clean, but you can lightly sand them if desired for a smoother finish.
Step 5: Grouting (Optional for Mosaic Look)
For a true mosaic appearance with distinct individual pieces, grouting is often desired. If you're going for a seamless look, you might skip this or use a very thin, color-matched sealant in the joints.
-
Wait for Cure:
Allow the adhesive to fully cure before grouting. This usually takes 24-48 hours, but always check the adhesive manufacturer's instructions.
-
Mix Grout:
Prepare your grout according to the product's instructions. Ensure it has a consistent, workable consistency. Choose a grout color that complements your rust mosaic tones – often a dark brown, charcoal, or even a deep terracotta can work wonders.
-
Apply Grout:
Using a rubber grout float, spread the grout diagonally across the surface of the tiles, pushing it firmly into the gaps. Work in small sections.
-
Remove Excess:
Once an area is grouted, remove as much excess grout from the tile surface as possible with the edge of your float, holding it at a 45-degree angle.
-
Clean Haze:
After the grout has partially set (usually 15-30 minutes, forming a haze), use a damp (not soaking wet) sponge to gently wipe off the grout haze from the tile surfaces. Rinse your sponge frequently in clean water. Be careful not to pull grout out of the joints.
-
Final Buff:
Once the grout is fully dry and cured (check manufacturer's times), you can buff the tiles with a clean, dry cloth to remove any lingering haze and shine them up.
Step 6: Sealing (Recommended for Longevity)
While
MCM Flexible Stone
is highly durable, applying a good quality sealer can offer additional protection, especially in high-traffic areas, kitchens, bathrooms, or exterior applications. It can help protect against stains, moisture, and UV degradation.
-
Grout Cure:
If you grouted, ensure the grout is fully cured before sealing (often 48-72 hours, or as per grout instructions).
-
Apply Sealer:
Apply the sealer according to the product's instructions, typically with a brush, roller, or sprayer. Some sealers require multiple coats.
-
Ventilation:
Ensure good ventilation during application and drying, as sealers can have strong fumes.
Post-Installation Care and Maintenance
You've put in the hard work, now let's make sure your beautiful rust mosaic stone surface lasts for years to come! The good news is that
MCM series products
are generally low maintenance, which is another feather in their cap for both
residential and commercial projects
.
Initial Curing
After installation, give the adhesive and grout (if used) ample time to fully cure. This is often stated on the product packaging, but typically ranges from a few days to a week. During this time, avoid heavy impact, scrubbing, or exposure to harsh conditions.
Routine Cleaning
-
Interior:
For interior walls, a simple wipe-down with a damp cloth is usually sufficient to remove dust and light grime. For tougher spots, a mild, non-abrasive detergent diluted in water can be used. Always rinse with clean water afterwards and dry with a soft cloth to prevent water spots.
-
Exterior:
Exterior MCM surfaces can be cleaned with a hose (low to medium pressure) and a soft brush if needed. For stubborn dirt, a mild pressure washer can be used cautiously, always keeping a safe distance and using a wide fan nozzle to avoid damaging the surface or grout. Again, a mild detergent can be used for deep cleaning.
-
Avoid Harsh Chemicals:
Steer clear of abrasive cleaners, strong acids, bleaches, or solvents, as these can damage the MCM material or its sealer.
Inspections and Repairs
Periodically inspect your MCM Flexible Stone surface for any signs of wear, damage, or loose tiles. While incredibly durable, accidents can happen. If a tile becomes loose or damaged, it can often be carefully removed and replaced with a new one using the same adhesive. This is another area where having that extra 10-15% material comes in handy!
Re-sealing (if applicable)
If you applied a sealer, its lifespan depends on the product, exposure, and wear. Check the sealer manufacturer's recommendations for reapplication intervals, which could range from every few years to much longer. Regular re-sealing helps maintain the material's protective properties and appearance.
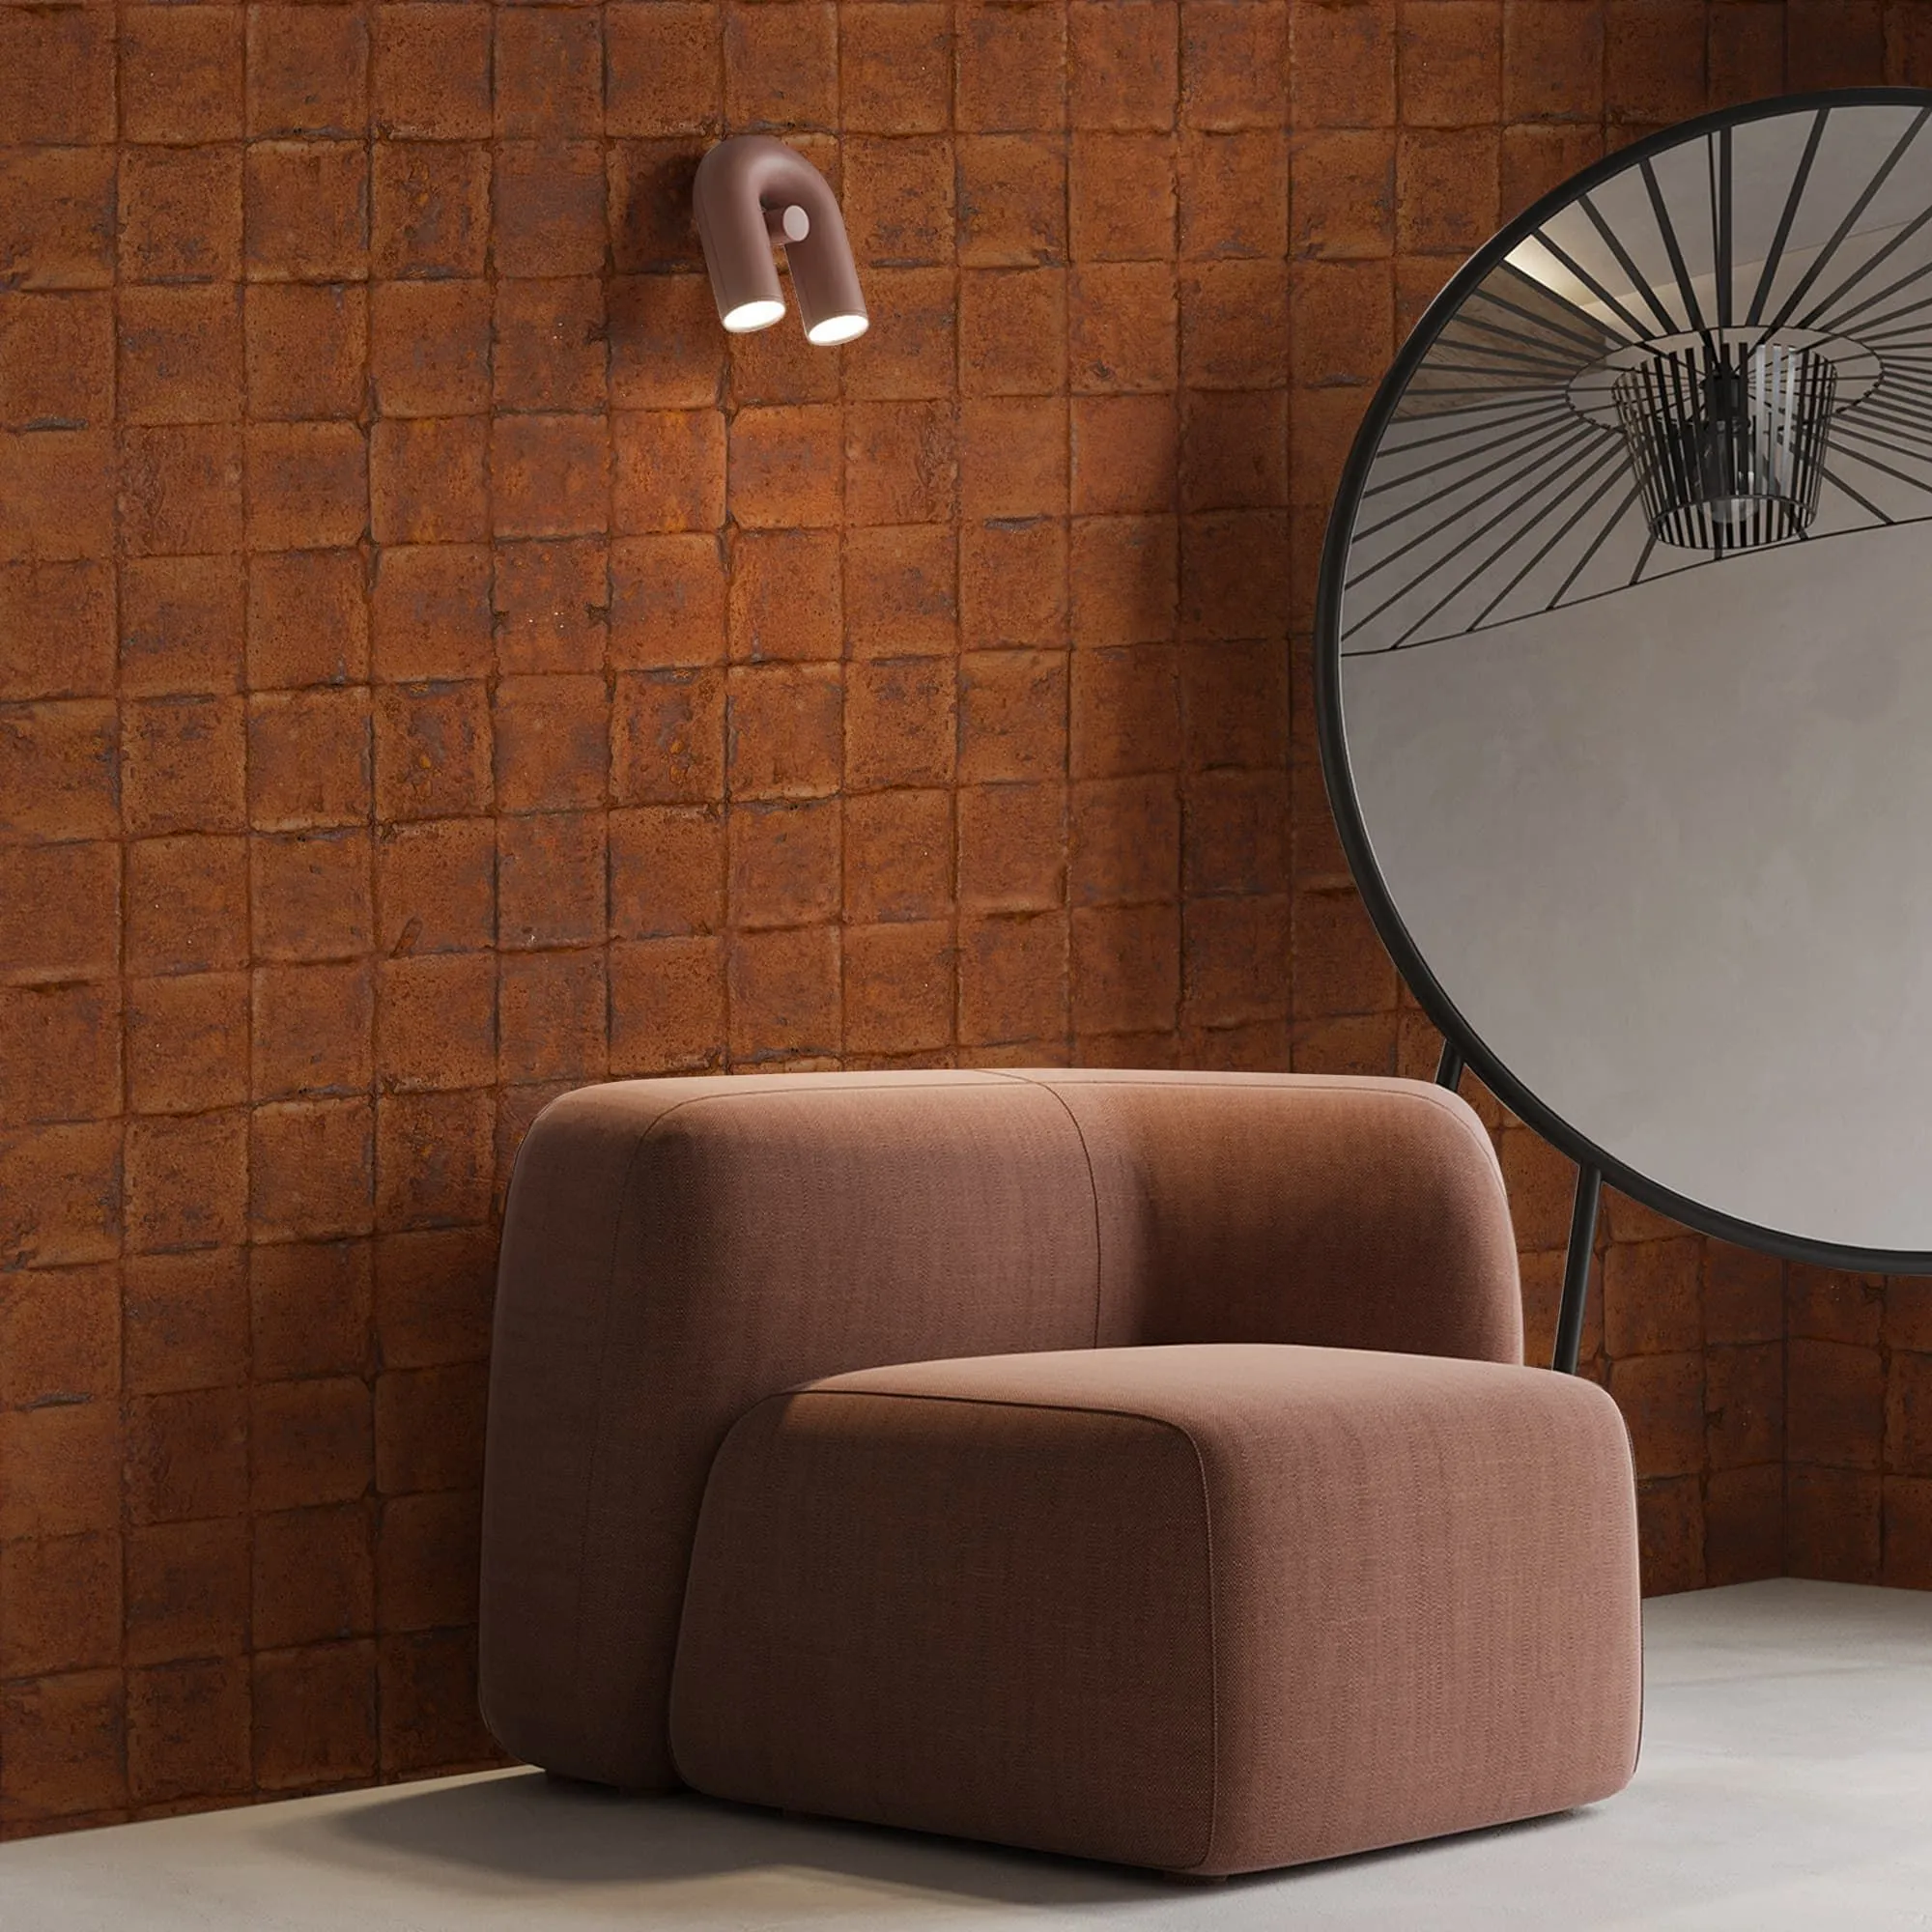
Design Considerations and Creative Ideas for Your Rust Mosaic
The beauty of
MCM Flexible Stone
from COLORIA GROUP, especially in a rust mosaic pattern, lies in its versatility. It's not just about covering a wall; it's about making a statement, crafting an ambiance, and truly bringing a design vision to life. Our dedication to
customization
means you have endless possibilities.
-
Feature Walls:
Create a stunning focal point in a living room, bedroom, or dining area. The rust tones add warmth and character.
-
Fireplace Surrounds:
Elevate your fireplace from ordinary to extraordinary. The fire-resistant properties of MCM make it an ideal choice.
-
Kitchen Backsplashes:
A rust mosaic backsplash can add an unexpected industrial-chic or rustic charm to your kitchen. Just ensure proper sealing for easy cleaning.
-
Bathroom Accents:
Use it in showers (with proper waterproofing and sealing), around vanity mirrors, or as a feature strip to add spa-like texture.
-
Exterior Facades:
Give your home or commercial building a robust, natural, and timeless look. MCM's weather resistance makes it perfect for outdoor use.
-
Column Wraps & Pillars:
Transform plain columns into architectural features. The flexibility of MCM is a huge advantage here.
-
Commercial Spaces:
Hotels, restaurants, retail stores – the rust mosaic look can create a memorable, upscale, or industrial aesthetic that truly sets a brand apart.
Pairing and Contrast
Rust mosaic stone, with its inherent textural depth and earthy colors, pairs beautifully with a range of other materials and palettes:
-
Wood:
The natural warmth of wood (light or dark) is a classic companion, enhancing the organic feel.
-
Metal:
Black metals, brushed steel, or even actual rusted metals (if you dare!) can accentuate the industrial side of the rust mosaic.
-
Glass:
Clear or frosted glass elements can provide a modern contrast, allowing the texture of the stone to shine.
-
Light Colors:
Balance the rich rust tones with crisp whites, creams, or light greys on adjacent walls or furnishings to prevent the space from feeling too dark or heavy.
-
Greenery:
Bring in plants! The natural vibrancy of green foliage offers a refreshing contrast to the earthy rust tones.
Troubleshooting Common Installation Issues
Even with the best preparation, sometimes little hiccups occur. Knowing how to handle them can save you time and frustration. As your
one-stop solution provider
, COLORIA GROUP wants to equip you with answers.
1. Tiles Not Sticking or Lifting
-
Problem:
Tiles detach or corners lift shortly after application.
-
Solution:
-
Insufficient Adhesive:
Ensure adequate back-buttering (80-90% coverage) and firm pressure during placement.
-
Surface Issues:
Re-check if the substrate was clean, dry, and free of contaminants. If not, the adhesive can't bond properly.
-
Adhesive Skinning:
You might be working too slowly, allowing the adhesive to skin over before the tile is placed. Work in smaller sections.
-
Temperature/Humidity:
Extreme temperatures can affect curing. Ensure conditions are within the adhesive's recommended range.
2. Uneven Grout Lines or Grout Haze
-
Problem:
Grout lines are inconsistent, or a persistent haze remains on the tiles.
-
Solution:
-
Uneven Gaps:
Use consistent spacers during installation if uniform gaps are desired.
-
Improper Grout Application:
Ensure you're pushing grout firmly into joints and removing excess thoroughly with the float.
-
Grout Haze:
Wipe with a damp sponge only after the grout has partially set (not too wet, not too dry). Rinse sponge frequently. For dried haze, special grout haze removers are available, but always test on an inconspicuous area first.
3. Visible Seams or Poor Cuts
-
Problem:
Cut edges are ragged, or seams between tiles are too obvious.
-
Solution:
-
Sharp Blades:
Always use a fresh, sharp utility knife blade for clean cuts.
-
Precise Measuring:
Double-check measurements before cutting. "Measure twice, cut once" is the golden rule.
-
Layout Planning:
Strategic placement of cuts in less visible areas can help.
4. Color Variation Appears Unnatural
-
Problem:
The rust mosaic color looks blocky or uniform, rather than naturally varied.
-
Solution:
-
Mix from Different Boxes:
This is crucial. Always pull tiles from several different boxes simultaneously during installation to blend any subtle color variations and create a more organic, natural-looking rust mosaic pattern.
-
Dry Layout:
Conducting a dry layout before adhesion allows you to arrange tiles for optimal color distribution.
The COLORIA GROUP Difference: More Than Just Materials
At COLORIA GROUP, we understand that constructing or renovating a space is more than just stacking materials. It's about vision, quality, and achieving a lasting impact. That's why we don't just sell products; we offer comprehensive support as a dedicated
one-stop solution provider
.
Our expertise spans decades, and our global footprint, including our significant operations in Saudi Arabia, allows us to bring world-class innovation to your doorstep. We are deeply invested in the future of construction, which is why our entire
MCM series products
lineup, from the large format MCM Big Slab Board Series to our intricate MCM 3D Printing Series, is designed with sustainability at its core. When you choose COLORIA GROUP, you're choosing materials that are not just beautiful and durable, but also
green and eco-friendly
.
We believe in empowering our clients, whether they are large-scale contractors managing ambitious
residential and commercial projects
or individual homeowners embarking on a personal renovation. Our commitment to
customization
means that your unique design aspirations can always find a perfect match within our product range. The rust mosaic stone aesthetic, achievable through our versatile
MCM Flexible Stone
, is just one example of how we help bring distinct character to any space.
Need more guidance?
Don't hesitate to reach out to the COLORIA GROUP team. Our experts are always ready to provide detailed technical support, product recommendations, and installation advice for your specific project. We're here to ensure your success, from conceptualization to the final, stunning reveal!
Final Thoughts: Embrace the Beauty of Rust Mosaic
The allure of rust mosaic stone is undeniable – it speaks to authenticity, natural elegance, and a touch of rugged sophistication. With COLORIA GROUP's
MCM Flexible Stone
, achieving this look is no longer a complex, labor-intensive, or environmentally taxing endeavor. We've revolutionized the process, making it accessible, efficient, and sustainable for everyone from seasoned professionals to enthusiastic DIYers.
By following this comprehensive installation guide, you're well on your way to transforming any space into a testament to exceptional design and robust functionality. Remember the core principles: meticulous preparation, precise application, and careful finishing. These are the cornerstones of any successful installation, and they are especially applicable when working with materials designed to last as long and look as good as our MCM products.
So go ahead, unleash your creativity! Whether it's a dramatic feature wall, an inviting exterior facade, or an intricate commercial interior, your rust mosaic stone project, powered by COLORIA GROUP's innovative materials, is bound to leave a lasting impression. We're excited to see what you create!


