In the world of construction and design, time is more than just money—it's the difference between meeting a client's deadline, staying within budget, and watching a project spiral into delays. For decades, cladding materials have been a major culprit in these delays. Heavy natural stones that require cranes to lift, brittle concrete panels that crack during transport, and labor-intensive installation processes that drag on for weeks… these are the headaches that architects, contractors, and homeowners know all too well. But what if there was a material that could cut installation time in half, reduce labor costs, and still deliver the stunning, high-end look of natural stone? Enter
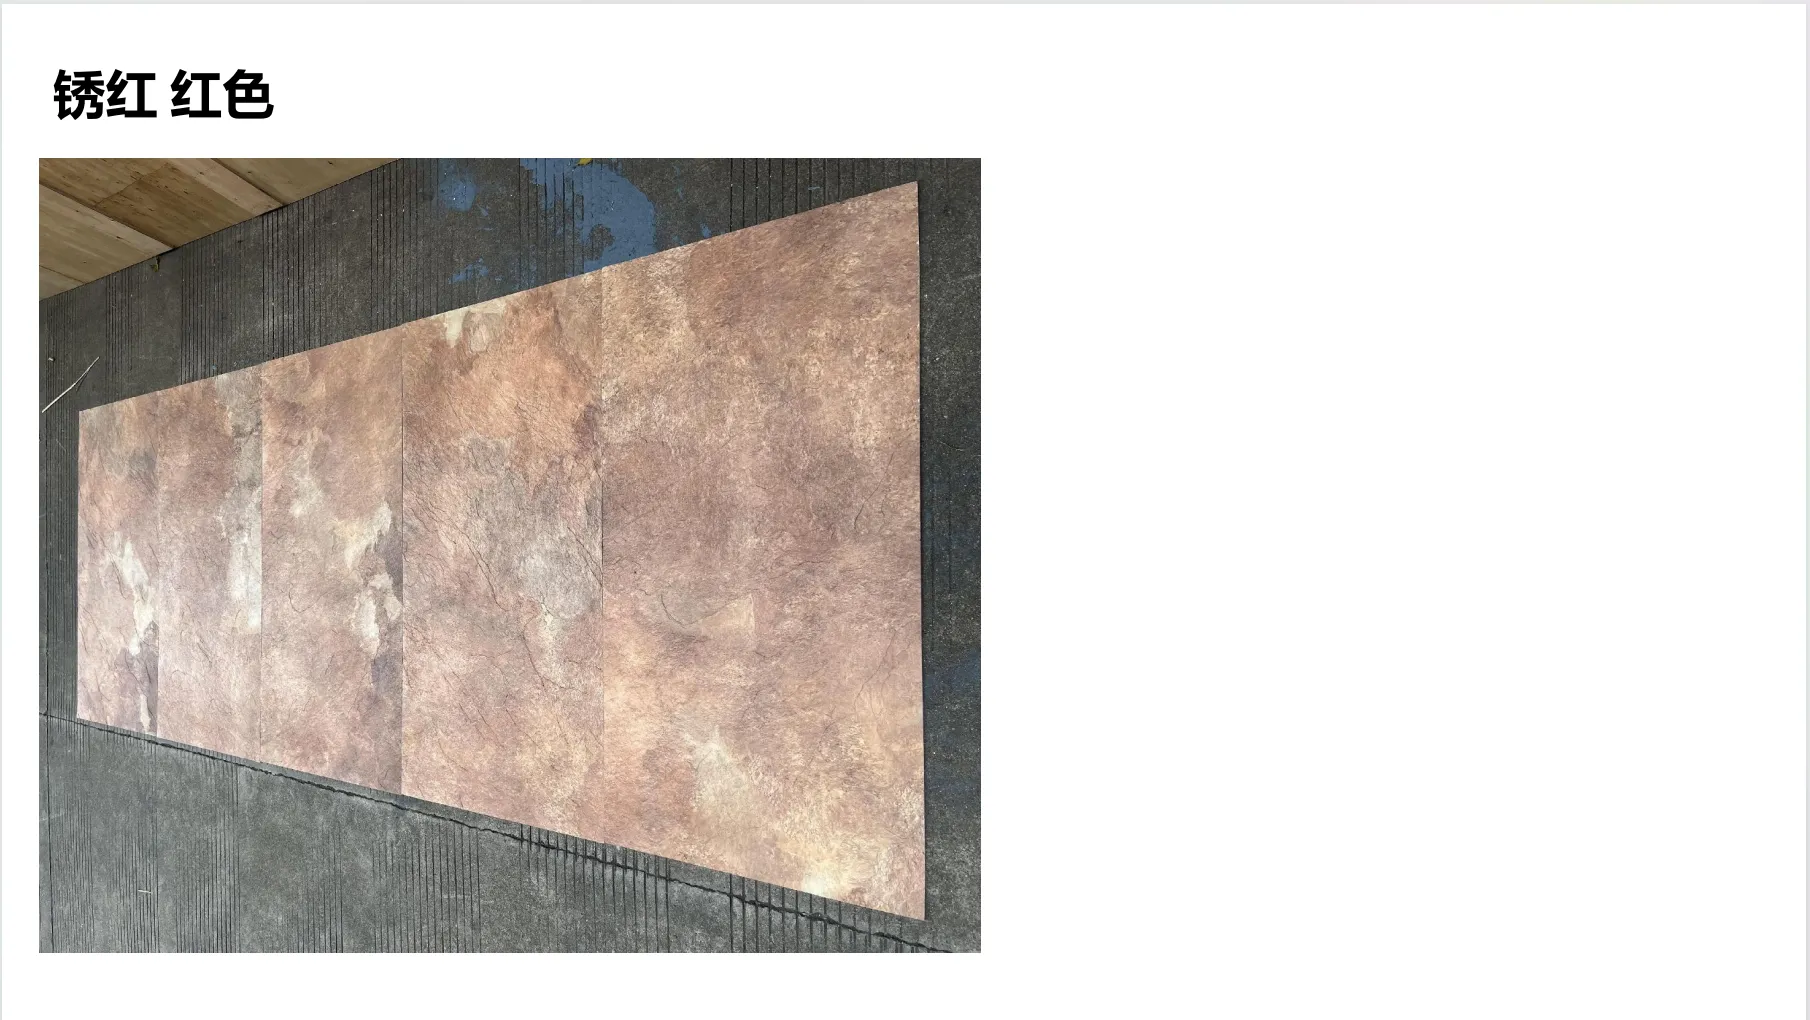
Rusty Red MCM—a game-changer in the world of cladding.
Rusty Red isn't just a color; it's a statement. Its warm, earthy tones evoke the rugged beauty of desert landscapes and the timeless charm of weathered metal, making it a favorite for both modern and rustic designs. But beyond its aesthetic appeal,
Rusty Red MCM (Modified Composite Material) is redefining what's possible in cladding installation. Lightweight, flexible, and designed for speed, it's quickly becoming the go-to choice for projects where time and quality can't be compromised. In this guide, we'll dive deep into what makes
Rusty Red MCM so revolutionary, walk through its step-by-step installation, and show you why it outperforms traditional materials like
fair-faced concrete and natural
travertine. Whether you're a contractor looking to streamline your workflow or a homeowner dreaming of a facade that turns heads, this is your roadmap to faster, smarter cladding.
The Cladding Crisis: Why Traditional Materials Are Slowing You Down
Before we explore the solution, let's first understand the problem. Traditional cladding materials have been around for centuries, and while they have their merits, they're ill-suited for the fast-paced demands of modern construction. Take natural stone, for example. A single slab of marble or granite can weigh 50–100 kg, requiring teams of workers or heavy machinery to move and install. Not only does this increase labor costs, but it also raises safety risks—dropped slabs can cause serious injuries, and uneven weight distribution can stress a building's structure over time.
Then there's
fair-faced concrete, a staple in industrial and minimalist design. While durable, concrete panels are notoriously brittle. A small bump during transport can lead to cracks, forcing crews to replace panels and delaying the project. Installation is no easier: each panel requires precise anchoring, and curing times for adhesives can add days to the timeline. Even "lightweight" options like fiber cement boards often fall short—they're still heavier than necessary, and their rigid nature makes them difficult to install on curved surfaces.
The numbers tell the story. A typical 200 sqm facade using natural
travertine might take a crew of 4–5 workers 2–3 weeks to install. That's 80–100 labor days, not counting time lost to material delivery delays or on-site accidents. For commercial projects, every day of delay can cost tens of thousands of dollars in lost revenue. For homeowners, it means living in a construction zone longer than expected, with dust, noise, and stress dragging on.
And let's not forget aesthetics. Traditional materials often lack consistency—natural stones have unique veining and color variations, which can be beautiful but make it hard to achieve a uniform look. Concrete panels, meanwhile, can develop discoloration over time, especially in harsh weather. For designers aiming for a specific vibe—say, the warm, cohesive
rusty red of a desert-inspired retail space—traditional materials often force compromises.
What Is MCM? The Science Behind the Speed
MCM, or Modified Composite Material, is the result of decades of innovation in material science. Born from the need to combine the beauty of natural materials with the practicality of modern engineering, MCM is a hybrid of natural minerals, polymers, and reinforcing fibers. The result? A material that's 70% lighter than natural stone, 50% more flexible than concrete, and 100% designed for efficiency.
The Anatomy of MCM
At its core, MCM is a sandwich of three layers: a top decorative layer, a middle core of lightweight composite, and a bottom backing layer. The decorative layer is where the magic happens—for
Rusty Red MCM, this layer is infused with iron oxide pigments and textured to mimic the look of weathered terracotta or aged copper. The middle core, made from a blend of calcium carbonate and polymer resins, gives the panel its strength without the weight. And the backing layer, often a fiberglass mesh, adds flexibility, allowing panels to bend slightly without cracking—perfect for curved walls or uneven surfaces.
But what really sets MCM apart is its manufacturing process. Unlike natural stone, which is quarried and cut, MCM is molded under high pressure and heat, ensuring consistent thickness, color, and texture across every panel. This consistency is a game-changer for installation: no more sorting through stacks of stone to find matching pieces, no more unexpected gaps or uneven edges. Every
Rusty Red MCM panel is identical, making planning and installation a breeze.
Why MCM Installs Faster: Key Benefits
Let's break down the features that make MCM, especially
Rusty Red, so much faster to install than traditional materials:
-
Lightweight:
At just 3–5 kg per sqm, Rusty Red MCM panels can be carried by a single worker. No cranes, no forklifts, no straining muscles—this alone cuts down on equipment costs and speeds up on-site movement.
-
Flexible:
Unlike rigid concrete or stone, MCM bends up to 5 degrees without breaking. This means it can conform to curved walls, arches, and uneven surfaces without special cutting or custom fabrication.
-
Easy to Cut:
MCM panels can be trimmed with a standard utility knife or circular saw, no diamond blades required. This eliminates the need for specialized tools and reduces cutting time by up to 70%.
-
Adhesive-Friendly:
MCM bonds quickly to most substrates (brick, concrete, metal, wood) using standard construction adhesives. No need for heavy anchoring systems or lengthy curing times—panels stay in place within hours.
To put this in perspective: A crew of 2 workers can install 40–50 sqm of
Rusty Red MCM in a single day. Compare that to natural
travertine, where the same crew might install 15–20 sqm. That's more than double the speed—meaning a 200 sqm facade that would take 10 days with
travertine can be finished in just 4 days with
Rusty Red MCM. For contractors, that's a 60% reduction in labor costs and a project that's completed weeks ahead of schedule.
Rusty Red MCM: Aesthetic Appeal Meets Practicality
Speed is important, but no one wants a fast-installing material that looks cheap. Fortunately,
Rusty Red MCM delivers on both fronts. Its color is a rich, warm rust that ranges from deep terracotta to burnt sienna, with subtle variations in texture that mimic the natural aging of metal or stone. It's the kind of color that catches the light differently throughout the day—soft and golden at sunrise, bold and dramatic at sunset—adding depth and character to any facade.
Rusty Red MCM isn't limited to exteriors, though that's where it truly stands out. Its versatility makes it a favorite for:
-
Commercial Facades:
Retail stores, restaurants, and office buildings use Rusty Red to create a welcoming, memorable entrance. Its bold color draws customers in, while its durability stands up to heavy foot traffic and weather.
-
Residential Exteriors:
For homeowners who want a facade that's both striking and low-maintenance, Rusty Red adds curb appeal without the upkeep of natural wood or stone.
-
Accent Walls:
Indoors, Rusty Red MCM panels make stunning accent walls in living rooms, kitchens, or home offices. They add warmth to modern spaces and complement rustic decor.
-
Outdoor Spaces:
Patios, pool surrounds, and garden walls benefit from Rusty Red's resistance to moisture and UV rays—it won't fade or warp, even in harsh climates.
Take, for example, the renovation of a 1970s office building in downtown Austin. The client wanted a facade that would honor the building's industrial roots while giving it a modern update. The architect chose
Rusty Red MCM for the main facade, pairing it with black metal accents and large windows. The result? A building that looks like it's been there for decades, but with the clean lines of contemporary design. And the best part? The entire facade was installed in 5 days, allowing the building to reopen to tenants weeks ahead of schedule.
Designers also love
Rusty Red for its ability to complement other materials. Pair it with wood grain MCM for a cozy, cabin-like feel, or with
fair-faced concrete for an industrial-chic vibe. It even works with glass and metal, adding a pop of color to sleek, modern structures. The possibilities are endless—and because MCM panels are consistent in color and texture, you can mix and match without worrying about mismatched batches.
Step-by-Step Installation Guide: Installing Rusty Red MCM Like a Pro
The true beauty of
Rusty Red MCM lies in its simplicity. You don't need a team of specialized installers or fancy equipment—just a few basic tools, some careful planning, and a little patience. Below is a detailed, step-by-step guide to installing
Rusty Red MCM, from pre-installation prep to the final touches.
Pre-Installation: The Key to a Smooth Process
As with any construction project, preparation is half the battle. Skipping these steps can lead to misaligned panels, adhesive failure, or uneven surfaces—so take the time to get it right.
1. Inspect the Substrate
MCM can be installed on almost any substrate, including brick, concrete, drywall, metal, and wood—but the surface must be clean, dry, and structurally sound. Start by checking for:
-
Cracks or damage:
Fill small cracks with a concrete patching compound; larger damage may require professional repair.
-
Moisture:
Use a moisture meter to check for dampness (aim for less than 5% moisture content). If the surface is wet, allow it to dry completely or use a waterproofing primer.
-
Debris:
Scrape off dirt, dust, and loose paint. A pressure washer works well for exterior surfaces; for interiors, a damp cloth or vacuum will do.
-
Flatness:
Use a level to check for uneven areas. MCM panels are flexible, but significant bumps or dips can cause panels to warp over time. Sand down high spots and fill low spots with a leveling compound.
2. Measure and Plan
Measure the installation area carefully, accounting for windows, doors, and any obstacles. Sketch a layout plan, marking where each panel will go. It's best to start from the bottom corner and work your way up and out, as this ensures panels are level and aligned. For exterior installations, include a 5mm gap between panels to allow for expansion in hot weather—this prevents buckling.
Pro tip: Order 10% extra panels to account for cutting waste and potential mistakes. It's better to have too many than to run out mid-project and wait for a new batch.
3. Gather Your Tools
You won't need a truckload of equipment—just the basics:
-
Measuring tape and pencil
-
Straightedge or level (2ft and 4ft options)
-
Utility knife or circular saw with a fine-tooth blade
-
Notched trowel (6mm x 6mm for flat surfaces, 8mm x 8mm for uneven surfaces)
-
Adhesive (we recommend a high-quality construction adhesive like Loctite PL Premium or Sikaflex)
-
Caulk gun
-
Rubber mallet (for tapping panels into place)
-
Clean rags (for wiping excess adhesive)
-
Safety gear: gloves, safety glasses, and a dust mask (if cutting panels)
Installation: Putting It All Together
Now that you're prepped, it's time to install. Follow these steps for a seamless, fast process:
1. Cut the Panels (If Needed)
Most
Rusty Red MCM panels come in standard sizes (e.g., 1220mm x 2440mm), but you'll likely need to cut some to fit around windows, doors, or corners. Measure twice, cut once! Use a straightedge and pencil to mark the cut line, then score the panel with a utility knife. Apply firm pressure and score along the line 3–4 times—this weakens the panel, making it easy to snap along the line. For more complex cuts (e.g., curves or notches), use a circular saw with a fine-tooth blade. Always cut outdoors or in a well-ventilated area, and wear a dust mask.
2. Apply Adhesive
Squeeze a bead of adhesive onto the back of the panel, then use the notched trowel to spread it evenly. Hold the trowel at a 45-degree angle to create ridges—this ensures full contact with the substrate. For large panels, apply adhesive in a "snake" pattern to cover the entire back; for smaller panels, a perimeter bead plus a few dots in the center works. Avoid applying too much adhesive, as excess can squeeze out and mar the panel's surface.
3. Position the Panel
Lift the panel (remember, it's lightweight—one person can handle it!) and align it with your layout marks. Press it firmly against the substrate, starting from the bottom edge and working your way up. Use a level to ensure the panel is straight, then tap it gently with a rubber mallet to set the adhesive. This helps the adhesive spread and ensures a strong bond.
4. Repeat and Align
Continue installing panels, working row by row. Use spacers (e.g., small pieces of wood or plastic) to maintain the 5mm expansion gap between panels. Check each panel with a level to ensure they're aligned both horizontally and vertically—even a small misalignment can snowball into a noticeable issue later. If a panel is crooked, gently pull it away and reposition it before the adhesive sets (you have about 10–15 minutes of working time with most adhesives).
5. Clean Up Excess Adhesive
As you install each panel, wipe away any adhesive that squeezes out from the edges with a clean rag. If adhesive dries on the panel, it can be difficult to remove—so act fast! For dried adhesive, use a plastic scraper (avoid metal, which can scratch the surface) and a mild soap solution.
6. Finish the Gaps
Once all panels are installed, allow the adhesive to cure for 24 hours (check the adhesive manufacturer's instructions for exact curing times). Then, fill the expansion gaps with a color-matched silicone caulk. This prevents water from seeping behind the panels and adds a clean, finished look. Smooth the caulk with a wet finger or caulk tool, then wipe away excess with a rag.
And that's it! You've installed
Rusty Red MCM in a fraction of the time it would take with traditional materials. Pat yourself on the back—you've just saved days (or weeks) of work.
Installation Time Comparison:
Rusty Red MCM vs. Traditional Materials
Still not convinced? Let's crunch the numbers. Below is a comparison of installation times for a 200 sqm facade using different materials:
|
Material
|
Installation Time (Crew of 4)
|
Labor Days
|
Key Delays
|
|
Natural Travertine
|
2–3 weeks
|
80–120
|
Heavy lifting, cutting with diamond blades, curing time for mortar
|
|
Fair-Faced Concrete
|
1–2 weeks
|
40–80
|
Brittle panels prone to cracking, anchoring system installation
|
|
Fiber Cement
|
5–7 days
|
20–28
|
Heavy panels, need for power tools, sealing edges
|
|
Rusty Red MCM
|
3–4 days
|
12–16
|
Minimal—only cutting and adhesive curing (24 hours)
|
The difference is staggering.
Rusty Red MCM cuts installation time by up to 75% compared to natural stone and 50% compared to fiber cement. For a contractor paying a crew of 4 $250/day, that's a savings of $16,000–$27,000 on labor alone for a 200 sqm project. And because MCM panels are lightweight, you'll also save on equipment costs—no need to rent a crane or forklift.
Case Study: How Rusty Red MCM Saved a Retail Renovation
The Project: A Boutique Retail Space in Denver
Client: A high-end clothing boutique owner with a tight deadline—she needed her storefront renovated and open for the holiday shopping season, just 3 weeks away.
Challenge: The existing facade was outdated and damaged, requiring a full cladding replacement. Traditional materials like natural stone would take 2 weeks to install, leaving only 1 week for interior work—a risky timeline.
Solution: The contractor recommended Rusty Red MCM for its speed and aesthetic. The color matched the boutique's brand—warm, inviting, and slightly edgy.
Results: A crew of 3 installed 120 sqm of Rusty Red MCM in just 2 days. The adhesive cured overnight, and the gaps were caulked the next day. Total facade time: 3 days. This left 2 weeks for interior renovations, ensuring the store opened on time for Black Friday—generating $50,000 in opening weekend sales that would have been lost with delays.
Client Feedback: "I was skeptical that something so fast could look this good," said the boutique owner. "The Rusty Red panels look like they've been weathered for years, but they're so clean and uniform. My customers can't stop commenting on how unique the storefront is!"
Maintenance: Keeping Rusty Red MCM Looking New for Decades
One of the biggest myths about "fast" materials is that they're low-quality or require constant upkeep. Not
Rusty Red MCM. In fact, it's one of the lowest-maintenance cladding materials on the market—here's how to keep it looking its best:
Cleaning
Rusty Red MCM resists dirt, mold, and mildew, so regular cleaning is a breeze. For most surfaces, a quick rinse with a garden hose or a wipe with a damp cloth is enough. For tougher stains (e.g., bird droppings or oil), mix a mild detergent with water and scrub gently with a soft-bristle brush. Avoid harsh chemicals like bleach or abrasive cleaners—they can damage the panel's finish.
Inspection
Inspect your
Rusty Red MCM facade once a year for loose panels or cracked caulk. If a panel is loose, gently push it back into place and apply a bead of adhesive along the edges. For cracked caulk, remove the old caulk with a utility knife and reapply fresh caulk. These small fixes prevent water from seeping behind the panels and causing damage.
Longevity
With proper installation and maintenance,
Rusty Red MCM can last 30+ years—longer than many traditional materials. It's resistant to UV rays (so it won't fade), moisture (so it won't rot or warp), and impact (so it can withstand hail, debris, and even minor collisions). Unlike natural stone, which can chip or crack over time, MCM's flexibility helps it absorb impacts without damage.
Sustainability: Building Greener with Rusty Red MCM
In today's world, sustainability isn't just a buzzword—it's a requirement. Clients, especially commercial ones, are increasingly demanding materials that reduce their carbon footprint, and
Rusty Red MCM delivers. Here's how:
Eco-Friendly Manufacturing
MCM is made from a blend of natural minerals (like calcium carbonate) and recycled polymers, reducing the need for virgin materials. The manufacturing process uses less energy than quarrying natural stone or producing concrete, and most MCM manufacturers have strict waste-reduction policies—scrap material is recycled back into the production process, minimizing landfill waste.
Energy Efficiency
Rusty Red MCM's lightweight nature reduces the load on a building's structure, meaning less steel and concrete are needed for support—lowering the overall carbon footprint of the project. Additionally, MCM has natural insulating properties, helping to keep buildings cooler in summer and warmer in winter. This reduces reliance on heating and cooling systems, cutting energy costs and emissions.
Green Building Certifications
For projects aiming for LEED, BREEAM, or other green certifications,
Rusty Red MCM is a valuable asset. Its recycled content, low embodied energy, and durability contribute to points in categories like "Materials and Resources" and "Sustainable Sites." Many manufacturers also offer third-party certifications (e.g., GREENGUARD) to verify low chemical emissions, making it safe for indoor use.
Design Inspiration: 5 Ways to Use Rusty Red MCM
Need ideas for your next project? Here are five stunning ways to incorporate
Rusty Red MCM:
1. Modern Desert Oasis
Pair
Rusty Red MCM with white stucco and large glass windows for a look inspired by the American Southwest. Add wooden accents and native plants to complete the vibe—perfect for a residential home or a boutique hotel.
2. Industrial Chic Office
Combine
Rusty Red MCM with black metal framing, exposed brick, and Edison bulbs for an industrial look that's warm and inviting. Use it for accent walls in common areas or as a facade for a tech startup's headquarters.
3. Coastal Rustic Restaurant
For a beachside eatery, mix
Rusty Red MCM with weathered wood and blue accents. The rusty tones evoke driftwood and sand, while the durability of MCM stands up to salt air and moisture.
4. Minimalist Home Exterior
Keep it simple with a full
Rusty Red MCM facade, paired with black windows and a flat roof. The uniform color and clean lines create a sleek, modern look that's anything but boring.
5. Historic Renovation
Restore a historic building by covering damaged brick or stone with
Rusty Red MCM. Its weathered appearance mimics aged materials, preserving the building's character while adding modern durability. This is a favorite for adaptive reuse projects, like converting old warehouses into apartments or offices.
While
Rusty Red is a standout, it's just one star in the
MCM project board series—a collection of cladding materials designed to meet every aesthetic and functional need. From the sleek, metallic look of foamed aluminium alloy boards to the organic texture of
bamboo mat board, there's an MCM panel for every design vision. Some popular options include:
-
Lunar Peak Series:
Silvery, golden, and black panels that mimic the moon's cratered surface—perfect for futuristic designs.
-
Travertine Starry Series:
Features flecks of color (blue, red, orange) that sparkle in the light, adding drama to facades.
-
Wood Grain Board:
Mimics the look of real wood without the maintenance—ideal for interior accent walls or exterior siding.
-
Fair-Faced Concrete:
For a raw, industrial look without the weight and brittleness of real concrete.
The best part? All these panels share the same fast installation benefits as
Rusty Red MCM. Mix and match to create a truly unique design, or stick with one series for a cohesive look—the choice is yours.
Conclusion: The Future of Cladding Is Fast, Beautiful, and Rusty Red
In a world where time and quality are non-negotiable,
Rusty Red MCM is more than a material—it's a solution. It's the answer to contractors tired of missed deadlines, designers craving both beauty and practicality, and homeowners who want a facade that's stunning, durable, and easy to maintain. With its fast installation, low maintenance, and sustainable credentials, it's no wonder
Rusty Red MCM is quickly becoming the gold standard in cladding.
So, what are you waiting for? Whether you're tackling a commercial project, a residential renovation, or just a small accent wall,
Rusty Red MCM will help you get the job done faster, better, and with less stress. Say goodbye to heavy stones, endless delays, and compromise—and hello to a cladding material that works as hard as you do.
The future of cladding is here. And it's
rusty red.