There's something uniquely comforting about a wood fence. It's not just a barrier—it's a silent storyteller, framing your garden's blooms, muffling the hum of the street, and turning a house into a home. I've spent weekends wandering hardware stores, scrolling through
wood fence real photos for inspiration, and even helped a neighbor rebuild theirs after a storm. What I've learned? Installing a wood fence yourself isn't just about saving money (though that's a nice perk). It's about putting your mark on your space, one post and picket at a time. Whether you're dreaming of a cozy cottage-style picket fence or a sleek horizontal slat design, this guide will walk you through every step—no pro experience required. Let's dive in.
What You'll Need: Tools & Materials
Before you grab a shovel and start digging, let's gather your supplies. Think of this as your fence-building toolkit—skipping even one item could mean extra trips to the store (or a wobbly fence, which we're definitely avoiding). Here's what I recommend:
-
Tools:
Post hole digger (manual or power—save your back with a power auger if you're digging more than 4 holes), level (2-foot and 4-foot for accuracy), tape measure (25-foot minimum), hammer, cordless drill with bits, saw (circular or miter for cutting rails/pickets), string line, stakes, wheelbarrow, and a rubber mallet.
-
Materials:
Fence posts (6×6 pressure-treated wood is standard for durability), rails (2×4s or pre-cut wood grain board for texture), pickets (1×6 or 1×4, depending on style), concrete mix (fast-setting works best), gravel (3/4-inch), galvanized screws/nails (rust-proof is non-negotiable), and stain/sealer (more on this later).
-
Extras:
Work gloves, safety glasses, a tarp (for mixing concrete), and a friend—trust me, setting posts alone is a workout.
Pro Tip:
Check your local hardware store for "fence kits"—they often bundle posts, rails, and hardware for specific lengths, which can save time. I once bought individual pieces and miscalculated rail lengths—kits take the guesswork out!
Step 1: Plan Like a Pro (Measure Twice, Dig Once)
Map Your Space & Check Permits
Fence-building starts with a plan—no exceptions. Grab your tape measure and walk the perimeter where you want the fence. Jot down measurements, noting slopes, trees, or obstacles (like that stubborn rose bush you can't bear to move). Sketch a rough diagram—even stick figures work! This will help you calculate how many posts, rails, and pickets you need.
Next, call 811 (or your local utility locating service) to mark underground lines. Hitting a gas or electric line isn't just dangerous—it could land you with a huge repair bill. I learned this the hard way years ago when I nicked a water line; the plumber's bill was more than the fence materials!
Finally, check your city's permits. Most areas require a permit for fences over 4 feet tall (or 6 feet for backyard fences). Skipping this step might mean tearing down your hard work later—no thanks.
Mark Your Layout
Now, translate that sketch to your yard. Drive stakes into the ground at each corner of your fence line. Tie string line between the stakes—this will be your guide for straight posts. For a sloped yard, use a line level to adjust the string so it follows the slope (this is called "racking" the fence).
Space posts 6-8 feet apart—closer if you're using heavy pickets or live in a windy area. Mark each post location with spray paint or a stake. Pro move: Use a string line to ensure posts are in a straight line—eyeballing it almost always leads to a "drunken fence" look.
Step 2: Set Posts—The Foundation of a Sturdy Fence
Posts are the backbone of your fence. A wobbly post = a wobbly fence, so take your time here. Let's break it down:
Dig Deep (Below the Frost Line)
Post holes need to be 1/3 to 1/2 the length of the post underground. For a 6-foot post, that's 2-3 feet deep. If you live in a cold climate, go deeper than the frost line (check local guidelines—here in the Northeast, it's 30 inches). Why? Frost heave will push shallow posts up like a popsicle stick in mud.
Use your post hole digger to create holes 12 inches wide. If the soil is rocky, a power auger will be your new best friend. I once dug 8 holes by hand in clay soil—it took 4 hours and left me with blisters. Invest in the auger.
Gravel, Concrete, Repeat
drop 6 inches of gravel into each hole—this prevents water from pooling at the bottom of the post, which causes rot. Then, lower the post into the hole. Have your friend hold it upright while you check with the 4-foot level—both vertically (plumb) and horizontally (level).
Mix concrete according to the bag instructions (usually 1 part water to 5 parts mix). Pour it into the hole, leaving 2-3 inches at the top for soil (to hide the concrete). Use a shovel handle to "stir" the concrete—this removes air bubbles. Check the post again with the level—concrete sets fast, so fix any tilting now!
Pro Tip:
Add a slight slope to the concrete top (away from the post) so rainwater runs off. I forgot this once, and water pooled around the post—hello, early rot. Oops.
Let It Cure
Let the concrete set for at least 24 hours—longer if it's cold or humid. Resist the urge to start attaching rails early! I once tried to rush this step and ended up with a post that leaned 2 inches off-center. Patience pays off.
Step 3: Attach Rails—The Fence's "Backbone"
Rails connect the posts and hold up the pickets—think of them as the fence's ribs. Most fences use 2-3 rails per section (bottom, middle, top). Here's how to install them:
Measure & Cut Rails
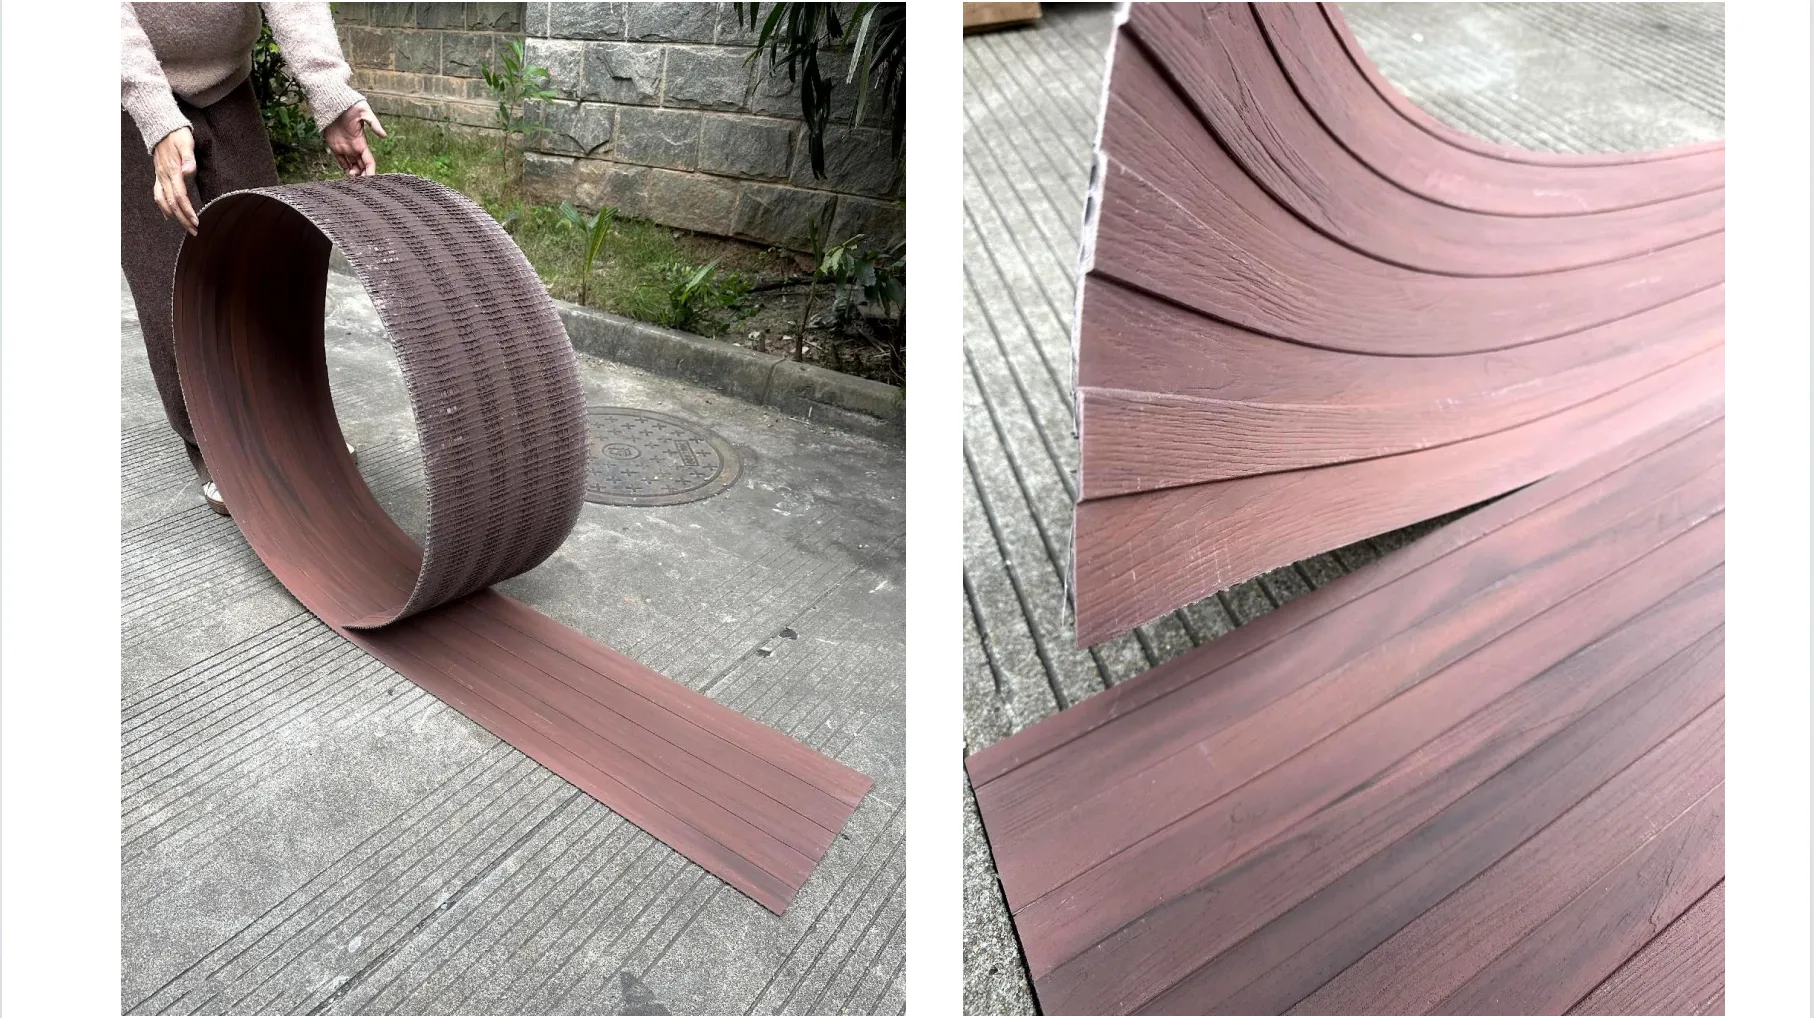
Measure the distance between two posts—this is your rail length. Cut your 2×4s or
wood grain board to size. If you're using
wood grain board, note that its textured surface adds visual interest—great for a rustic look. I used it on my last fence, and neighbors still comment on how "unique" the rails look!
Attach Rails to Posts
Mark rail positions on the posts—typically 6 inches from the top, 6 inches from the bottom, and one in the middle (for 3-rail designs). Use a level to ensure marks are even across all posts.
Attach rails with 3-inch galvanized screws (two per rail end). Pre-drill holes to avoid splitting the wood—especially important for hardwoods. If you're using
wood grain board, pre-drilling is a must; its density can cause splitting otherwise.
Pro Tip:
Leave a 1/4-inch gap between the rail and post—wood expands in humidity, and this prevents warping. I skipped this once and ended up with a bowed rail after a rainy summer. Lesson learned!
Step 4: Install Pickets—The Fence's "Face"
Pickets are what give your fence its style—closed, spaced, shadowbox, or even custom designs. This is where your creativity shines! Here's how to get them straight and secure:
Choose Your Style
Closed Pickets:
No gaps—great for privacy. Use 1×6 pickets nailed tight together.
Spaced Pickets:
Gaps (2-3 inches) for airflow—classic picket fence style.
Shadowbox:
Pickets alternate on either side of the rails for a "see-through" look from the street but privacy from the yard.
Attach Pickets
Start at one end of the rail section. Place the first picket against the post, ensuring it's flush with the bottom rail. Use two screws per rail to attach it (top and bottom). Then, use a spacer (a scrap piece of wood cut to your desired gap size) to set the next picket. This ensures even spacing—no more "eyeballing" gaps that end up wonky.
For a polished look, check that pickets are level across the top. If your yard slopes, "rack" the pickets by cutting the bottom at an angle to follow the slope. I once forgot to rack and ended up with a fence that looked like it was melting—definitely not the vibe I was going for.
Add Accents (Optional)
Want to elevate your fence? Add rough granite stone (beige) at the base—its earthy tone pairs beautifully with wood. I added it to my neighbor's fence last year, and it turned a simple design into something that looks like it belongs in a home magazine. Just dig a shallow trench along the fence line, place the stones, and backfill with soil to hold them in place.
Step 5: Finish & Protect—Make It Last
Your fence is up—now let's make sure it stays beautiful for years. Finishing isn't optional; untreated wood will warp, rot, or fade in just a few seasons. Here's how to do it right:
Sand & Prep
Sand rough edges with 120-grit sandpaper—no one wants splinters! Wipe away dust with a damp cloth. If you used pressure-treated wood, let it dry for 3-6 months before staining (it's wet when you buy it). Staining too early traps moisture, leading to peeling.
Stain or Paint
Stain:
Enhances wood grain and lets the natural texture show. Oil-based stains penetrate deeper for durability; water-based stains dry faster and clean up easy.
Wood grain board looks stunning with a semi-transparent stain—it makes the grain pop like art.
Paint:
More color options, but covers the wood grain. Use exterior-grade paint with primer to prevent peeling.
Apply with a brush (for detail) or roller (for speed). Do two coats, waiting 24 hours between coats. I prefer a natural cedar stain—warm, timeless, and it complements rough granite stone (beige) perfectly.
Pro Tip:
Stain/paint the top of posts and pickets—water loves to seep in through unprotected wood. I once missed a post top, and it rotted from the inside out. Ouch.
Wood Types Compared: Which Is Right for You?
|
Wood Type
|
Pros
|
Cons
|
Best For
|
|
Pine (Pressure-Treated)
|
Budget-friendly, resists rot/insects
|
Heavy, needs staining after drying
|
Backyard privacy fences
|
|
Cedar
|
Natural rot resistance, lightweight, beautiful grain
|
More expensive, fades to gray over time (unless stained)
|
Front yard picket fences, decorative designs
|
|
Redwood
|
Durable, naturally insect-resistant, rich color
|
Pricey, limited availability in some areas
|
High-end, long-lasting fences
|
|
Wood Grain Board
|
Textured, unique look, takes stain well
|
May require pre-drilling, heavier than pine
|
Rustic or modern designs with visual interest
|
Maintenance: Keep Your Fence Happy
A little care goes a long way. Here's how to keep your fence looking new:
-
Clean:
Hose off dirt/mildew yearly. For tough spots, mix 1 part bleach with 3 parts water and scrub gently (wear gloves!).
-
Re-seal:
Every 2-3 years for stain, 3-5 years for paint. Check for peeling or fading—don't wait until it looks shabby.
-
Repair:
Tighten loose screws, replace warped pickets, and fix leaning posts ASAP. Small issues turn into big problems fast.
Final Thoughts: Your Fence, Your Story
Installing a wood fence isn't just a project—it's a memory. I still smile when I walk past my first fence, remembering the sunburn, the laughter with my friend who helped, and the pride of seeing it stand tall after weeks of work. Whether you're using classic pine, textured
wood grain board, or adding rough granite stone (beige) for flair, this fence will be more than wood and nails. It'll be where your kids chase fireflies, where you hang holiday lights, and where you sit with a cup of coffee, watching the world go by.
So grab your tools, rally a friend, and start building. And when you're done, take a step back, snap a photo (add it to those
wood fence real photos for future DIYers!), and say, "I did this." Trust me—there's no feeling like it.